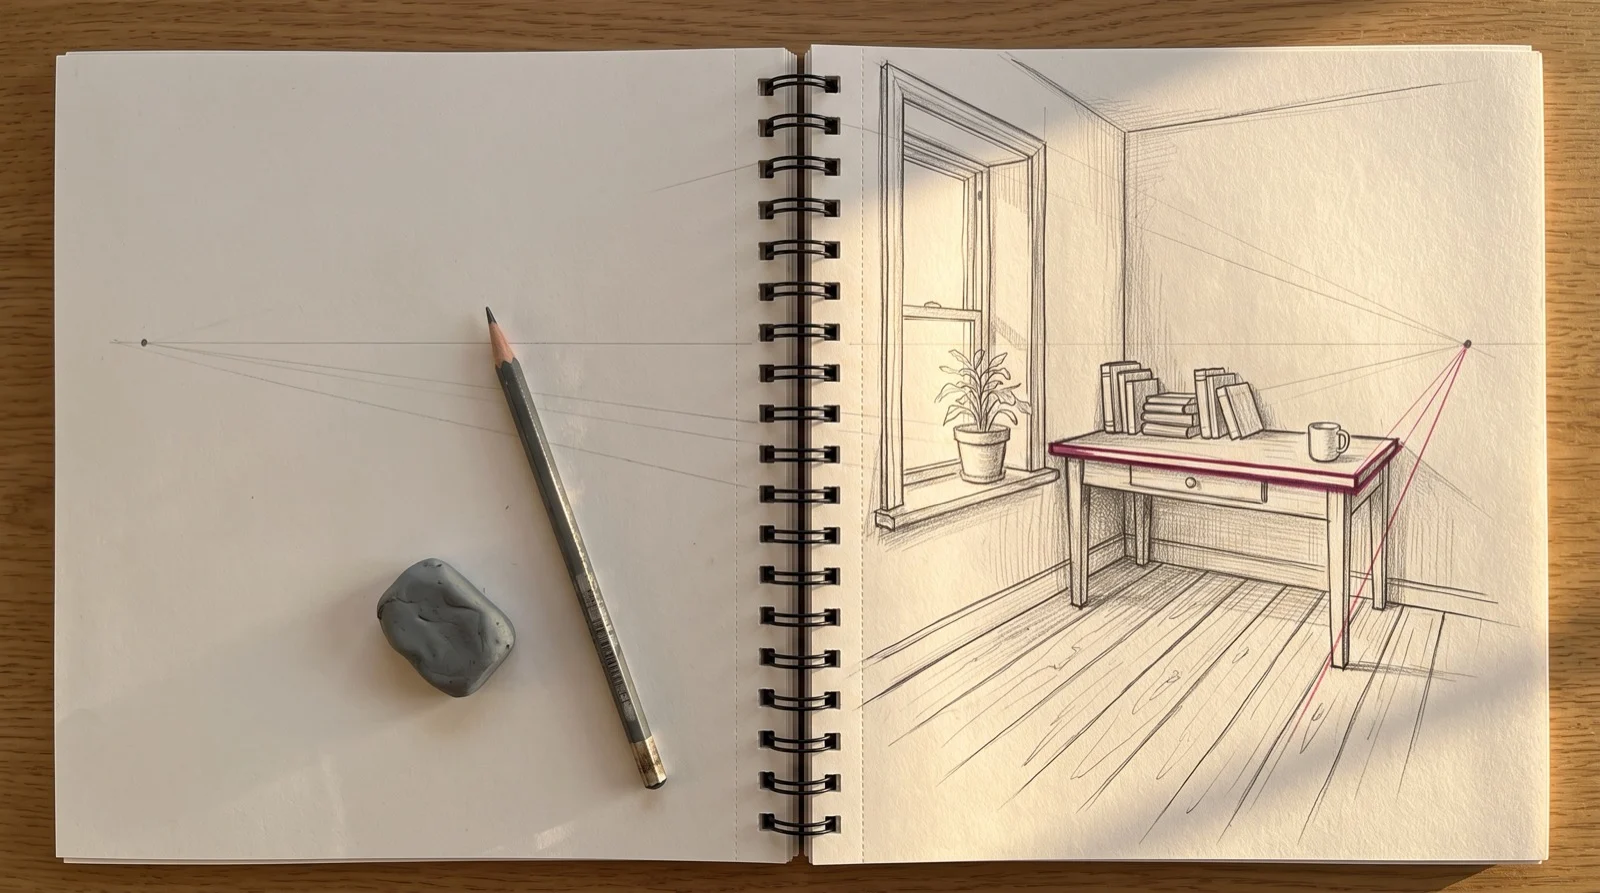
Set the horizon line first, at the eye height of the person standing in the scene, before you touch a vanishing point. Everything above that line tilts down as it recedes, everything below it tilts up. Then place one or two vanishing points off the edge of the paper, box the biggest shape in the scene, and divide that box last. Skip the horizon and every line after it is a guess.
Perspective drawing goes wrong at the horizon, not at the vanishing points. The horizon line is the height of the viewer’s eye, so the moment you draw it you have decided where the person watching this scene is standing, sitting or floating above a rooftop. Most self-taught artists skip that decision. They draw a box, guess two points somewhere off to the sides, and only then notice the horizon is implied by where those points sit level with each other. By that point the room already reads wrong and there’s no clean way back to fix it without starting over.
The second silent killer is where the vanishing points land. Put them inside the picture, close together, and every line converges too fast. Walls bow inward, straight ceilings curve, a simple room reads like it was shot through a fisheye lens. Nobody told the artist why; it just looks off. The fix is not a better eye for angles, it’s distance: vanishing points belong off the edge of the page, often far off it, taped to a second sheet or worked out on a larger surface than the drawing itself.
Construction courses teach what a vanishing point is and how lines converge toward it. Fewer teach that the order matters more than the geometry: horizon first, then station point, then vanishing points, then the box, then everything inside the box. Do it in a different order and you’re not doing perspective wrong, you’re doing it out of order, which produces the same crooked result with none of the diagnosable causes.
- Set the horizon height. Draw one horizontal line across the page. This is eye level, nothing else. Low on the page means the viewer is seated or a child; high on the page means the viewer is standing on a balcony or a hill. Nothing else on the page exists yet.
- Fix the station point. Decide how close the viewer stands to the scene. Close in means a wide field of view and vanishing points that sit close to the edges of the picture, wide converging lines. Far back means a narrow field of view and vanishing points that can sit well off the page. This decision is invisible in the final drawing but it controls how aggressive the convergence looks.
- Place one or two vanishing points, off the picture. One point perspective drawing puts a single vanishing point on the horizon, used for a scene the viewer faces straight on, like a hallway or a street running away from you. Linear perspective drawing with two points puts one vanishing point on each side of the horizon, both well outside the edges of the paper, used when a box or building is turned at an angle to the viewer. Nothing is on the page inside the frame yet except the horizon and light guide lines running to each point.
- Box the main mass. Draw the single largest shape in the scene as a plain rectangular box using only lines that either sit on the horizon or run to a vanishing point. A room is a box. A street block is a box. A single building is a box. Resist adding a window, a door or a cloud at this stage; the box is the only thing that exists.
- Divide the box. Split the box into its actual parts last: a back wall, a row of windows, a receding floor. Depth divisions inside a converging box are not measured with a ruler, they’re found with a diagonal. Draw a diagonal corner to corner across the face you want to divide, mark where it crosses the vertical or horizontal you’re aiming for, and that intersection gives you the next correctly spaced division without eyeballing it.
- Flip the page horizontally. Mirror it, on paper by holding it to a light or in Procreate with the flip tool. A wrong horizon or a station point set too close jumps out immediately once the habitual reading of the page is broken. A failed check looks like one wall suddenly reading taller than its opposite, or a floor that tilts when it should be level.
- Trace the convergence lines back to their point. Pick any two parallel edges on the same plane and extend them with a straight edge until they meet. They should meet at the same vanishing point every time. A failed check is two edges that almost meet, or meet at two different spots near each other, which means the box was drawn by eye rather than from the point.
- Squint at the horizon. Close your eyes most of the way and look at only the horizontal band around the horizon line. Anything that should read as level, like a distant roofline or a tabletop, should sit flat against it. A failed check is a level surface that visibly slopes when everything else is blurred out.
- Measure the box height against its own width with a pencil. Hold the pencil at arm’s length, thumb marking the box’s width on the page, then rotate the pencil to compare it against the height. A failed check is a box that reads as a cube in the geometry but measures clearly rectangular on the page, meaning the depth lines were drawn steeper or shallower than the vanishing points actually call for.
- Cover the vanishing points and look at the box alone. A well-built box should still read as sitting on a floor and receding in space even with the construction lines hidden. A failed check is a box that goes flat or ambiguous the moment the guide lines are gone, meaning the convergence was too subtle to carry the illusion on its own.
Drawing the box before the horizon. This is the single most common order-of-operations error and it’s not fixable by nudging lines afterward, because every line in the box was drawn relative to nothing. The fix is to erase and restart from the horizon, not to rotate the existing box until it looks closer.
Vanishing points placed on the page instead of off it. This produces the fisheye look: walls that bow, a ceiling that curves, a street that narrows too fast. The fix is to work on a surface larger than the final drawing, or tape extra paper to the sides, so the points can sit where the station point actually puts them.
Dividing the box by eye instead of by diagonal. A row of windows spaced by guessing gets narrower toward the vanishing point at the wrong rate, usually too fast, because the eye underestimates how much a receding plane compresses. The diagonal method gives the correct spacing without any measuring by feel.
Treating one point perspective drawing as the easy version and two point as the hard one. They’re not a difficulty ladder, they’re two different viewing angles. A street drawn straight on is one point; the same street seen from a corner is two point. Picking the point count by perceived difficulty instead of by the actual angle of view is why a “simple” one point drawing of a room seen at an angle looks flat and wrong no matter how carefully it’s rendered.
This build order is for artists who need to place a whole scene, a room, a street, a building. It’s the wrong lesson for someone drawing a single object or a character in isolation with no ground plane to establish; that’s a foreshortening problem, not a horizon-and-vanishing-point problem, and this method will slow that person down for no return.
Tonight, in 30 to 60 minutes, draw the same box three times: once with the horizon at the bottom third of the page, once dead center, once near the top. Use one point perspective drawing for all three, same vanishing point, only the horizon height moving. This is the fastest easy perspective drawing exercise for seeing what eye height actually changes, because the box’s proportions stay identical and only its relationship to the horizon shifts.
After a month of building rooms and streets this way, the horizon-first order stops being a checklist and starts being the first mark made without thinking about it. The next plateau after that is populating the box: how to draw backgrounds that hold figures, furniture or trees inside a perspective grid without every added object needing its own vanishing point check. That’s a separate skill built on top of this one, not a replacement for it.
Where do I put the horizon line?
At the eye height of whoever is meant to be standing in the scene, not at a fixed spot on the page. A seated viewer or a child’s eye level puts it low on the page. A viewer standing on a balcony or a drone-height view puts it high. Decide who is looking before deciding where the line goes.
One point or two point perspective?
One point perspective drawing is for a scene the viewer faces straight on: a hallway, a street running directly away, a wall of a room seen head on. Two point is for anything turned at an angle to the viewer: a building seen from its corner, a room where you can see two walls meeting. The choice is the angle of view, not the level of the artist.
Why does my room look like a fisheye photo?
The vanishing points are too close together or sitting inside the picture instead of off its edges. Move them further out, onto a larger sheet if needed, and the convergence stops looking exaggerated.
How do I divide a wall into equal windows?
Draw a diagonal from one corner of the wall to the opposite corner. Where that diagonal crosses each vertical division line marks the correct, perspective-corrected spacing for the next window, without measuring by eye.
Do I need perspective if I draw characters?
Only when the character stands in a defined space, a room or a street with walls and a floor that need to read as solid. A character drawn against a plain or abstract background doesn’t need a horizon and vanishing points at all; that’s a foreshortening and anatomy problem, not this one.
42 hours of pencil drawing training, lifetime access
The video course I point plateaued students to — full lessons on portraits, hands, and realistic shading, not another short tutorial.