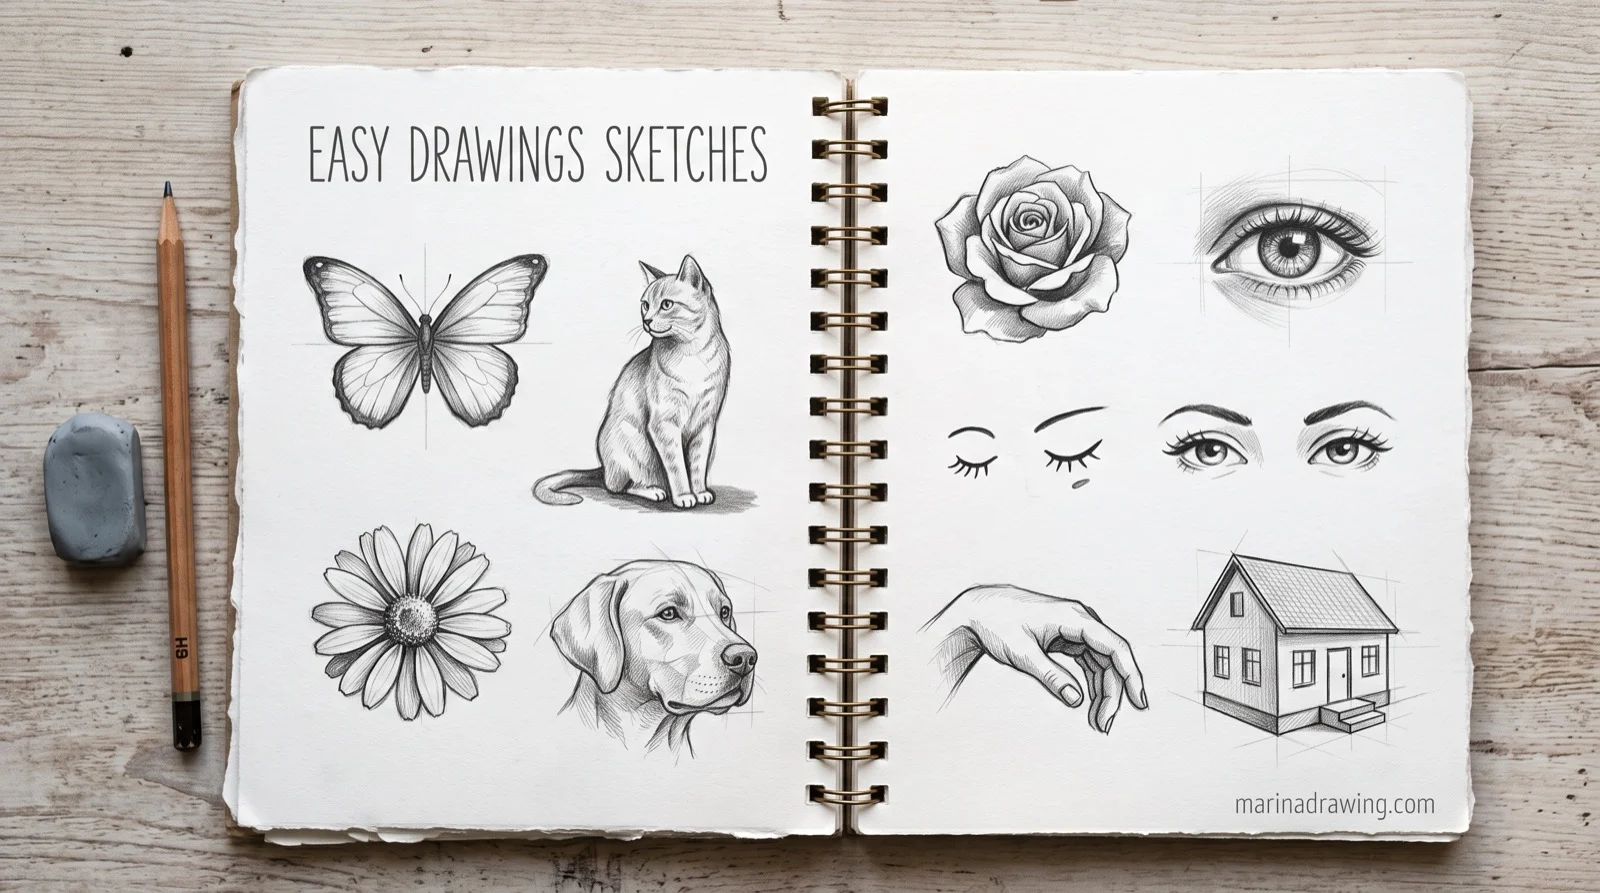
Easy drawings sketches go wrong in the first thirty seconds, long before the part you are staring at when you notice. I draw twelve things below, from a butterfly to a whole face, and every one starts the same way: two shapes and one check before a single line. These are easy drawings sketches for beginners in the only sense that matters: the order never changes, whatever you pick.
Quick Answer: Two Shapes Before Any Line
Pick your subject. Before you draw anything you mean to keep, you do five things:
- You mark the total height and width with two light ticks. That is the box your drawing has to live inside.
- You drop one centre line down or across the subject, wherever it is symmetrical.
- You put in two shapes only: the big mass and the second biggest. A cat is a circle and a rounded triangle. A butterfly is two blobs on a stick.
- Do the wonky test: hold the page at arm’s length, tilt it, look away and back. Anything that jumps out now you can still nudge.
- Only now draw the line you mean to keep.
To watch someone build a sketch end to end, the filmed graphite lessons keep the measuring stage in, which most tutorials cut.
Two shapes are not a rough version of your drawing. They are the measurement you take before you are allowed to draw.
What to Draw Tonight: Twelve Easy Drawings Sketches Worth the Page
Here is the list from the back of my own sketchbook, so you never open the page with nothing to draw:
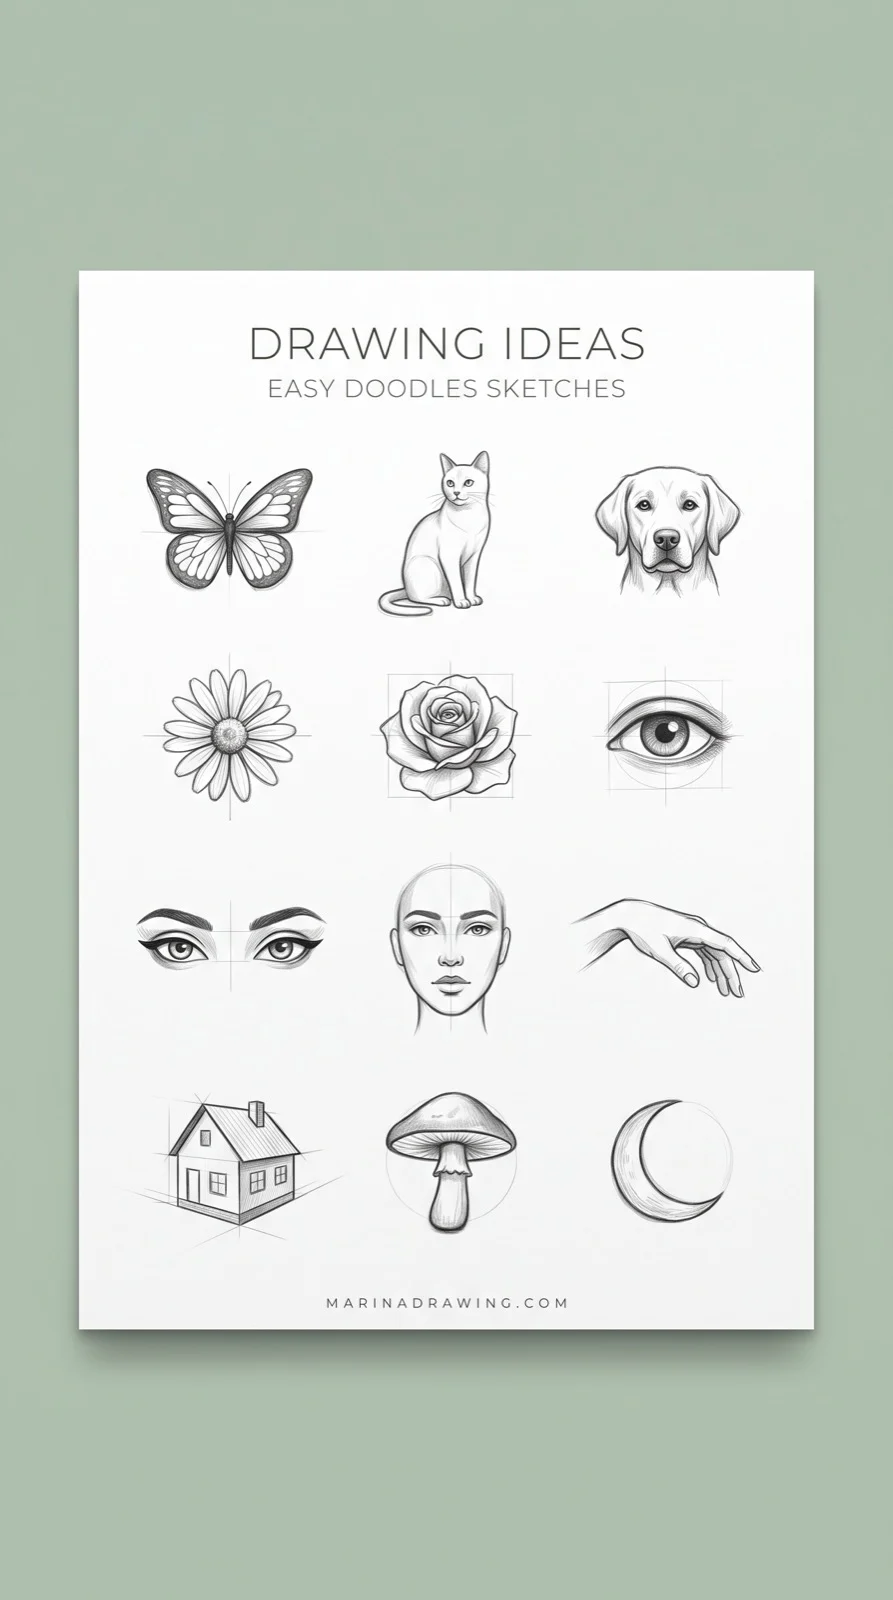 Pin it
- Butterfly: one line, two blobs, then pattern.
- Cat: circle, cheeks, two triangles.
- Dog: a box for the muzzle before anything else.
- Daisy-type flower: centre dot, ring, petals.
- Rose: a spiral you wrap petals around.
- A single eye, then anime eyes: the same almond, squashed.
- A whole face: eyes halfway down, not near the top.
- Your own hand: a palm box and five directions.
- A 3D box or house: one dot on the horizon.
- A doodle page and a tonal page: fifteen tiny things, or one subject in three values.
Start anywhere: they run from most forgiving to least, the same order I use in easy drawings for beginners.
The filmed lessons take a list like this one subject at a time.
The Wonky Test: Three Checks Before You Commit to a Line
You start somewhere small. An eye, an ear, a wing corner. It feels right, so you keep going.
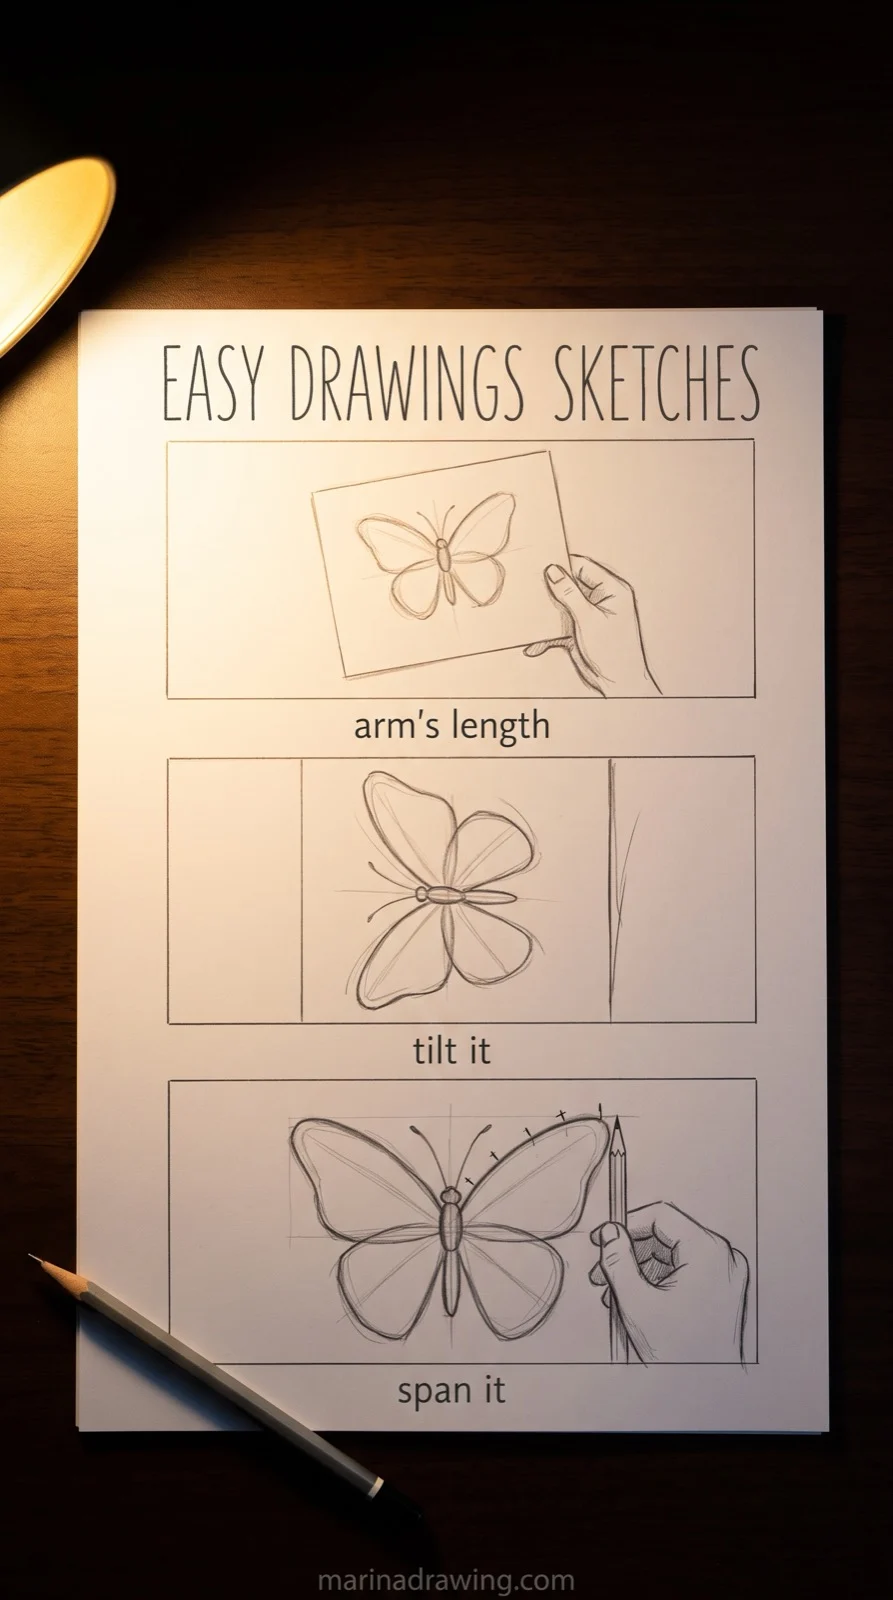 Pin it
Every shape after that one inherits the guess: the second against the first, the third against the second, nothing against the whole. By the far edge there is no total height left to argue with, so the drawing is not wrong anywhere you can point at. It is just off.
Three checks catch it while it still moves:
- Arm’s length. You push the page away. Errors of proportion only show up at distance; up close your eye keeps forgiving them.
- Tilt it. You turn the page sideways or upside down. You stop reading “cat” and start seeing shapes, and a lopsided one is obvious in half a second.
- Span it. You hold the pencil at arm’s length, measure the head, then count how many heads fit in the body. If you expected three and got five, nudge it now.
On drawing forums, sketching, gesture and block-in come up in about one post in seven. Twenty-nine describe the opposite failure: stiff, overworked, or erased back to nothing. Same missing frame, other direction.
Watching the measuring stage is the part that is hard to read
Pressure, speed and where the pencil lifts do not survive being written down. A filmed course keeps the light stage most tutorials skip.
Butterfly: One Line Down the Middle, Then Both Wings
A butterfly goes wonky for one reason: people draw the left wing, admire it, then try to match the right.
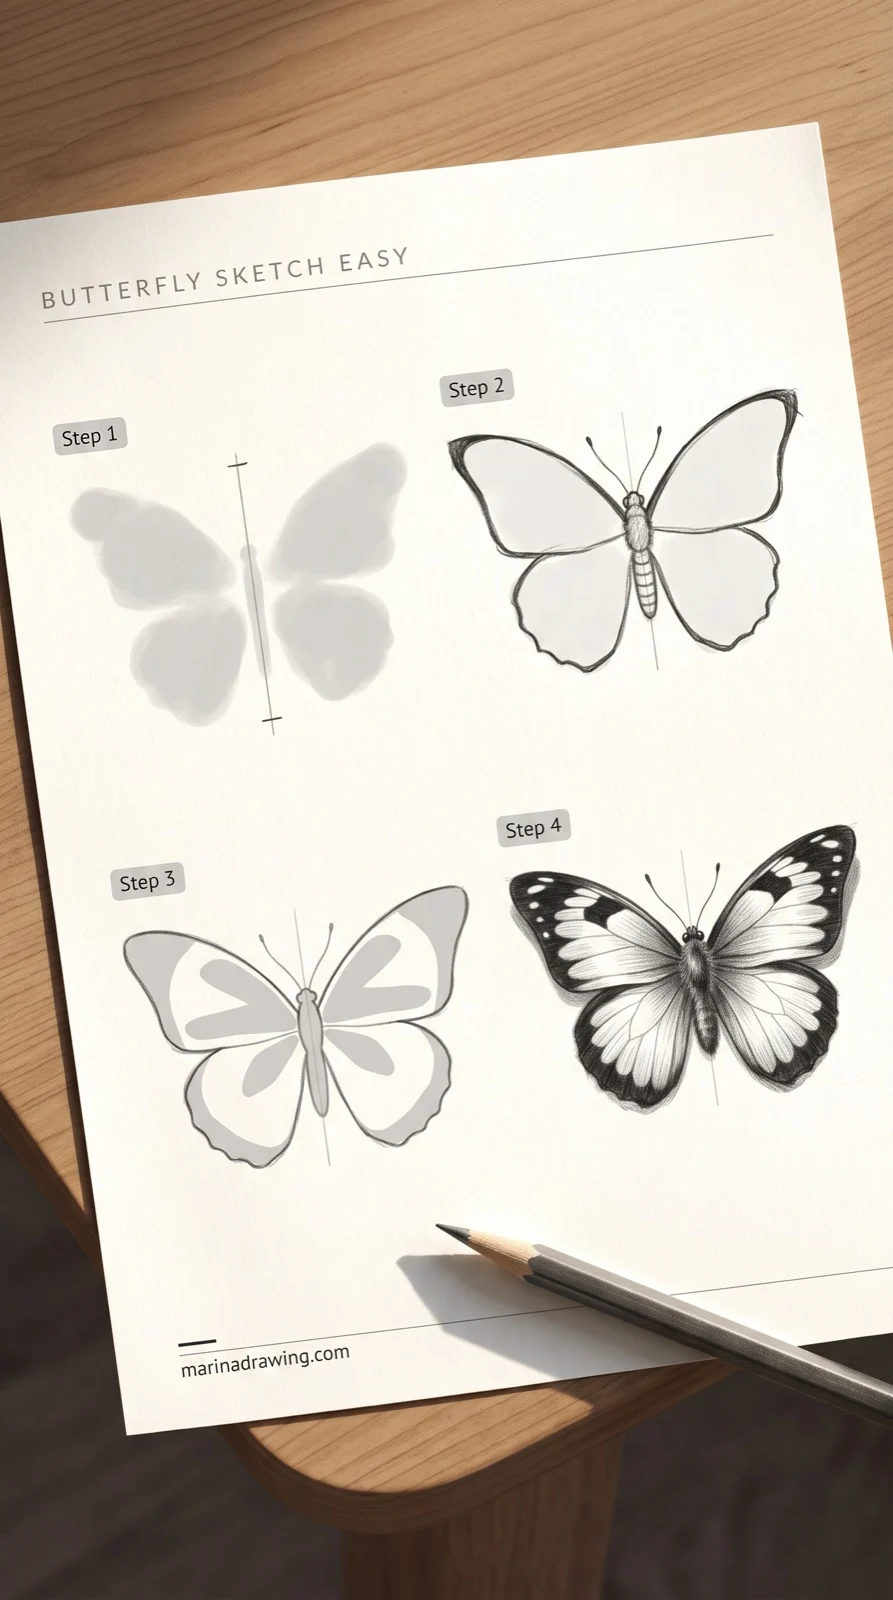 Pin it
Do it in this order instead:
- One vertical line for the body, with a tick at top and bottom for the total height.
- Four blobs, alternating sides. Upper left, upper right, lower left, lower right, and never two in a row on the same side.
- Wonky test. You tilt the page. If one side leans out further, you nudge the blob, not the line.
- Outline the blobs with the wing edge, pointed at the top corners, rounded at the bottom.
- Pattern last, three bands per wing. More reads as noise from across the room.
The alternating step is your whole trick. You are never copying one wing onto the other, so there is nothing to mismatch.
How hard the pencil presses on those first blobs shows in the lesson videos.
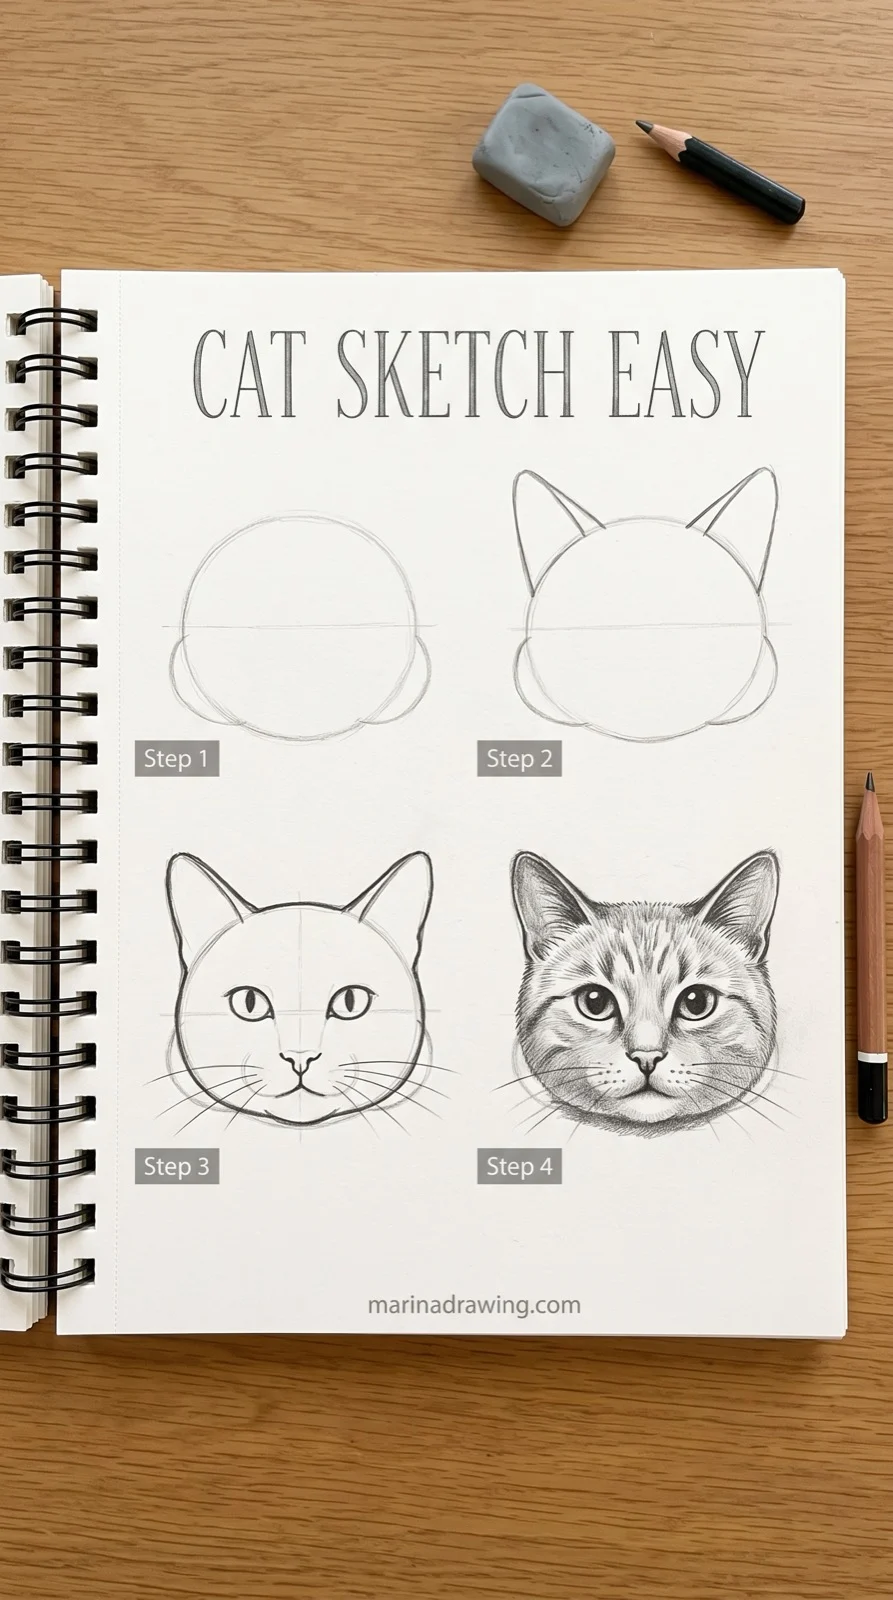
Cat: Circle, Cheeks, Two Triangles
Cat faces collapse when the ears get drawn on top of the head like a hat.
 Pin it
- You start with a circle for the skull, a little wider than tall.
- You add two soft bulges at the lower sides for cheeks. Your cheeks are what make it read as a cat and not a bear.
- Triangles inside the circle line, not on top of it. Your ear base sits down in the fur, and the outer edge of each ear lines up with the outer edge of each cheek.
- Wonky test at arm’s length. Ears too close together is the most common miss, and only visible from a metre away.
- You put the eyes on the horizontal centre, one eye-width apart, then nose and mouth in a small Y.
A whole cat is that face plus a rounded triangle for the body and a comma for the tail.
Fur that sits on the form is worth watching in the graphite lessons.
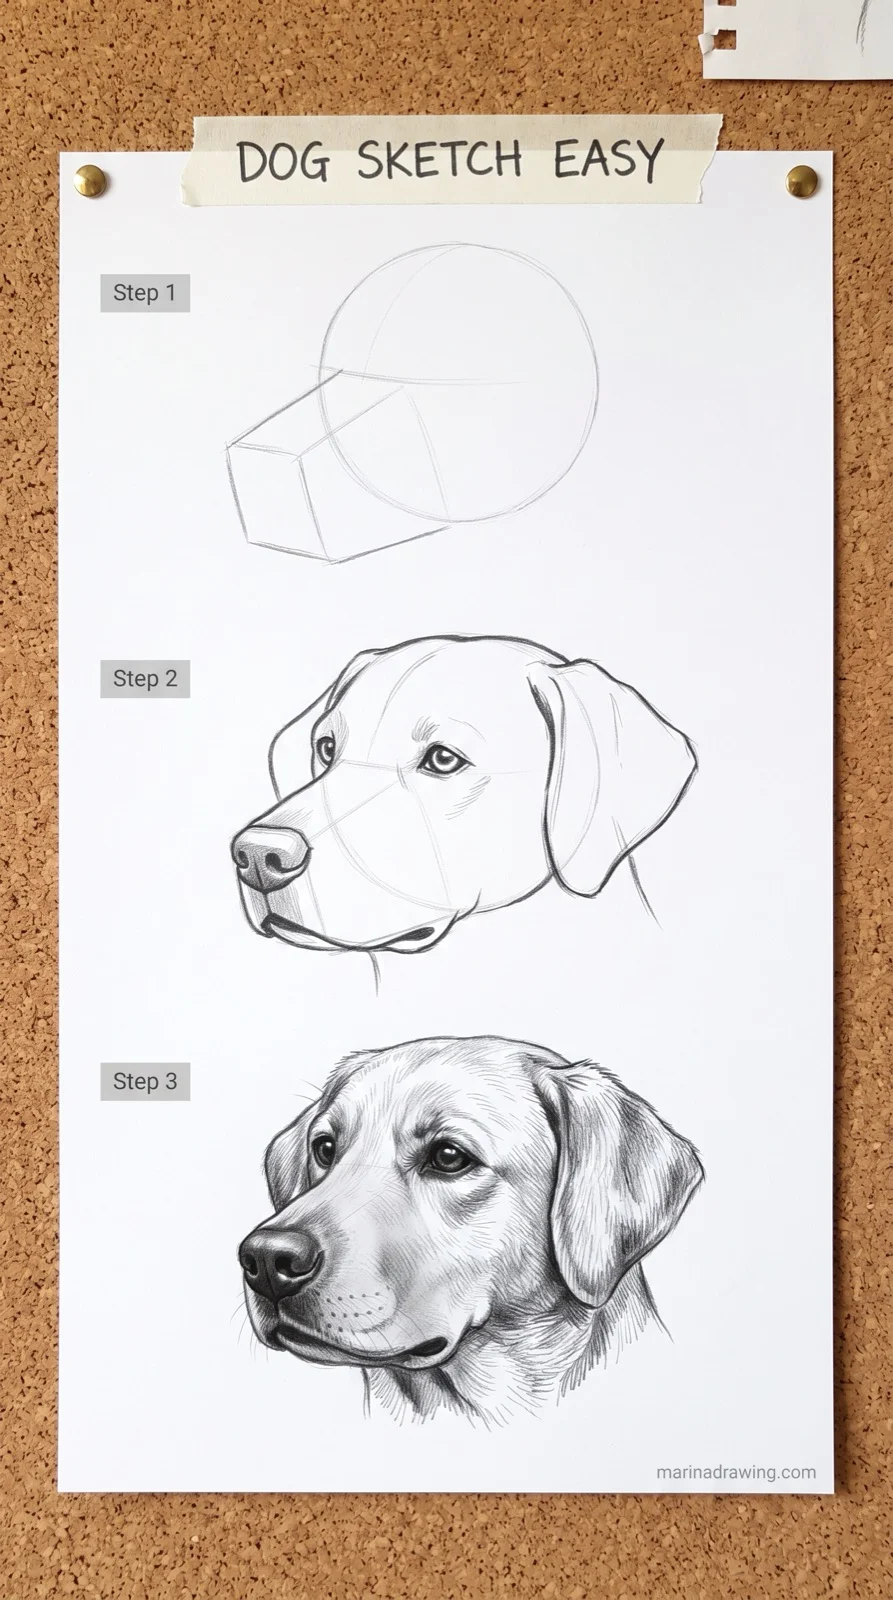
Dog: The Muzzle Box Comes Before the Nose
Dogs are harder than cats for one reason: breeds.
 Pin it
A box fixes it for you:
- You draw a circle for the skull.
- A box for the muzzle, overlapping the lower front of the circle. Long and low for a retriever, short and square for a pug. Get the box right and the breed is already there.
- Nose at the far end of your box, a rounded trapezoid, not a triangle.
- Wonky test: the eyes go on the line where circle and box meet, not up on the forehead. Check before you draw them properly.
Your fur goes last, only along the outline, in short strokes that follow the way it grows.
For the box idea taken further, I walk through it on a face in how to draw portraits.
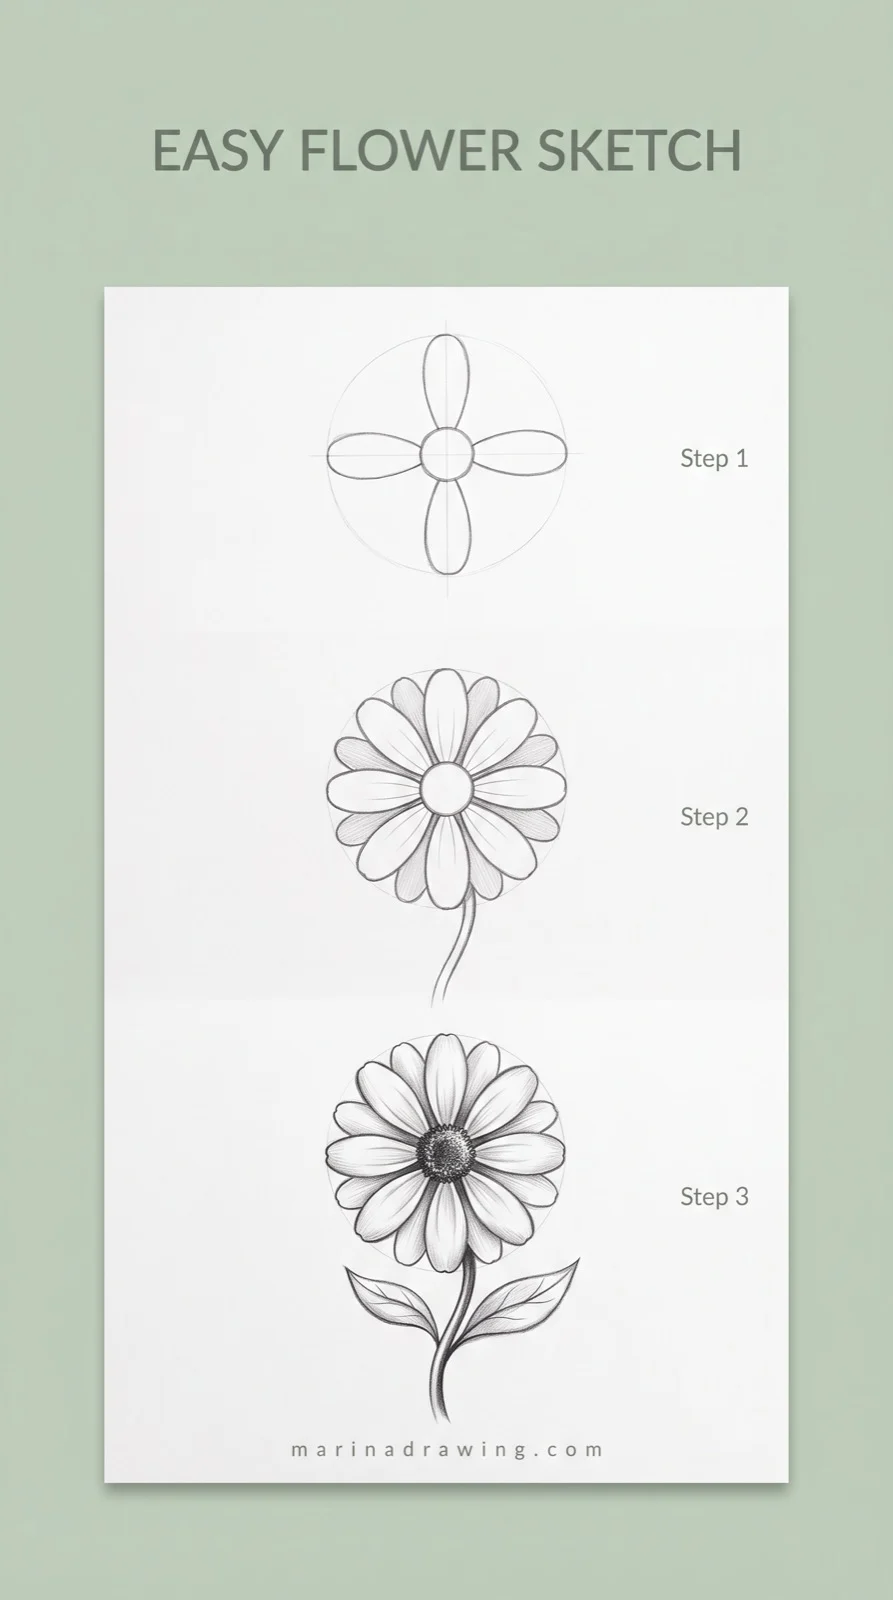
Flower: Centre Dot, Petal Ring, Then Petals
42 hours of pencil drawing training, lifetime access
The video course I point plateaued students to — full lessons on portraits, hands, and realistic shading, not another short tutorial.

A daisy-type flower is the friendliest subject in a sketchbook, and the one people crowd.
 Pin it
- You start with a small circle for the centre.
- A bigger faint circle around it: that ring is where the petal tips end. Nothing of yours goes outside it.
- You put four petals in first, at twelve, three, six and nine o’clock. Then you fill in between. Petals drawn one after another always run out of room.
- Wonky test: the gaps between petals should be equal. Squint and the uneven one shows up.
- Your stem is one curve, drawn in a single movement, then thickened.
Your leaves are two curves meeting at both ends, with one crooked line down the middle.
Petal softness comes off the paper better in a recorded demonstration.
I have a whole page of these: easy flower drawings, if you want more than one shape tonight.
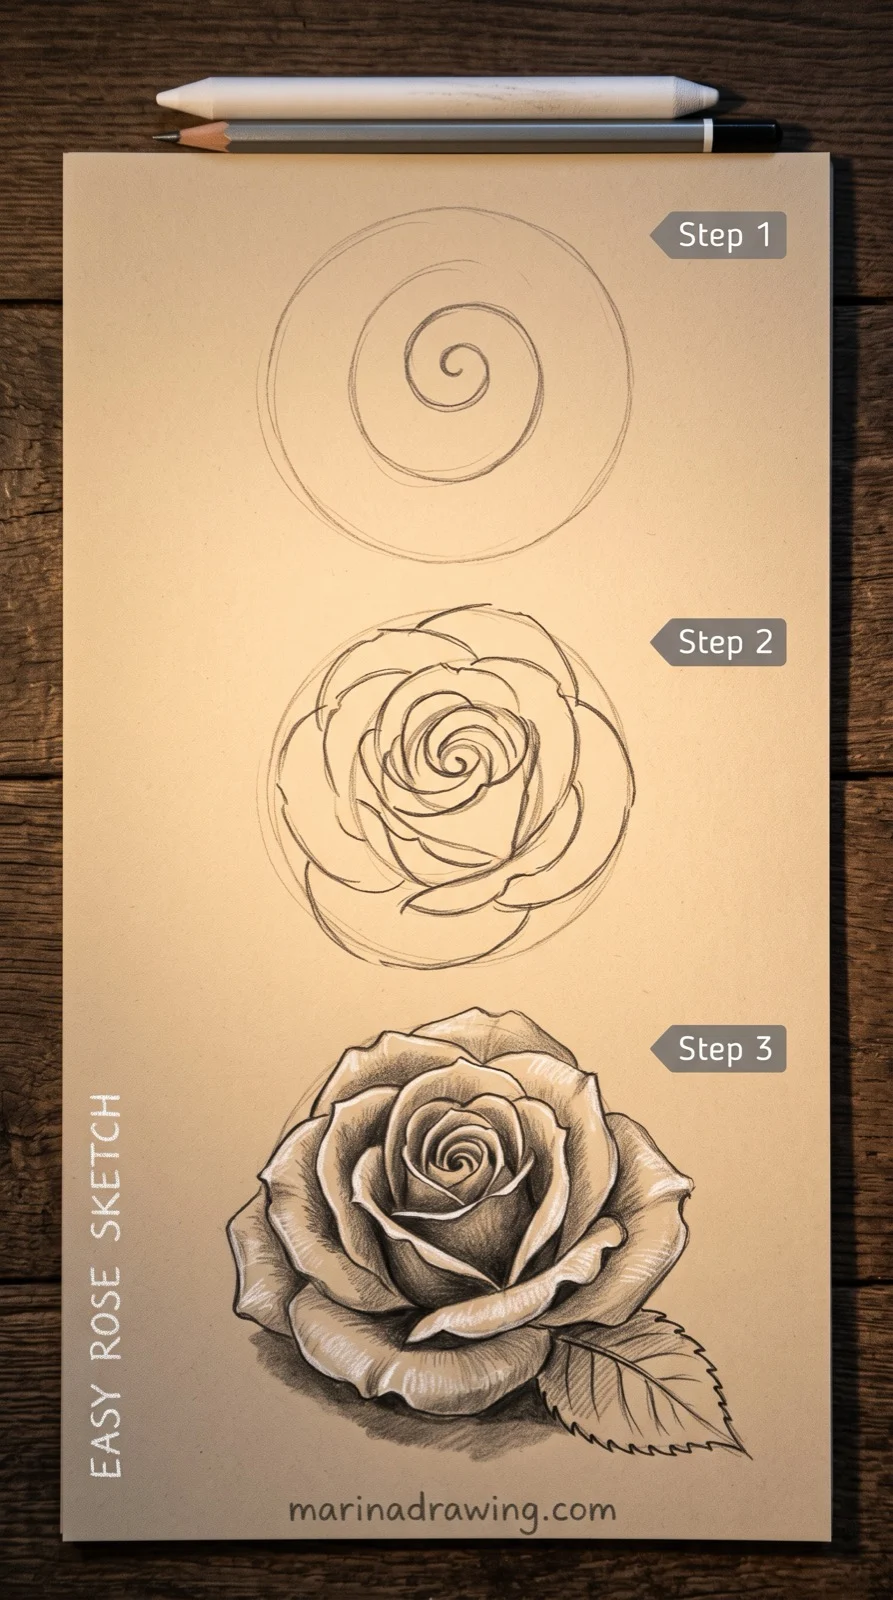
Rose: Spiral First, Petals Around It
Roses look complicated and are not: a spiral with wrapping.
 Pin it
- You draw a loose spiral, about two and a half turns, slightly off centre.
- A circle around your spiral for the outer edge of the bloom.
- Wrap the spiral: short curves from one arm to the next, like a scarf folding over itself.
- Bigger, looser petals at the outside, reaching the circle. They open up as they go out: tight in the middle, floppy at the edge.
- Wonky test: if the spiral is dead centre it looks like a cabbage. Off centre reads as a rose.
You leave the spiral lines showing faintly. They read as the inner folds and save you drawing them.
You will get a better rose on your third one than your first. I still redraw the spiral twice.
That first light wrap goes down at drawing speed in the filmed lessons.
Eye: The Almond Is Two Curves That Disagree
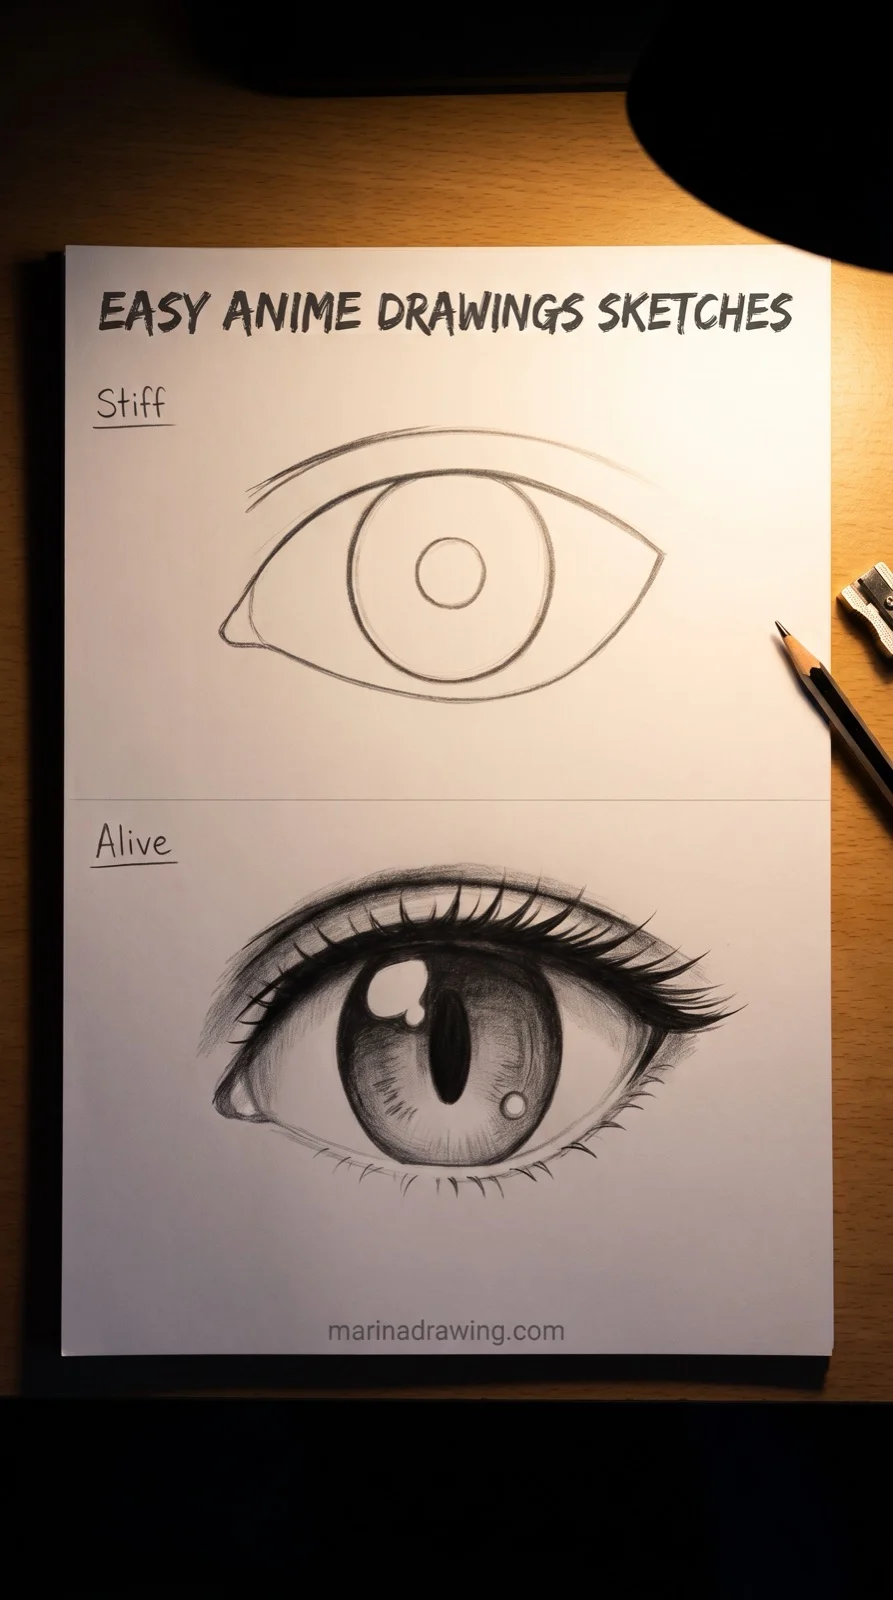
The stiffness people complain about in an eye comes from one habit: drawing it as a symmetrical leaf.
 Pin it
- You draw the top curve first, with its highest point closer to the nose side.
- Bottom curve shallower, with its lowest point closer to the outer corner. The two curves peak in different places, and that disagreement is what makes an eye look real.
- You draw the iris as a whole circle, even though the lid cuts it. Your iris is always partly covered; one floating clear of the lid reads as a stare.
- Pupil in the centre of the iris, then one white highlight overlapping pupil and iris.
- Wonky test: cover the iris with your thumb. The almond alone should still look like an eye.
You put lashes in last, in clumps of three or four, growing away from the eye, never straight out of the line.
When you are ready to take an eye further than a sketch, I go slowly through it in how to draw eyes.
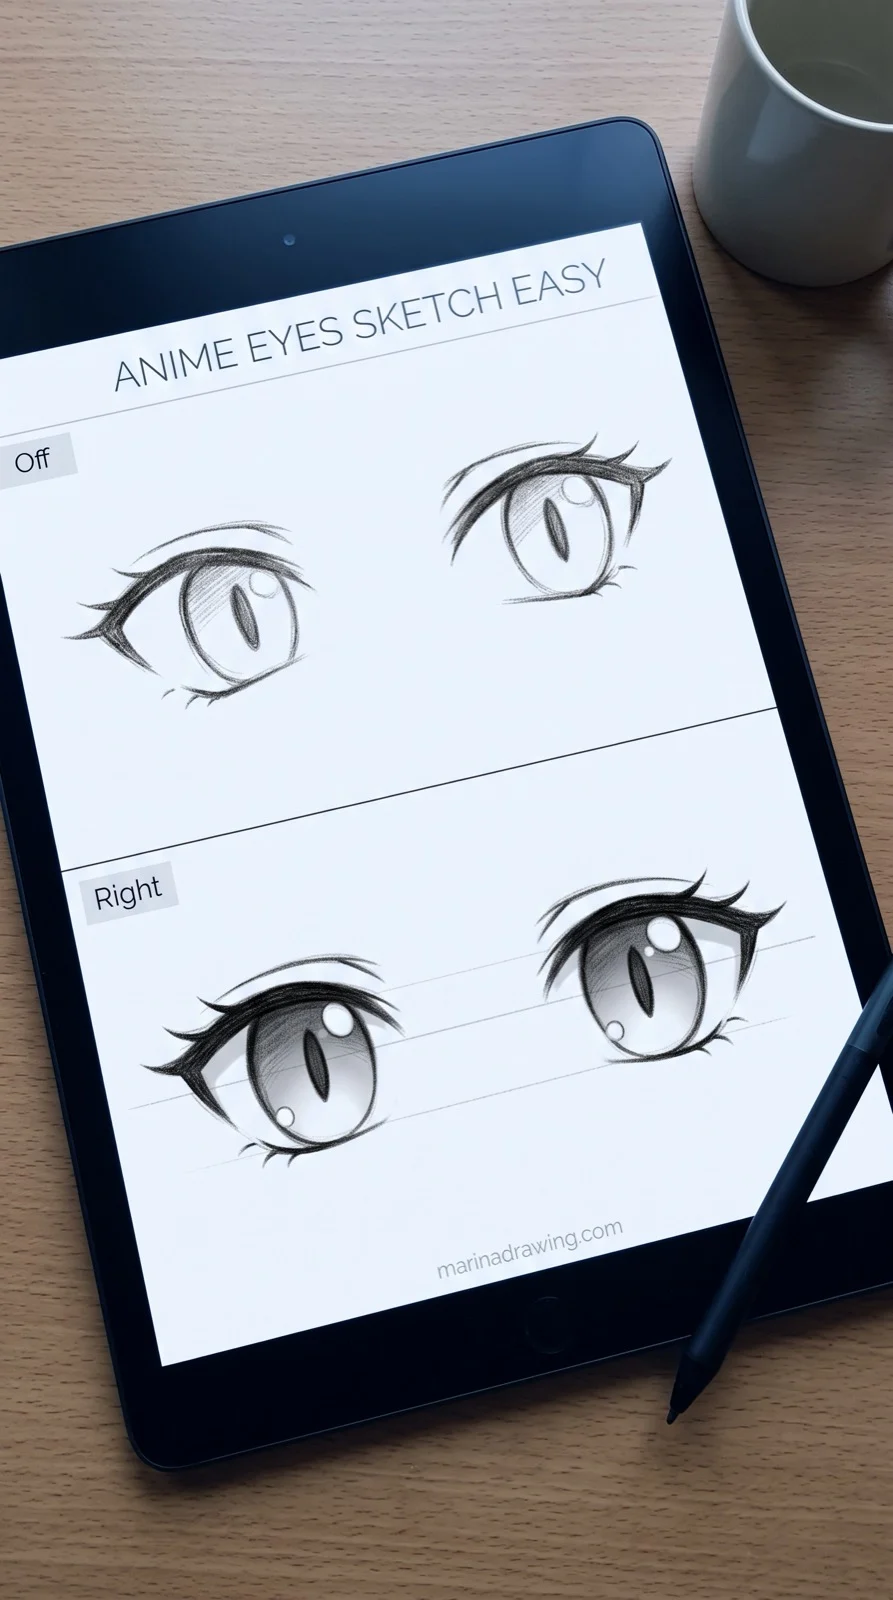
Anime Eyes: The Same Almond, Squashed
Anime eyes are the same almond, taller and simplified, and they break where yours will break.
 Pin it
- Thick top lid line, thin or missing bottom. Your heavy top is most of the style.
- Your iris is huge, cut off top and bottom by the lid lines. A full oval iris inside the eye instantly looks flat.
- You add two highlights, one large near the top, one small lower down on the other side.
- Both eyes tilted the same way. This is the one people miss: a pair tilting differently is the main reason an anime face looks off.
Wonky test for a pair: draw one horizontal line through both eyes before you draw either.
A Whole Face: Where the Eyes Actually Sit
Ask anyone to draw a face from memory and the eyes land near the top. They belong halfway down.
 Pin it
- You draw an oval, slightly narrower at the chin.
- You halve it horizontally. That line is the eye line, and it looks wrong until you check it against a photo.
- You halve the lower half for the nose, then halve again between nose and chin for the mouth.
- Five eye-widths across the face. Eye, gap, eye, and one eye-width of space at each side.
- Wonky test: ears sit between the eye line and the nose line. If they do not, the head is the wrong shape, not the ears.
You put hair on as a mass with its own volume, never as a line traced along the skull.
Check yourself against a photo: eyes halfway, ears between eye line and nose line. Faces are where most people go next, and the filmed portrait lessons take the same halves into a finished head.
Hand: Palm Box First, Fingers Second
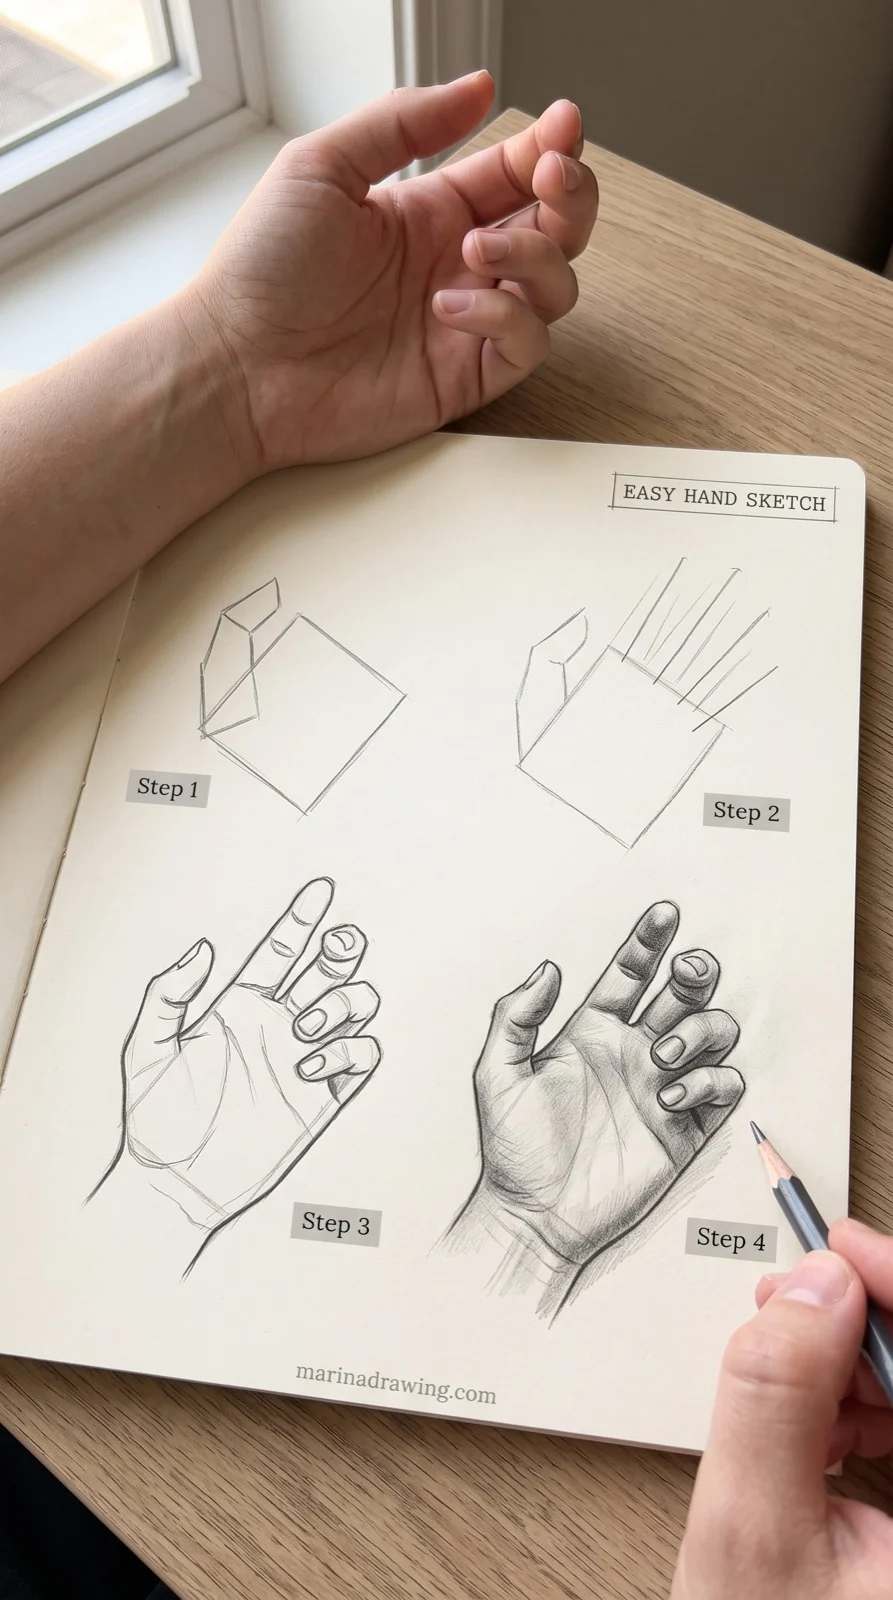
Your own hand is free and the fastest subject for spotting whether the habit has stuck.
 Pin it
- You block a box for the palm, square, tilted however the hand sits.
- Your thumb is a separate flap off one corner, with its own little box.
- Four lines for finger directions, before any finger shape: where each points, and how long.
- Wonky test: the middle finger is about the same length as the palm. If yours came out short, the palm box is too big.
- You thicken the lines into fingers, with a small wedge at each knuckle.
Draw your hand relaxed and curled. A flat open hand is much harder to look natural.
Knuckle wedges are easier watched than read in the graphite lessons.
My own hand is the subject I draw most, and how to draw hands takes the palm box further.
3D That Reads as 3D: One Vanishing Point
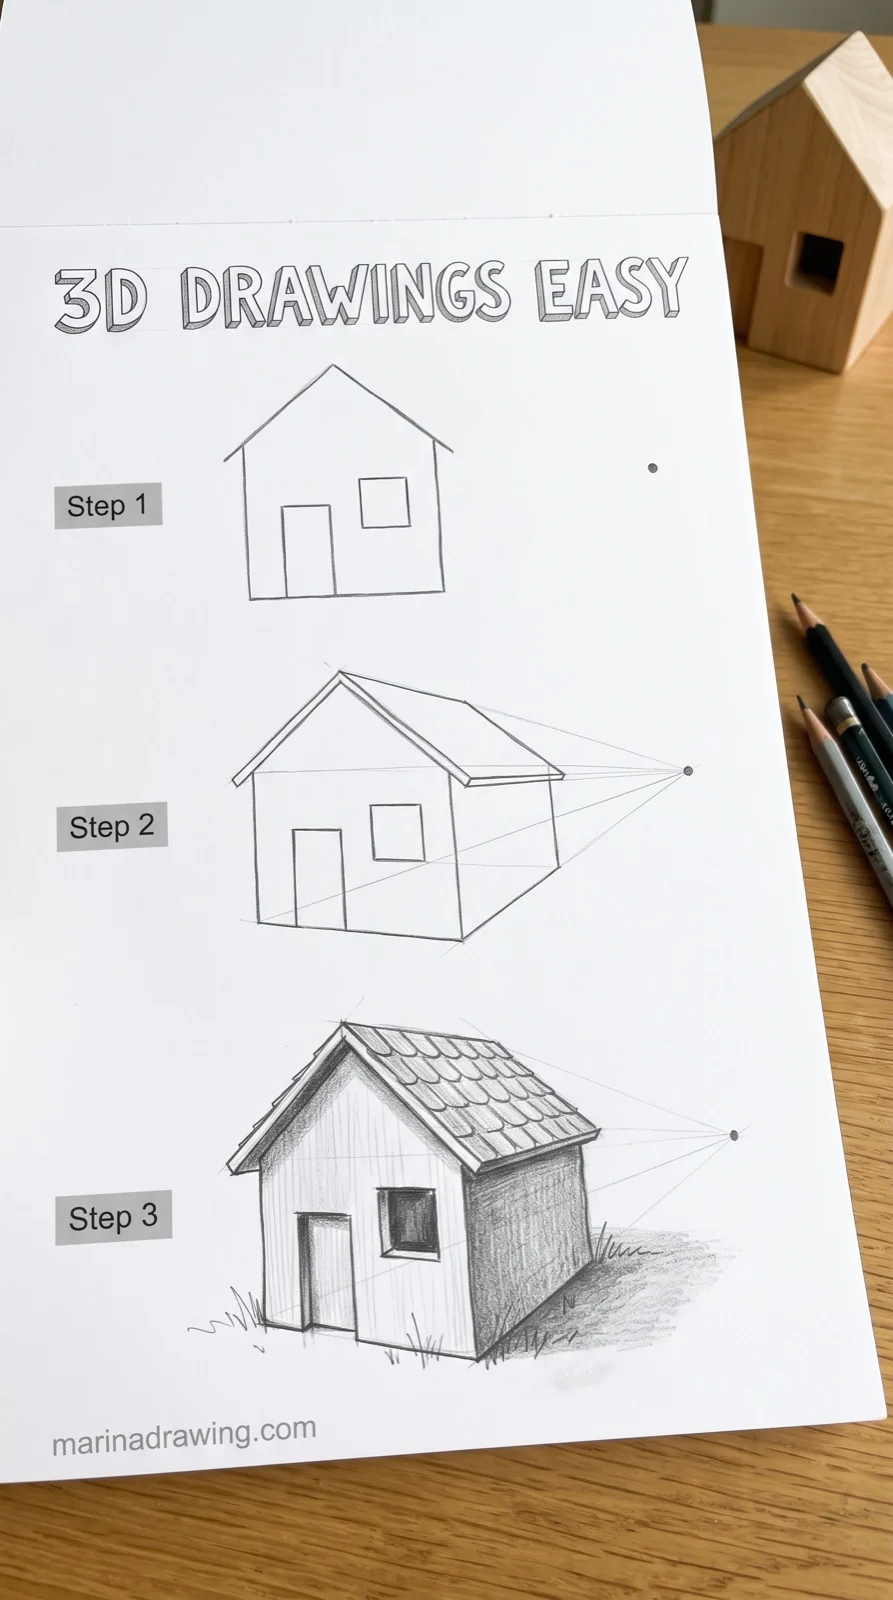
People try a 3d drawing freehand and get a box with edges that argue. One dot fixes it.
 Pin it
- You draw the front face of the box or house, flat and square.
- You put one dot somewhere on the page, off to the side. That is your vanishing point, and it stays put.
- Light lines from every corner of the front face towards that dot. Every single corner, because this is where it usually goes wrong.
- You cut them off at a matching depth, then join.
- Wonky test: extend any depth edge you doubt with a straight pencil. It should point at the dot. If it does not, that edge is the error.
Shade the three visible faces in three values and nothing else has to be correct for the box to read as solid.
Perspective drawn live reads easier than perspective written up: video lessons.
Once you trust the one dot, you can build a whole street from it, which is what I do in perspective drawing scene setup.
A Cute Doodle Page That Fills a Spread
42 hours of pencil drawing training, lifetime access
The video course I point plateaued students to — full lessons on portraits, hands, and realistic shading, not another short tutorial.
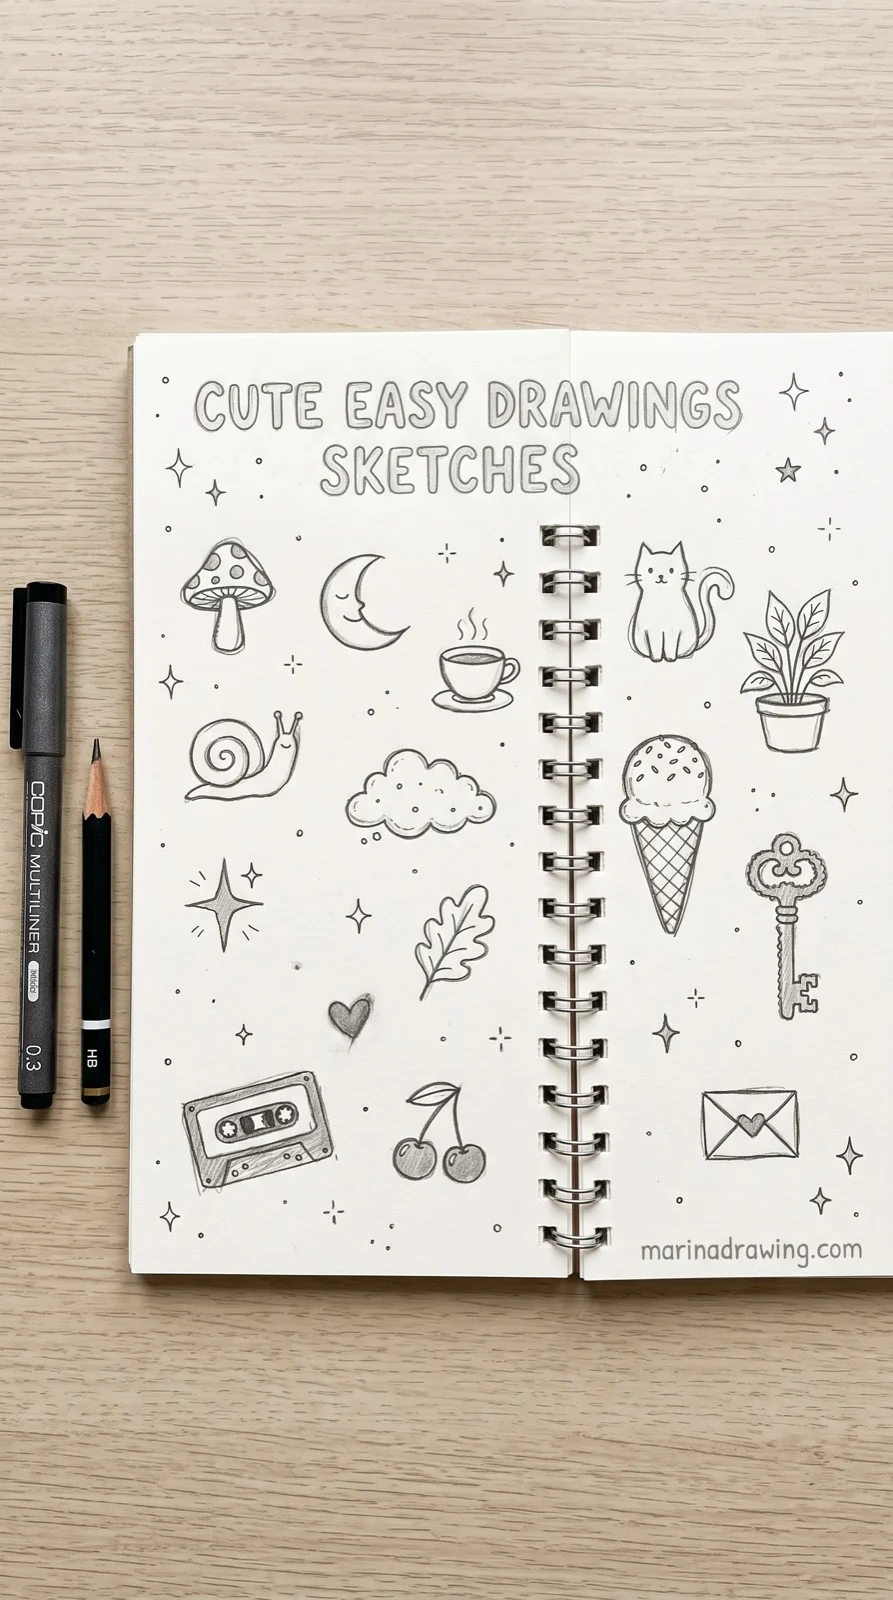
A doodle page is a different job: not one good thing, but a page of small things that sit together.
 Pin it
- You fill it with fifteen or so tiny subjects, none bigger than a coin: mushroom, moon, cup, cloud, star, leaf, heart, cassette, cherry.
- No rubber on the table. A wrong line becomes part of your next doodle.
- You vary the size deliberately: three big-ish, the rest small, so the eye has somewhere to land.
- One line weight throughout. Mixed weights are what make your doodle page look messy rather than cute.
Your two shapes rule still applies, just faster. A table of small objects is the next step up, which is what a still life setup is for.
You are allowed to do this badly. I fill a page with cute easy drawings sketches ideas when I do not want to think, and it still counts as drawing.
One steady line weight across a page comes from the grip, filmed in the lessons.
Aesthetic Pages: Three Tones, No Grey Mush
The sketches that look finished are not the detailed ones, but the ones with real darks.
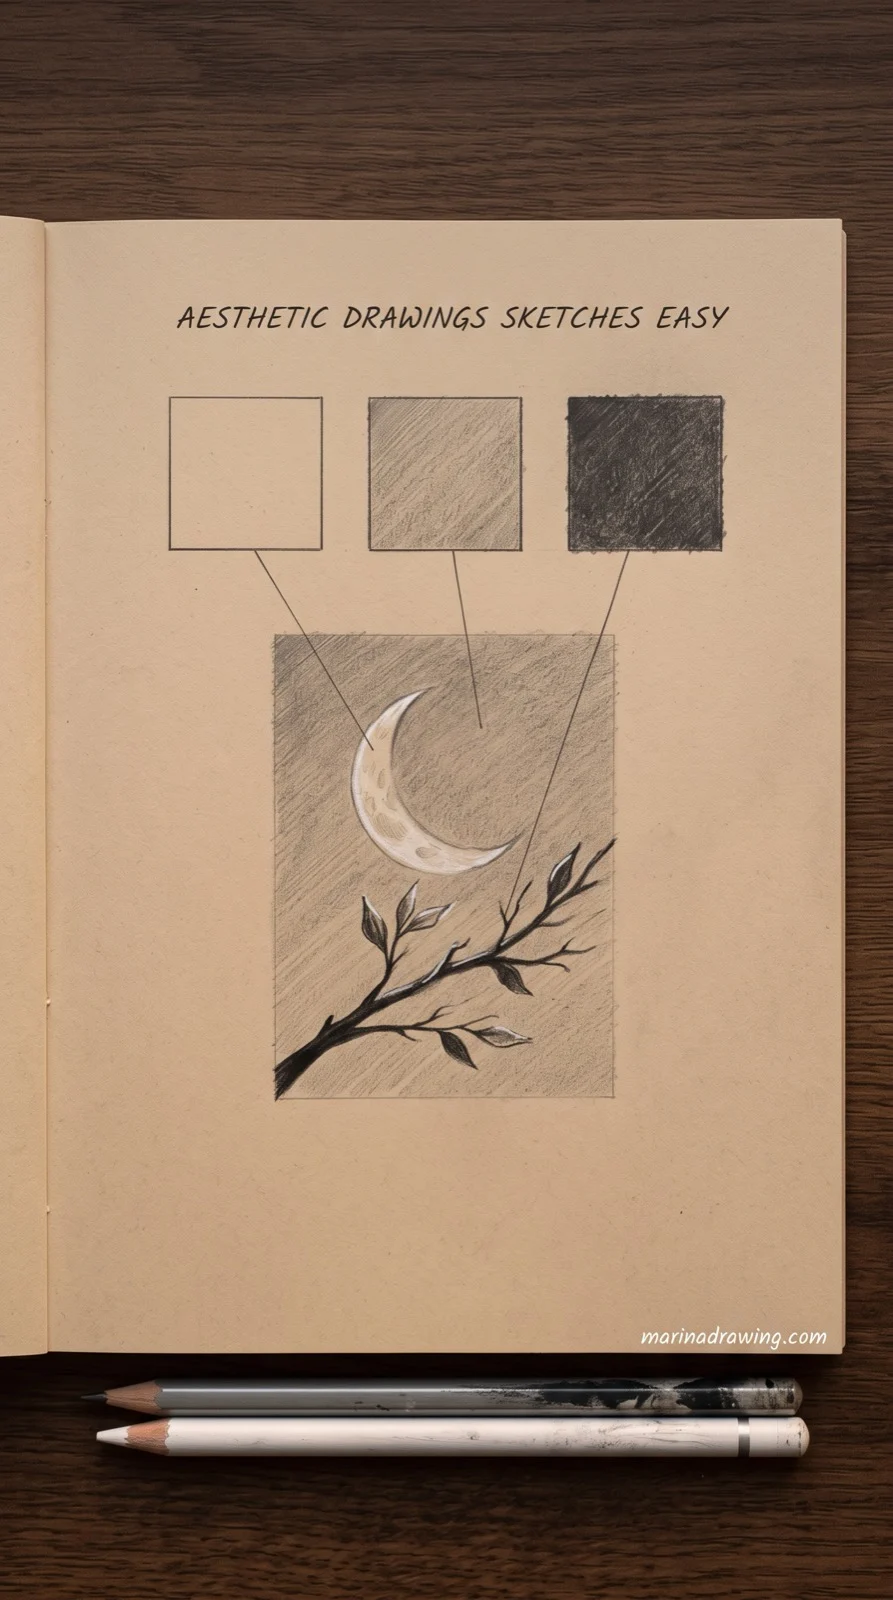 Pin it
- Light: your paper, untouched. Do not shade it “just a bit”.
- Mid: one even layer of HB held at an angle, over most of the shaded area.
- Dark: 2B, in the smallest areas only: usually a cast shadow and the underside of something.
You use three values, then stop. Grey mush is what you get from six values, where none is the paper and none is properly dark.
For a spread that reads as a whole: one subject per page, a wide margin of untouched paper, the date in the corner in your normal handwriting. The untouched paper does more work than the shading.
Three tones laid down in real time save weeks of guessing.
For three tones pushed to a proper finish, I take them further in realistic drawings shading.
Four Ways an Easy Sketch Gets Undone
People learn the two-shapes habit, use it a week, then drop it. Four ways it happens:
- Pressing hard on the shapes. If the construction lines are as dark as the drawing, you cannot ignore them, so you start tracing them instead of correcting them.
- You check after the line, not before. Once an edge is committed you will defend it. The tilt and the arm’s length happen while everything is still light.
- Detail creep. An eyelash or a whisker drawn before the whole shape is settled, and now you will not move anything in case you lose it.
- Erasing to fix instead of restating. You draw the corrected line next to the wrong one and leave both. Erasing mid-sketch takes the paper’s tooth away, and your reference point with it.
Number three is the one that gets everybody, me included. Your cure is boring: nothing sharp until the wonky test passes.
I lose number three more often than I would like, and noticing it is most of the cure. For the habit drilled rather than described, the course exercises repeat it on a new subject every lesson, and drawing practice has the free version of the same drill.
The Same Sketch on a Tablet
On a tablet the habit gets easier, because you stop erasing at all.
 Pin it
- You keep shapes on their own layer, opacity dropped to about 30%.
- Your line goes on a new layer above it. Never the same one.
- You switch the shapes off, not away. Hide the layer to judge your drawing alone, show it again to check proportions.
- Keep your canvas one size and resist zooming in. Zoom is how a quick sketch turns into a four-hour render.
The one thing digital breaks is pressure. Default brushes give a line the same weight everywhere, so construction reads as a commitment rather than a measurement. A brush with a real taper fixes it.
Brushes that keep a construction line looking light
Illustration brushes with a real pressure taper, so your shapes layer reads as a measurement and your outline as the drawing.
Pencil textures for the three-tone stage
Graphite textures that hold a mid tone without sliding into grey mush when you layer them.
What You Need on the Table
Less than you think. The shopping is not what stands between you and a sketch.
- An HB pencil for everything you do up to the outline. It stays light enough for you to ignore.
- 2B for your darks at the end. One pencil, one job.
- A kneaded rubber, for lifting a line rather than scrubbing it out.
- Plain paper, around 9×12, nothing textured. Cartridge paper is fine.
Two pencils and a rubber. Pencil drawings easy sketches and all, everything here was drawn with that.
If you are sketching with a child, you can skip every check. I keep the shapes out loud and nothing else in easy drawings for kids.
Questions People Ask Once They Start Sketching
 Pin it
How do I start drawing sketches if I can barely draw a straight line?
You do not need straight lines. Draw the two shapes lightly, check them, then restate the edge with one quick firmer stroke. A quick wobbly line looks confident; a slow careful one looks shaky, even when it is straighter.
What is the easiest drawing to start with?
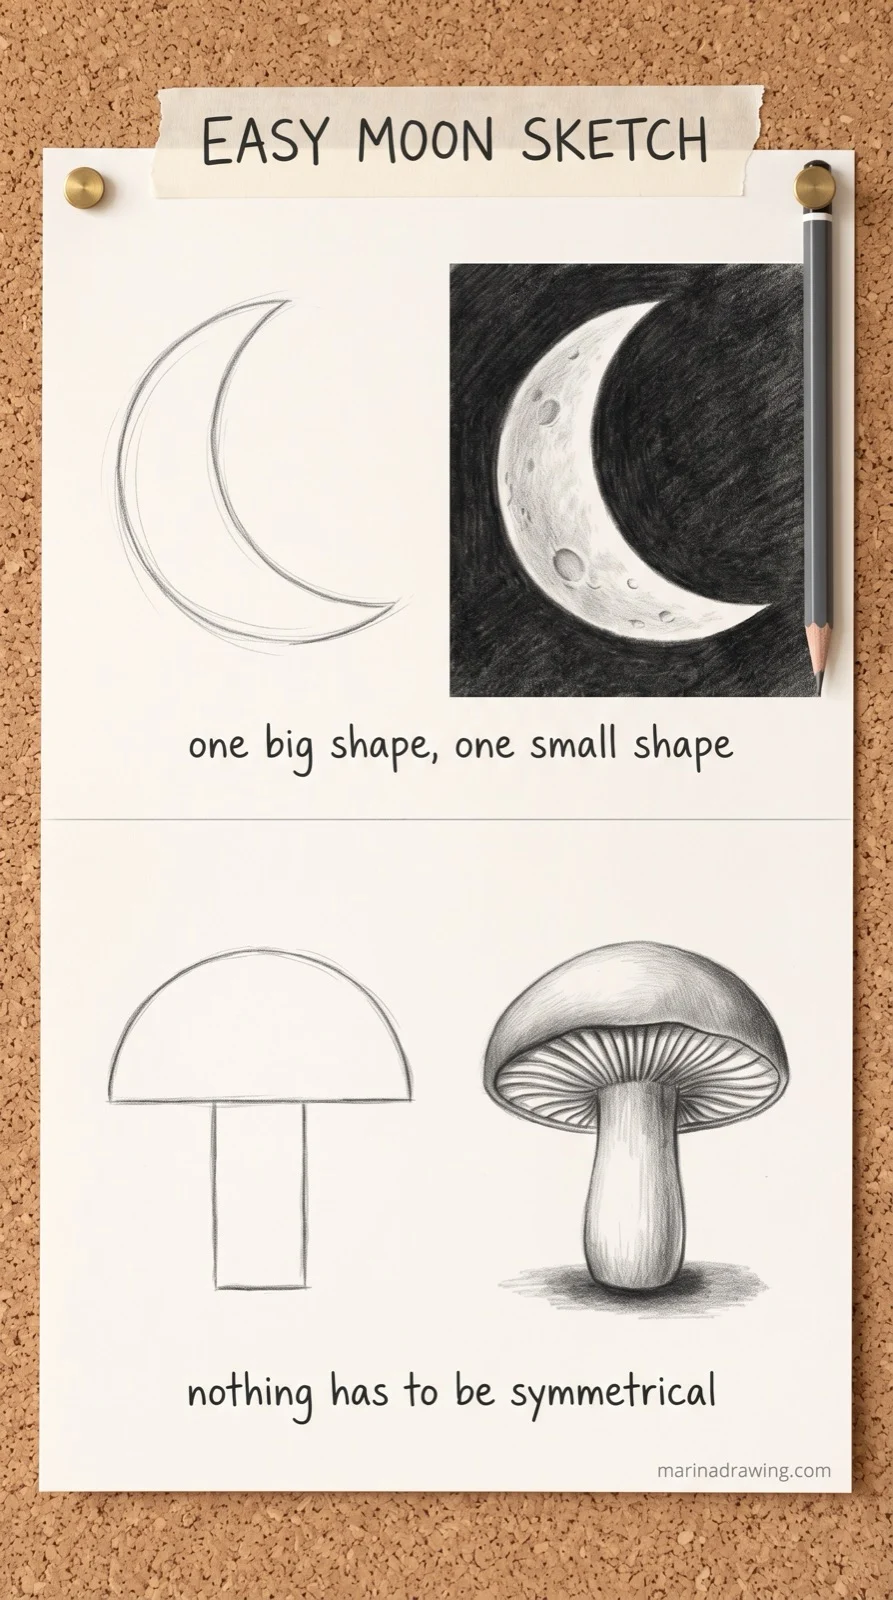
A mushroom or a cloud: one big shape, one small shape, nothing symmetrical. Keep your first easy drawings sketches simple enough to finish in one sitting. The butterfly and the flower here are the next step up, because they add a centre line to keep honest.
How to draw eyes sketch step by step?
Top curve peaking towards the nose, bottom curve shallower and peaking towards the outer corner, a full circle for the iris with its top cut off by the lid, pupil in the middle, one highlight across both. Lashes last.
How to sketch 3d drawing without a ruler?
Front face flat, one dot on the page, light lines from every corner to it, then cut them off at matching depth. Any depth edge you extend must point back at the dot.
How do I sketch with kids at the table?
Give the two shapes out loud and let them draw: “a circle and a triangle”. Skip the checking for children, because it turns a game into homework. The cat and the doodle page work best.
How long should an easy sketch take?
Ten to twenty minutes for anything here. Two minutes of shapes and checking, the rest on the line and three tones. Past forty minutes you have stopped sketching and started rendering.
Pencil or pen for sketching?
Pencil while you are learning the checks, because they only help if you can act on them. Pen once the habit is automatic, and especially for doodle pages, where the point is that nothing gets undone.
Where can I watch someone sketch this way from start to finish?
Reading the checks is not the same as seeing them. I use the filmed graphite lessons for that, because they keep the light blocking-in stage in the video instead of cutting to the finished drawing.
Why do my sketches look stiff?
Usually because the line was drawn slowly, over construction pressed too hard. Draw the shapes so lightly you have to squint, then put the keeper line in with one movement from the shoulder, not the fingers.
Key Takeaways
- Two shapes and a centre line before any line you mean to keep. The subject changes, the order does not.
- The wonky test is three things: arm’s length, tilt the page, span it with the pencil. All three happen while the drawing is still light.
- Detail before the whole shape is settled is what undoes a sketch. Nothing sharp until the check passes.
- Three tones and stop. Grey mush is six values with no paper left and no real dark.
- Twelve subjects on this page, two pencils, one rubber. The shopping is not the obstacle.
To watch the checks happen in real time on a page that is still light, that is exactly what the filmed graphite course shows.