I used to draw a horse like a big dog with a long face. The outline looked fine for two minutes, then the legs came out as four sticks, the neck sat on the body like a pipe, and the whole animal stood there stiff.
What fixed it was not more practice on the outline. I stopped drawing the outline first. A horse is a few simple shapes and four bent legs. Once those sit right, your easy horse drawing takes about ten minutes, and if you would like a person to look at your own horse after that, there is a course with work review for exactly that. It is the same shapes-before-outline habit I use for simple animals and for anatomy.
A horse looks wrong for one reason almost every time: the outline was drawn before the body shapes and leg joints that hold it up.
Why Your Horse Looks Stiff Even When the Outline Is Right
Quick answer: draw three shapes (chest, hip, head), join them with the neck and back line, and only then add legs as bent lines with joints. The outline comes last, on top of shapes that already stand.
You probably start at the nose and walk the outline round the animal. That works for a cup. It does not work for a horse, because a horse is mostly weight and balance. If your chest and hip are not the right size against each other, no clean line will save it. For a second pair of eyes on that, this course reviews the drawings you send.
One learner wrote that they knew the grid and the mannequin, yet the drawing still looked bad and they felt lost. For a horse, the missing step is the joint in the leg.
Here is what I check when a horse looks off:
- Chest and hip are almost the same size, so the body reads as a tube.
- The neck starts too low and the head hangs off the front.
- Legs are straight, so the animal has nothing to stand on.
- The mane and tail were drawn first and now the shapes are hidden.
You fix all four with the order below, not with better lines.
What You Need to Draw a Horse: One Pencil and Some Scrap Paper
- A soft pencil (2B is plenty) and an eraser you can dab, not scrub.
- Plain paper. Copier paper is fine for practice.
- A second sheet for the first three or four horses. They will be bad, and that is the plan.
Draw light, and keep a habit of short daily drawing practice so the horses pile up quickly. You should be able to erase every line in the first three steps, because half of them will move.
How to Draw a Horse Easy: Four Shapes, Then the Line
42 hours of pencil drawing training, lifetime access
The video course I point plateaued students to — full lessons on portraits, hands, and realistic shading, not another short tutorial.


1. Draw the chest and the hip as two ovals
Make your chest oval a little bigger than the hip oval and leave a gap of about one oval between them. That gap is the belly, and it is what stops you getting a sausage.
2. Add a small oval for the head and a line for the neck
Make the head oval about half the size of the chest. Draw the neck as two curved lines from the top of the chest to the head. You want it wider at the chest and narrower at the head.
3. Connect the back and belly with one smooth line each
Run the back line from the neck over the top of both ovals to the tail end. Run the belly line under both. Now you have a horse-shaped body with nothing else on it yet.
4. Place the legs as bent lines, then add the outline
Draw each leg as a light line with bends in it (the next section shows where). Only after the legs stand do you trace the final outline over the top and erase the ovals.
Mane and tail go last. If you draw them first they cover the shapes you still need to check. When you get stuck between steps 3 and 4, the lessons with work review cover exactly that jump.
How to Draw Horse Legs: Bend the Line Before You Add the Leg

Legs are where your horse will fall apart, so draw them as a zigzag of joints before they get any thickness. A horse’s leg is a line with three bends: a shoulder or hip at the top, a knee or hock in the middle, and a fetlock just above the hoof. Mark those with dots and connect them.
- Front leg: standing, it is a nearly straight column with the knee at the front. Lifted, the knee folds so the lower leg swings back.
- Back leg: the hock bends back, then the lower leg comes forward. That gives the back leg its Z shape.
- Hoof: a small wedge at the end of the line, not a rounded blob.
The same jointed line works for a standing, sitting or running horse. Only the angles of the bends change. When a leg carries weight you keep it close to straight. When it is lifted, you fold the bends sharply. If your lifted leg looks like a noodle, count the bends: you probably drew two instead of three. A teacher who sees your legs can spot that in seconds, and the course with feedback is built around it.
Draw the leg thickness around the line afterwards, thicker above the knee and thin below it. That thin part is why a horse looks elegant and not heavy.
How to Draw a Horse’s Head: A Long Wedge With a Small Jaw Circle
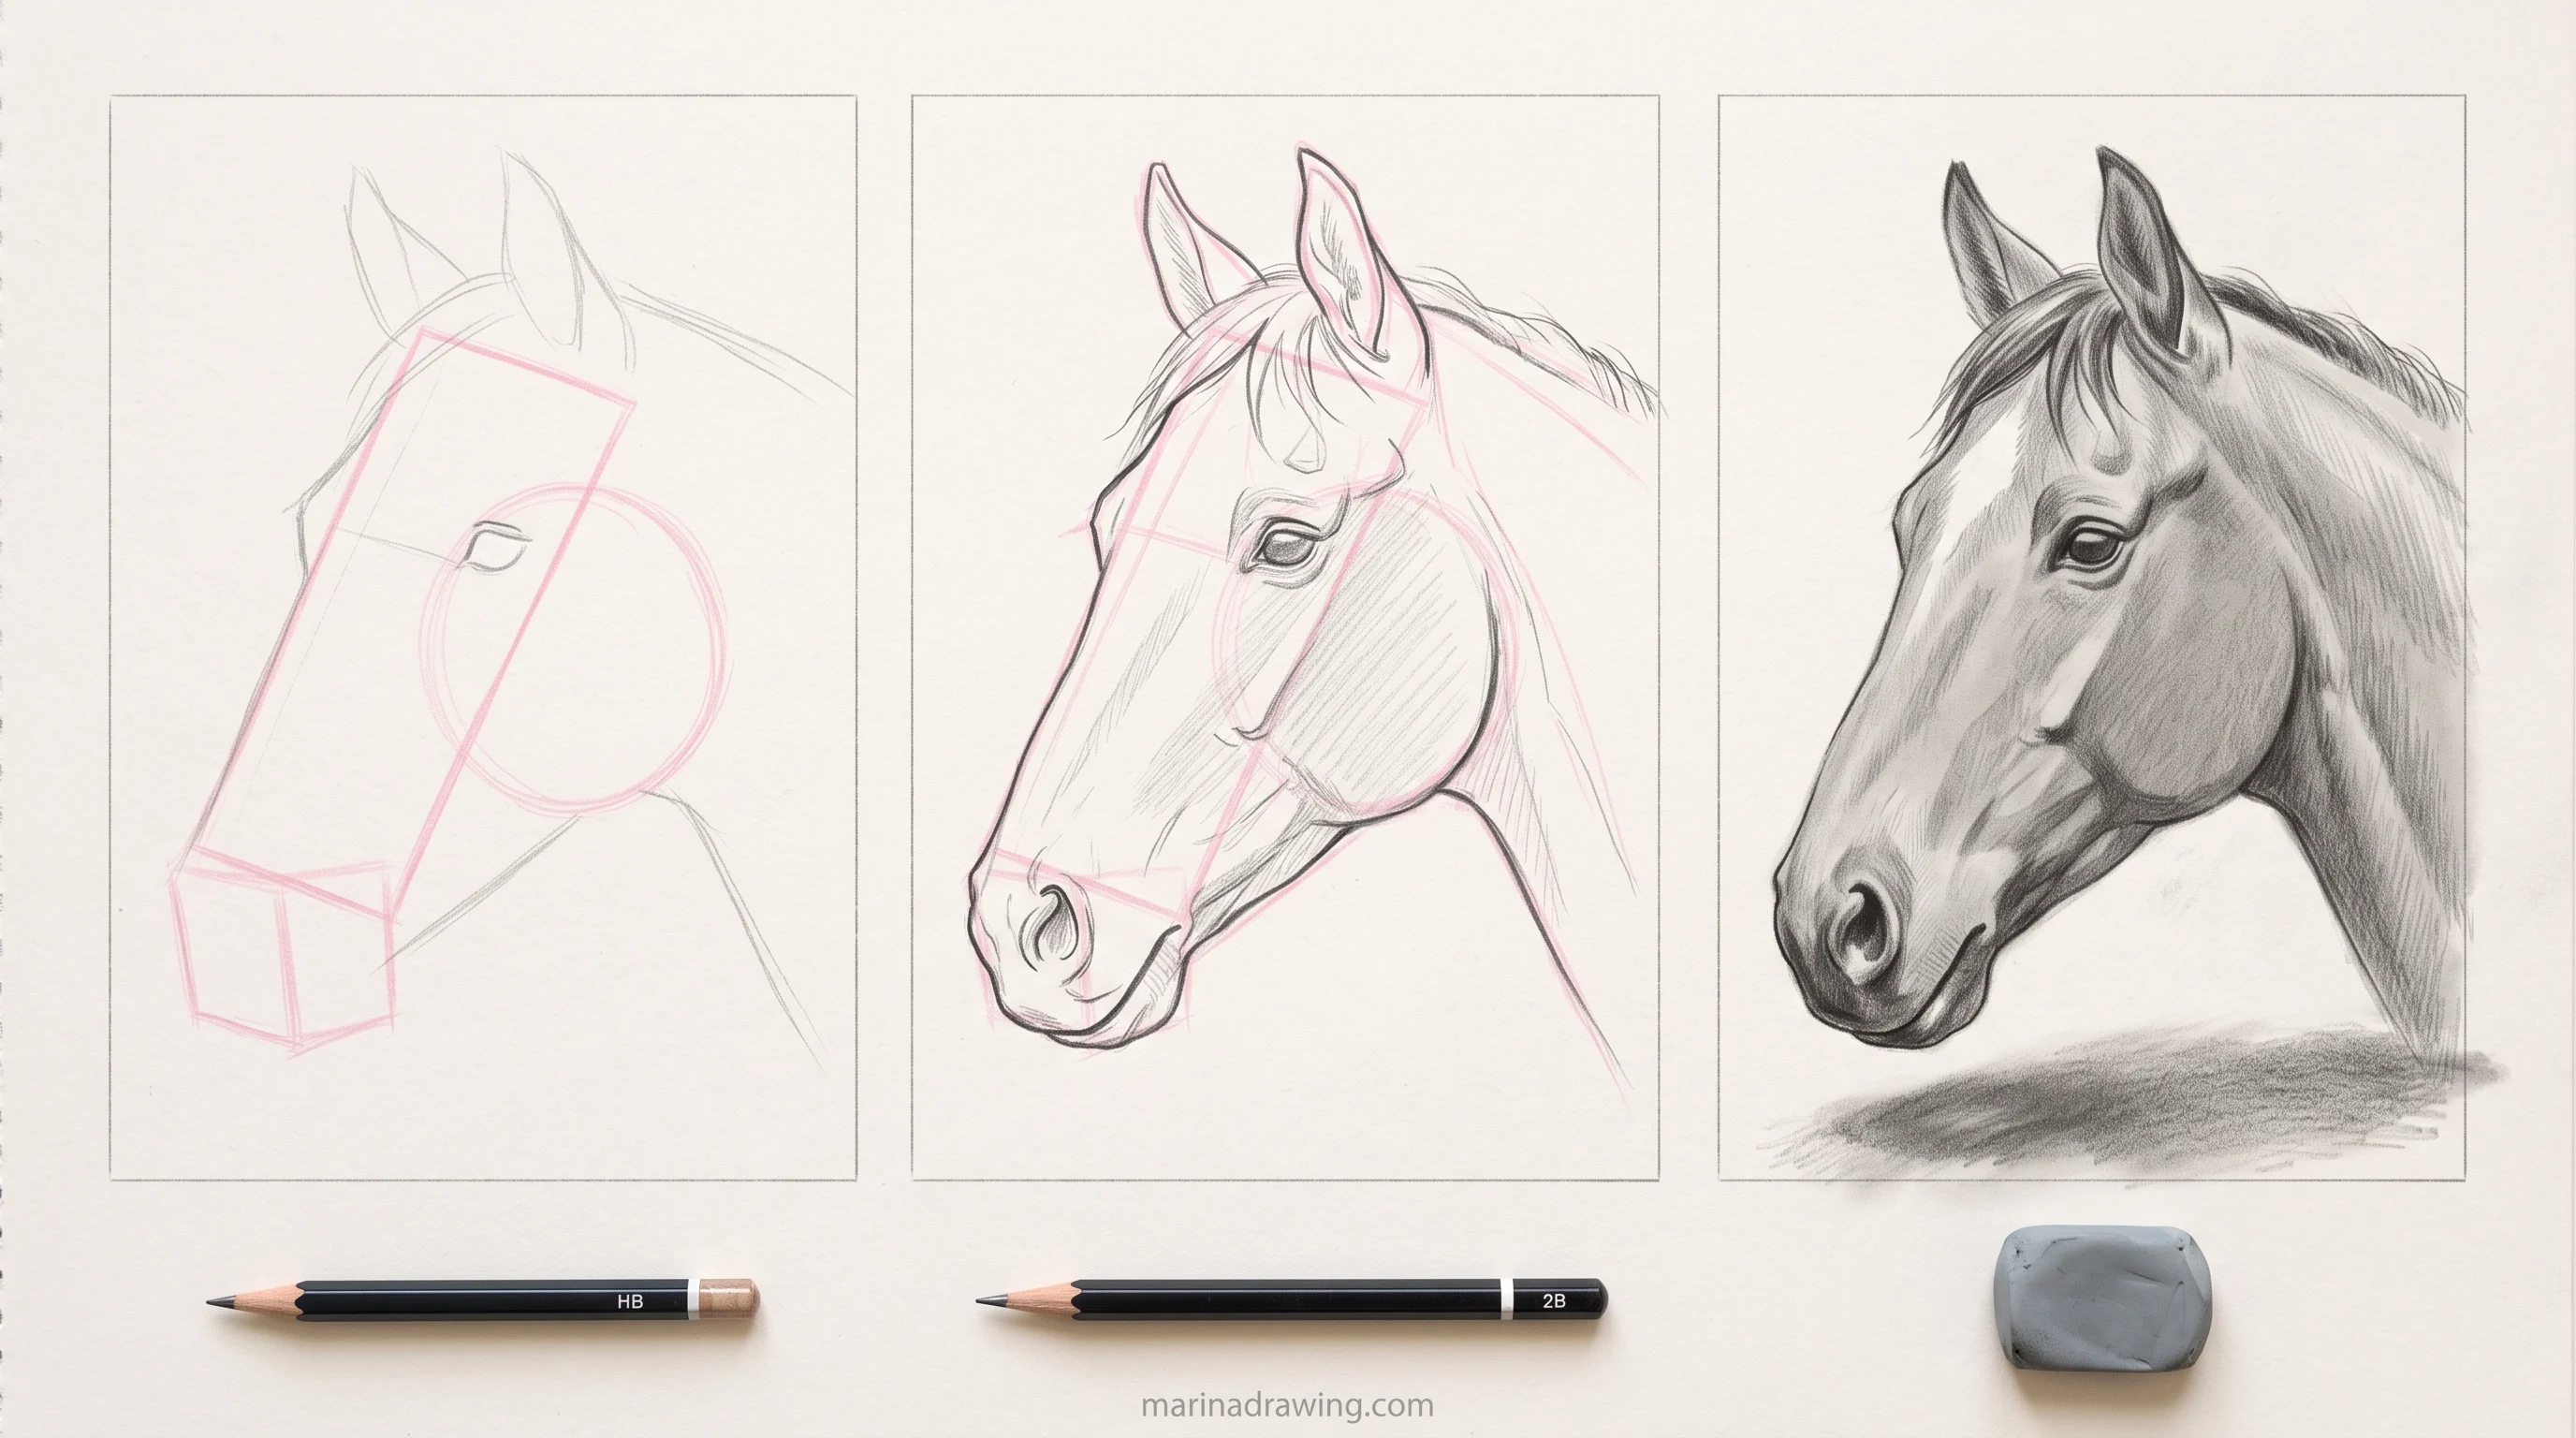
The head is easier than it looks if you start with the wedge and not with the eye. You can do it in six steps.
- Draw a long, slightly tilted rectangle. This is the face.
- Round the bottom end into a soft box. That is the muzzle.
- Draw a circle at the back-top of the rectangle. That is the cheek and jaw.
- Put the eye on the upper half of the circle, close to the rectangle.
- Add the ears above the eye, pointing up and slightly forward.
- Draw the nostril as a small comma near the end of the muzzle.
You will most likely put the eye too far forward, near the nose, which turns your horse into a goat. Push it back toward the cheek circle.
Want more on the eye itself? My eye guide covers the ball-and-lid order.
The wedge-before-feature order is the real lesson here, and it works on every head you draw. A structured pencil drawing course drills it until you stop reaching for the eye first.
How to Draw a Running Horse in Three Easy Steps
1. Draw the body as one curved bean and mark the head and tail ends
Tilt the whole body slightly upward at the front. Your running horse should never sit level.
2. Fold the legs: front pair reaching forward, back pair pushing behind
Use the jointed lines from the legs section. Bend the front legs forward at the knee and stretch the back legs behind the hip. In a full gallop pose all four hooves can be off the ground.
3. Trace the outline and blow the mane and tail back
Mane and tail flow the opposite way to the movement. That one detail carries most of the feeling of speed.
If your horse looks like it is sliding, lift one back leg off the ground higher than the others.
How to Draw a Horse With Its Head Down Next to a Person
42 hours of pencil drawing training, lifetime access
The video course I point plateaued students to — full lessons on portraits, hands, and realistic shading, not another short tutorial.
A lowered head changes the neck, not the head. Here is what you do when a horse leans over a person lying on the ground:
- Draw the neck as a curve that drops from the chest and arcs down, not a straight line tilted down.
- Keep the head wedge the same size. Only its angle changes.
- Keep the person low: a man lying flat is about as high as the horse’s knee, so the size difference reads at once.
- Let the mane hang along the underside of the neck. That single detail tells the eye the head is down.
Draw the person as a simple lying figure first, with rough boxes for chest and hips, the same shapes-first order you use for the horse. If you find the figure the hard part (the same block-in works for a hand or a duck), the course covers figures too, and my guide to quick sketches explains how to block a figure in before the details.
Three Checks Before You Draw the Final Line
Run these on the light pencil version, while every mark can still move.
- Are the chest and hip different sizes? If they match, resize one.
- Does every leg have its bends? Count three on each leg. A leg with one bend will not carry the body.
- Is the head about half the chest? Bigger reads as a cartoon, smaller as a pony.
Fix whichever check fails before you go on. Fixing after the outline is inked costs a whole new drawing.
These checks tell you whether your shapes are right. They cannot look at your own sketch and tell you which of them you keep getting wrong. That part needs someone looking at your work, and it is where a free tutorial ends.
Four Mistakes That Make a Horse Look Wrong
- Matching ovals. Chest and hip the same size make a tube. Make the chest bigger.
- Straight legs. No bends means no weight. Draw the joints first.
- Eye near the nose. Move it back to the cheek.
- Mane first. It hides the shapes you still need to adjust. Add it last.
Ten Minutes a Day for a Week Is Enough to See the Difference
Ten minutes a day is enough time to draw one horse with the four shapes, run the three checks, and redraw it once. By the end of a week you will do the order without thinking, and that is when your horses stop looking stiff. If you would like feedback along the way, the course with work review gives you that.
How do I draw a horse step by step for beginners?
Draw the chest and hip ovals, add the head oval and neck, join the back and belly lines, then place the legs as bent lines and trace the outline on top.
Why are horses hard to draw?
Because the body is defined by weight and leg joints, not by the outline. If the shapes inside are off, a clean outline cannot hide it.
How do I draw a horse for kids?
Use ovals for the body and head, straight lines with two bends for legs, and add the mane last. Let the child draw the shapes light so they can erase.
How do I draw a horse’s face?
Start with a long tilted rectangle, round the muzzle, add a jaw circle at the top back, and put the eye on that circle, not near the nose.
How long does it take to draw a horse?
The easy version takes about ten minutes once you know the four shapes. The first few will take longer.
Should I erase the ovals at the end?
Yes, but only once the outline is traced. Lightly erase the chest and hip ovals and keep any leg bends that help the pose.
Where do I get feedback on my own horse drawing?
From someone who sees the actual page. The course with work review does that, and it is self-paced.