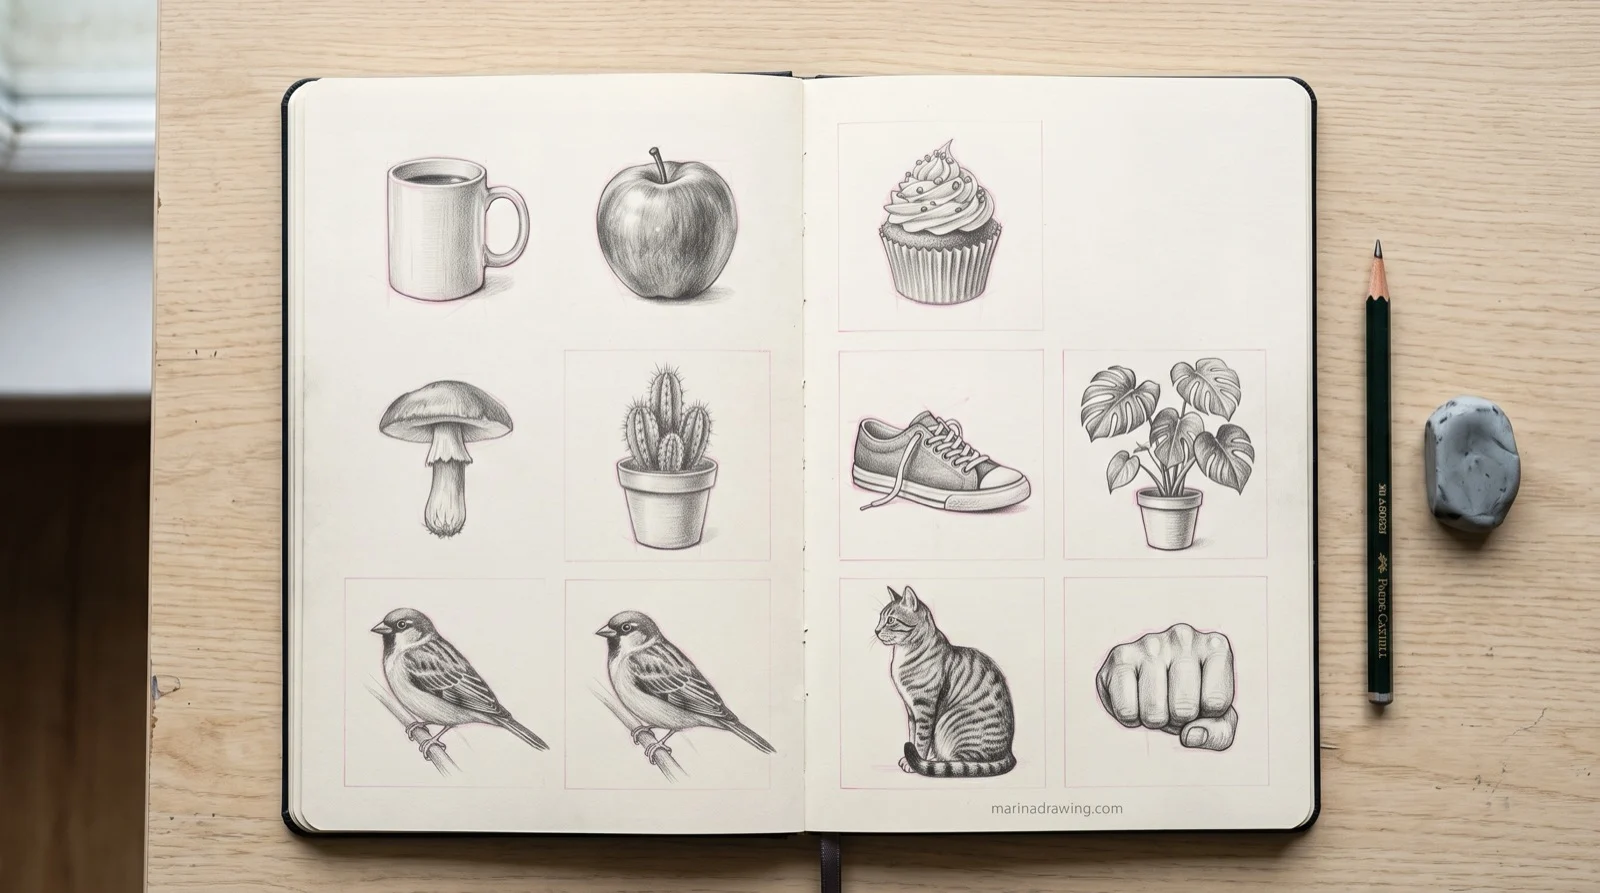
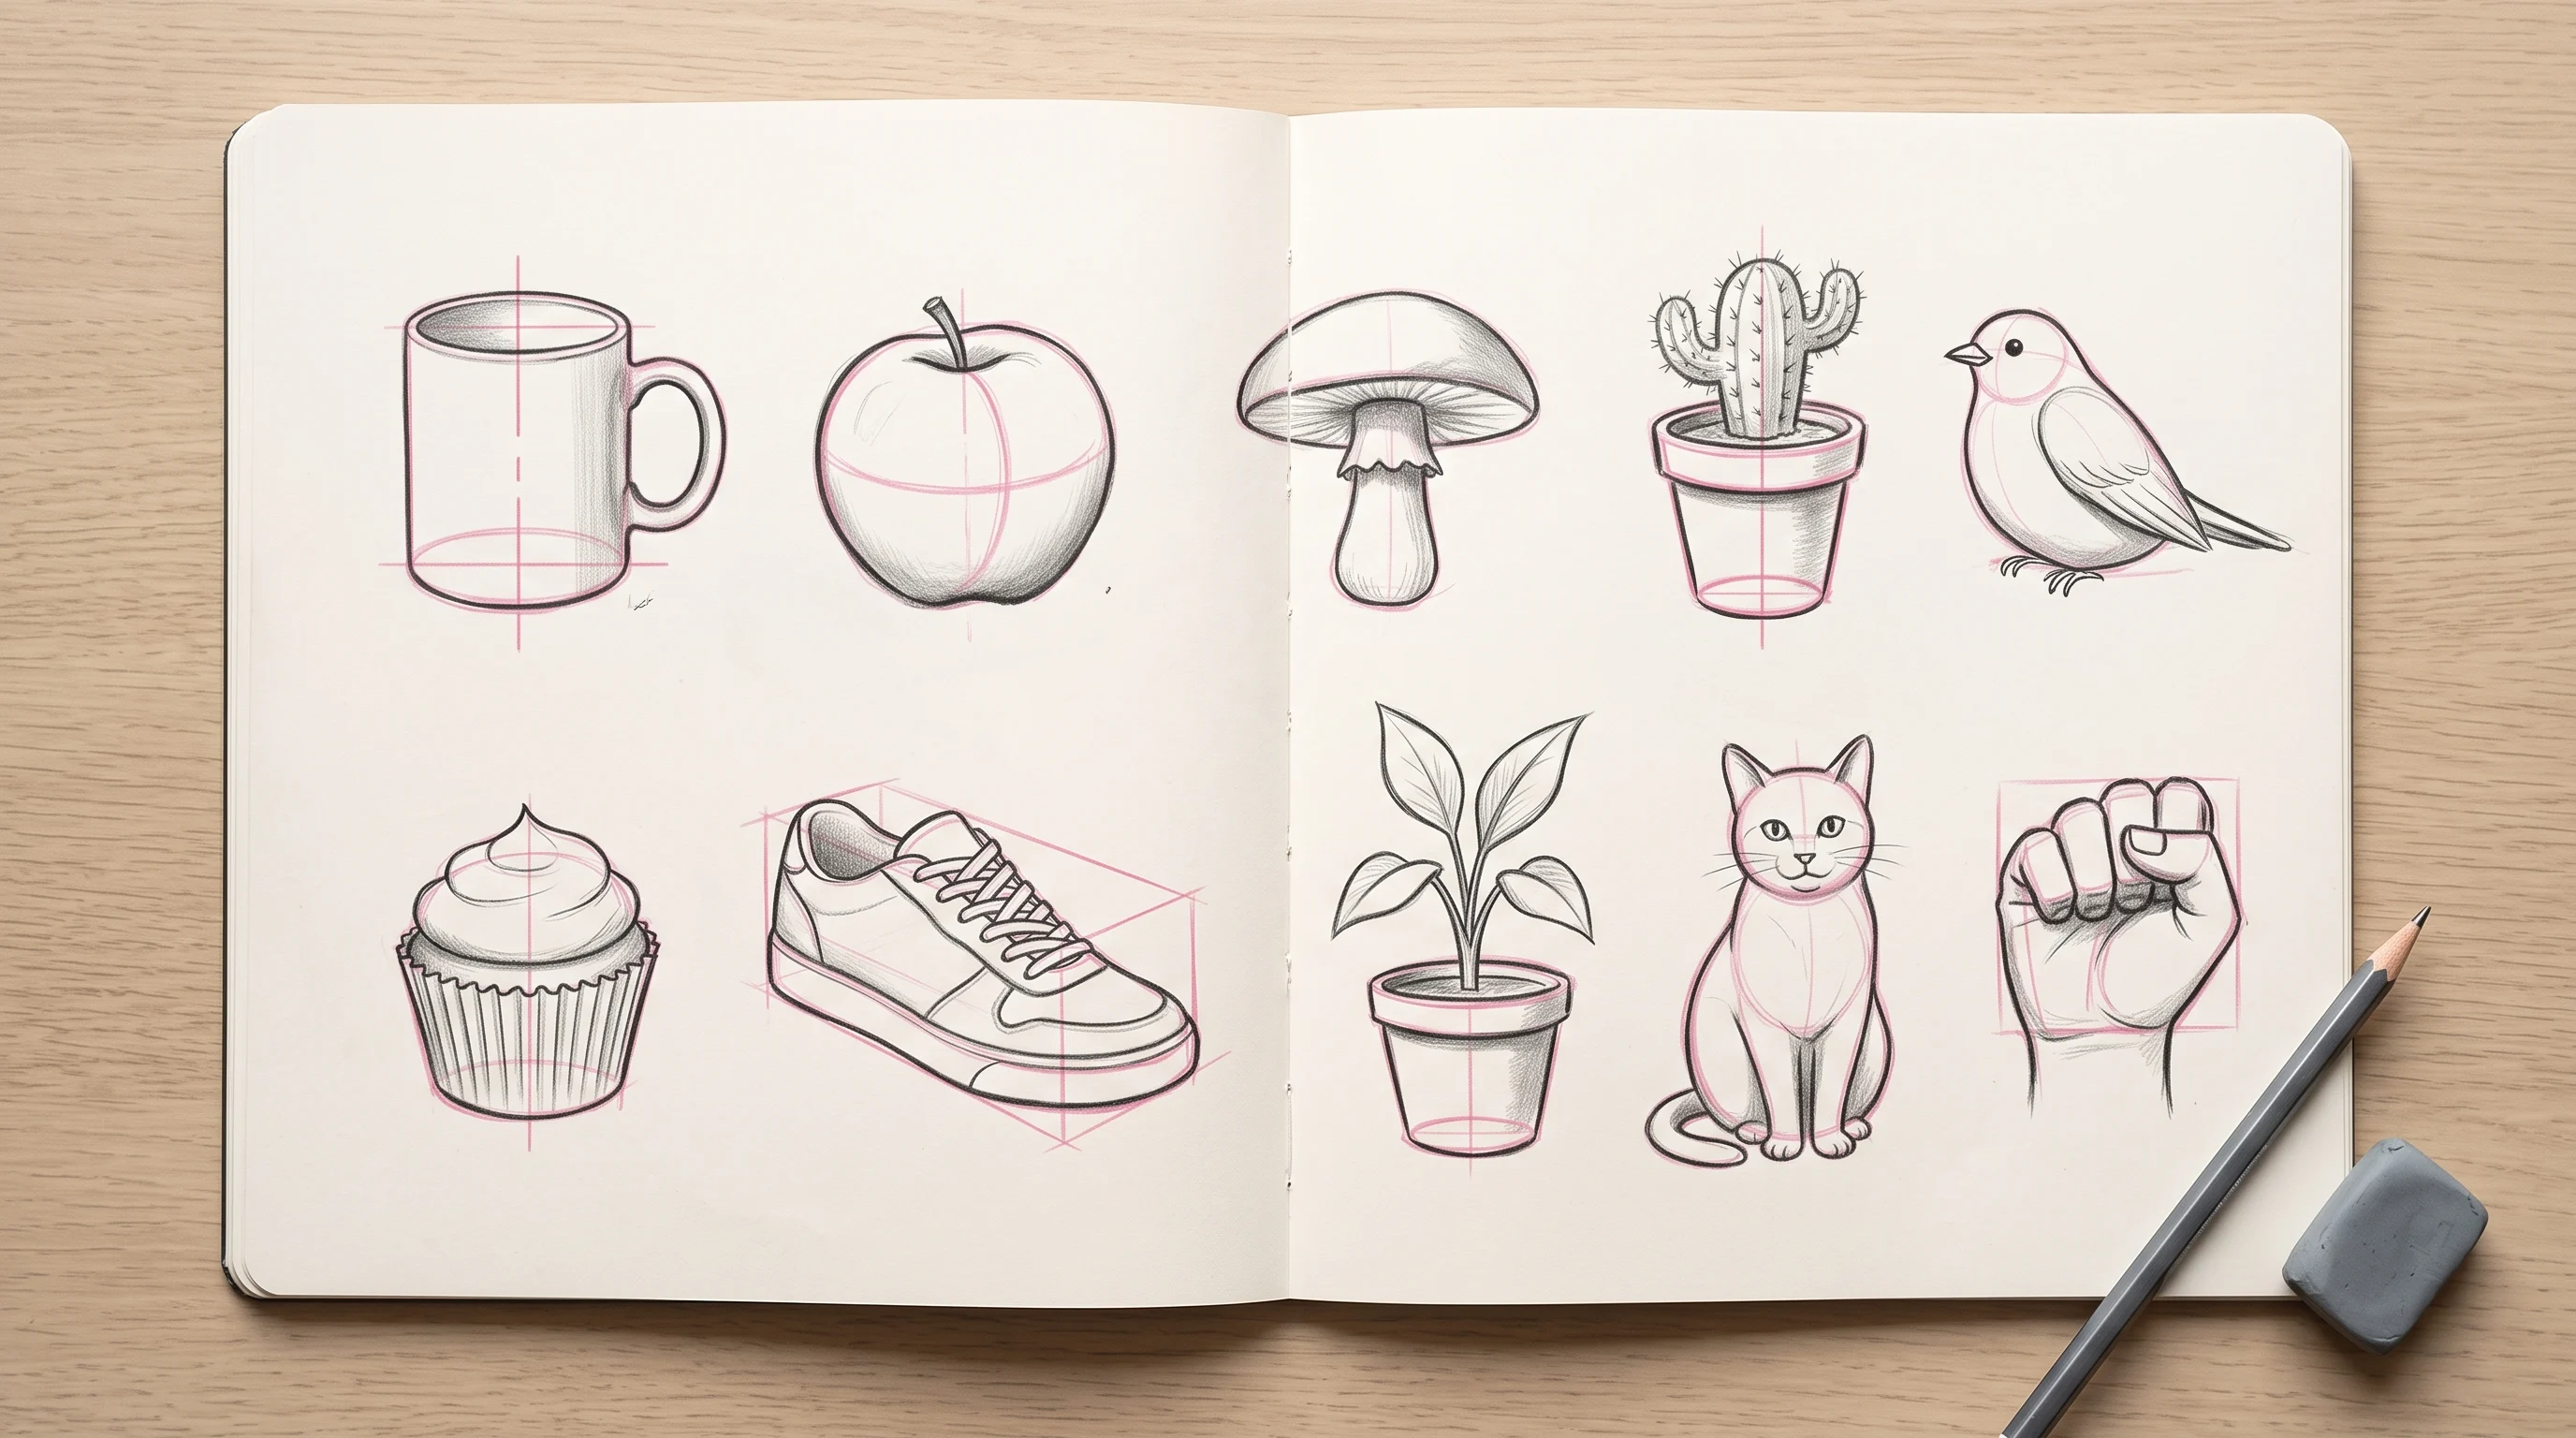
Easy drawings for beginners go wrong in a predictable way: the pencil traces an outline before it builds a solid form, and the subject brings two new problems at once. The fix is an order you can follow. Ten plain subjects, a mug first and a fist last, each adding one new problem, with a check for when a drawing looks off and a clear sign that a subject is passed.
Quick Answer: Draw These Ten Things in This Order
Here’s what a beginner should draw first, in order:
- a mug
- an apple
- a mushroom
- a cactus in a pot
- a bird
- a cupcake
- a sneaker
- a houseplant in a pot
- a sitting cat
- a fist
Each subject adds one new problem to the one before it. So when a drawing looks off, you already know which problem broke it: the new one.
These are easy drawings for beginners in the plain sense, nothing on the list needs a special pencil or a teacher. What makes them useful to you is the order.
A mug has one solid form and one ellipse. A fist has four forms pressed together and a thumb that overlaps them. Everything in between climbs one step at a time, so you always know which step you are on.
 Pin it
See each rung built on screen, not just finished
Forty-two hours of graphite lessons that start with simple objects. The block-in stage, the part a list of easy drawings skips, happens in front of you, stroke by stroke.
Why an Easy Drawing Still Looks Off
An easy drawing looks off for two reasons, and neither of them is your talent. The first: the pencil traced the outline before it built the form. The second: the subject asked for a problem the hand hadn’t met yet, so two new problems arrived at once and nobody can tell which one went wrong.
 Pin it
Start with the outline, and you meet the same trap a still life setup exposes on a table of objects.
An outline is the edge of a thing, and an edge says nothing about which way the surfaces turn. Draw a mug as a silhouette and your top ellipse won’t match the bottom one, the handle sits on the side like a sticker, and shading has nowhere to go.
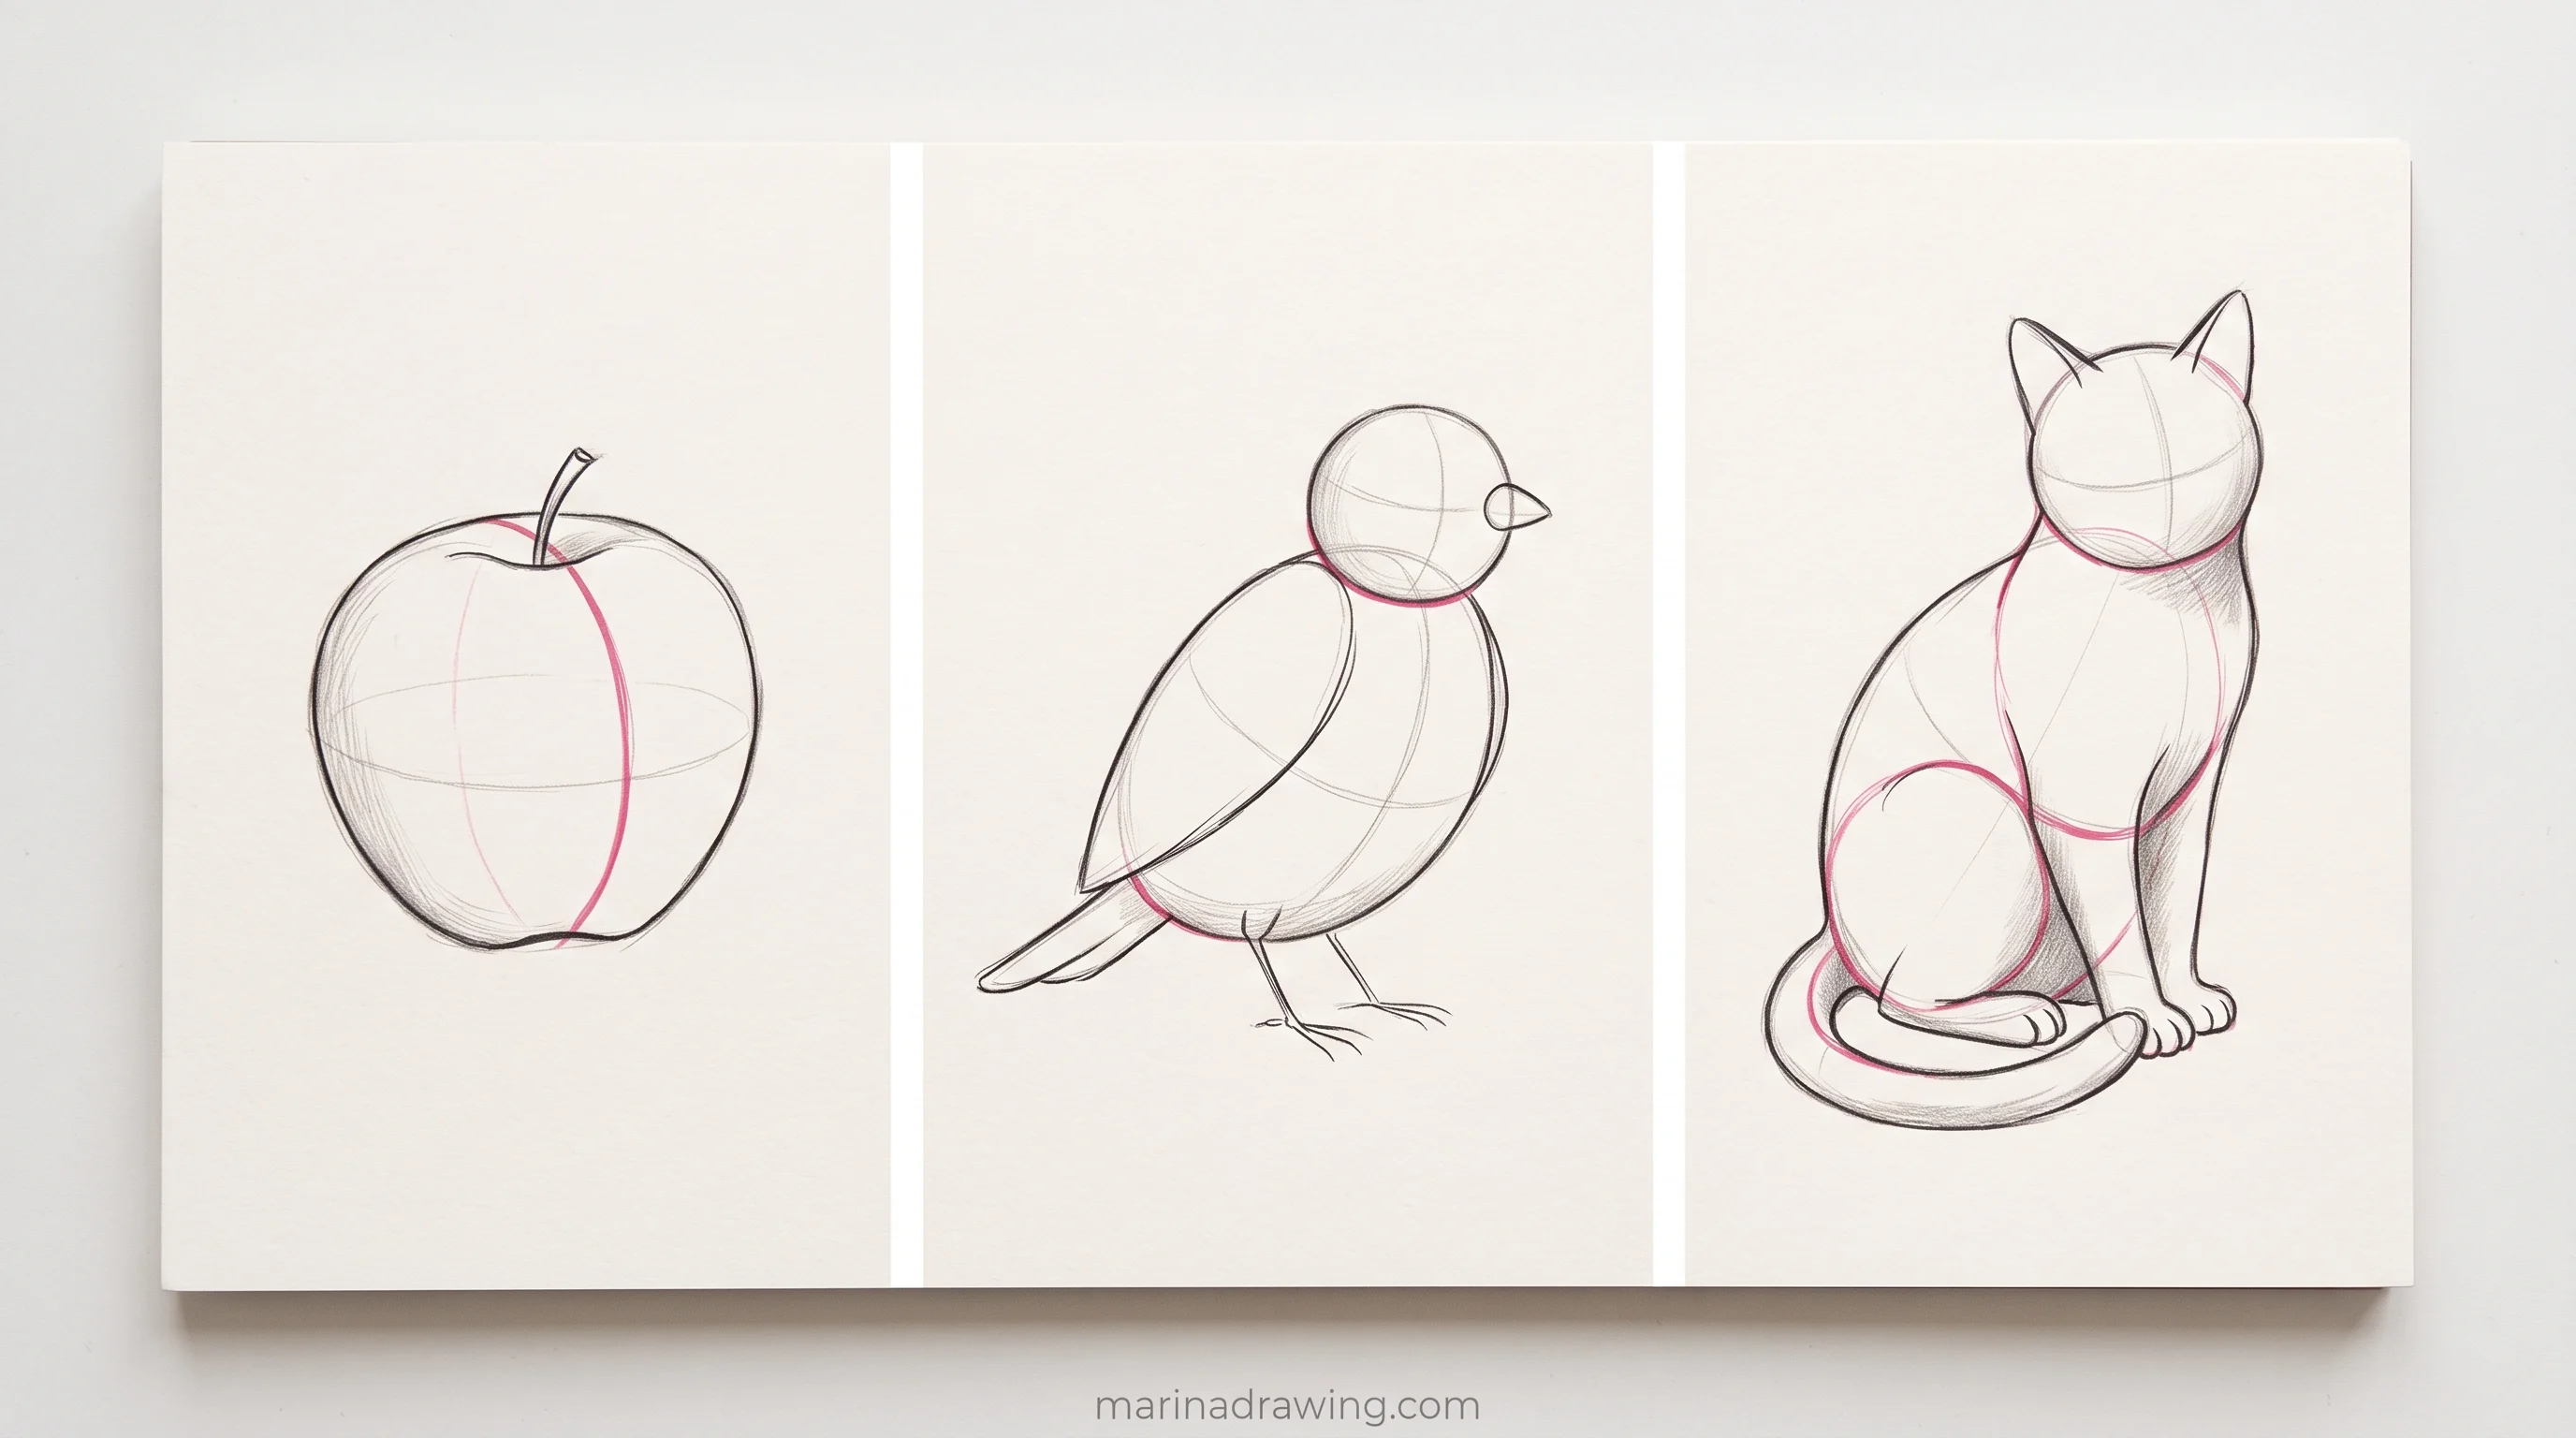
Draw the same mug as a cylinder first, with a centre line through it, and your ellipses have to agree with each other before the outline ever goes on.
 Pin it
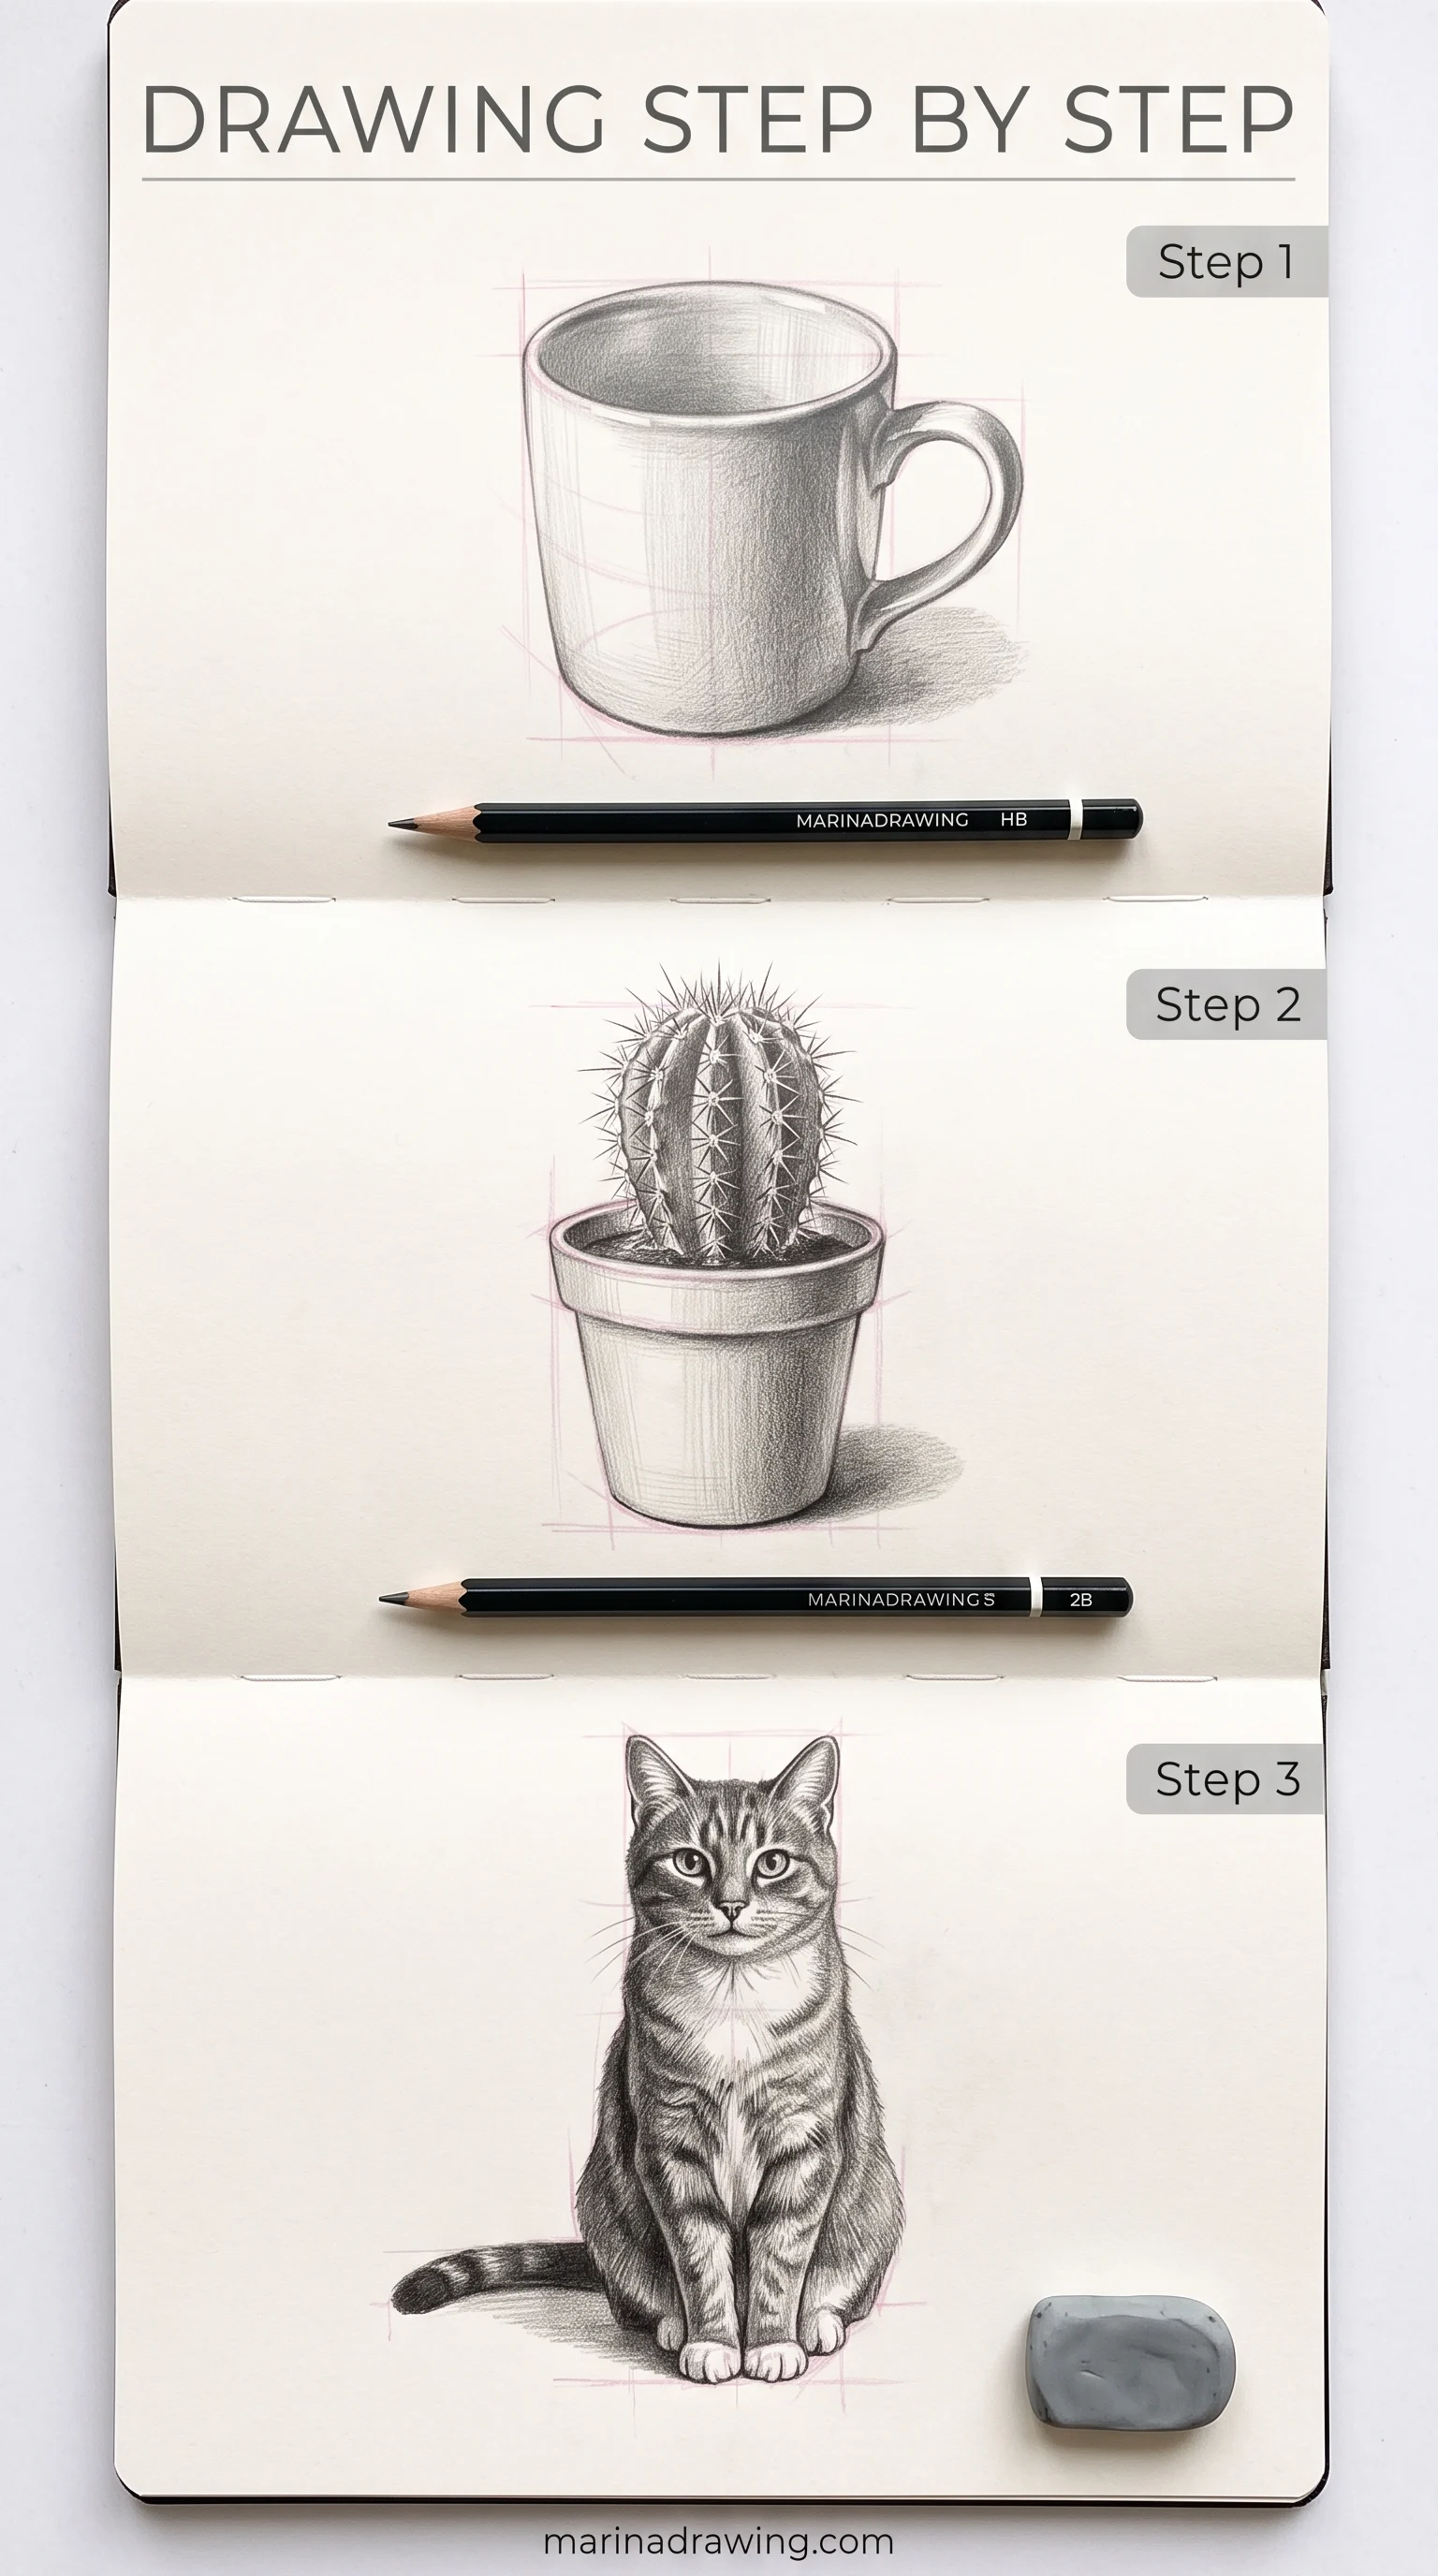
Same rule, three subjects.
Self-taught artists feel this without naming it. Across 6641 text posts on four drawing forums, 72 described the problem as “it looks off” or “something’s wrong” with no cause attached.
Construction or block-in, the words for the fix, came up in 91 posts, 1.4% of everything written there. People can see that the page is wrong. They don’t have the word for why.
When your drawing looks off, it almost always started from the outline. The outline is the last line you draw, the edge where the forms you built meet the air.
The second reason is the list itself. The standard roundup of easy things to draw gives thirty subjects in four groups and says there’s no wrong place to start. That’s kind, but it’s wrong for your page.
Pick a cat on day one and you’re handling a sphere, an egg, a tail that overlaps the body (the simple animal drawings guide splits those into separate steps) and ears that have to agree in size, all at once.
Your drawing comes out off and every one of those five things is a suspect.
I learned the order by watching it happen rather than reading it: the graphite lessons put the cylinder down on screen before a single outline goes on.
You’ve probably met the other half of this advice: start with the fundamentals. A beginner on one of those forums put it best, everyone says start with fundamentals and nobody says what fundamentals are.
Here’s the working answer you can use tonight. Fundamentals is a sequence: one form, then two forms that touch, then forms that overlap and leave space between them.
The Ladder: Ten Subjects, One New Problem Each
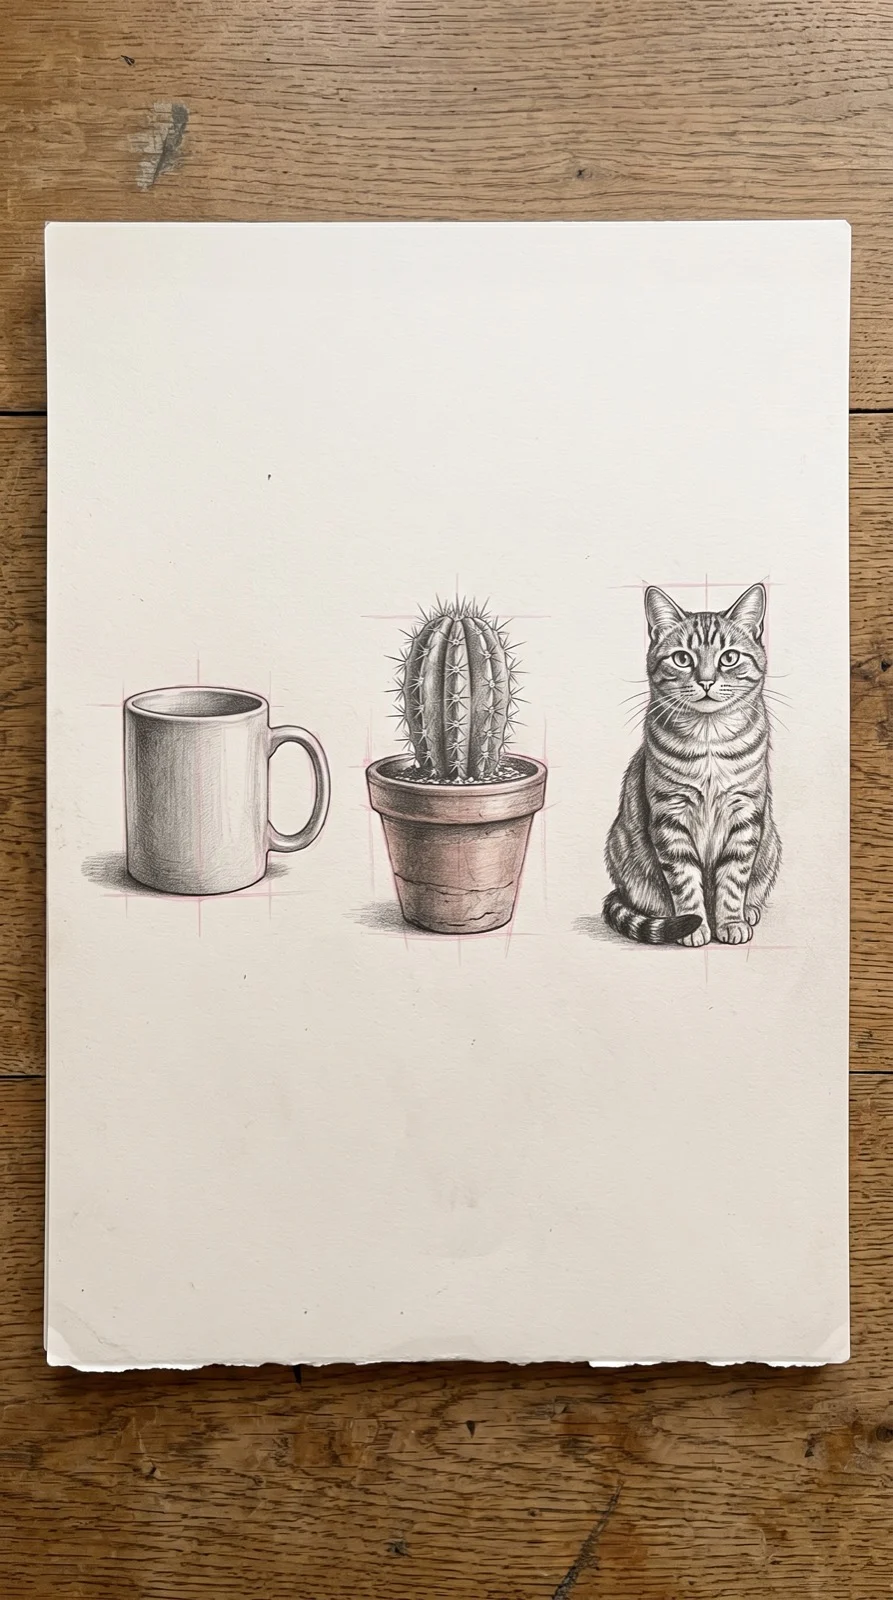
Every rung keeps what the last one taught you and adds one thing. That’s the whole trick. When rung six looks off and rung five didn’t, the culprit is whatever rung six added, and you check that first.
 Pin it
Here is the whole ladder in one table. Read it before you draw anything.
 Pin it
Three rungs, three kinds of problem.
 Pin it
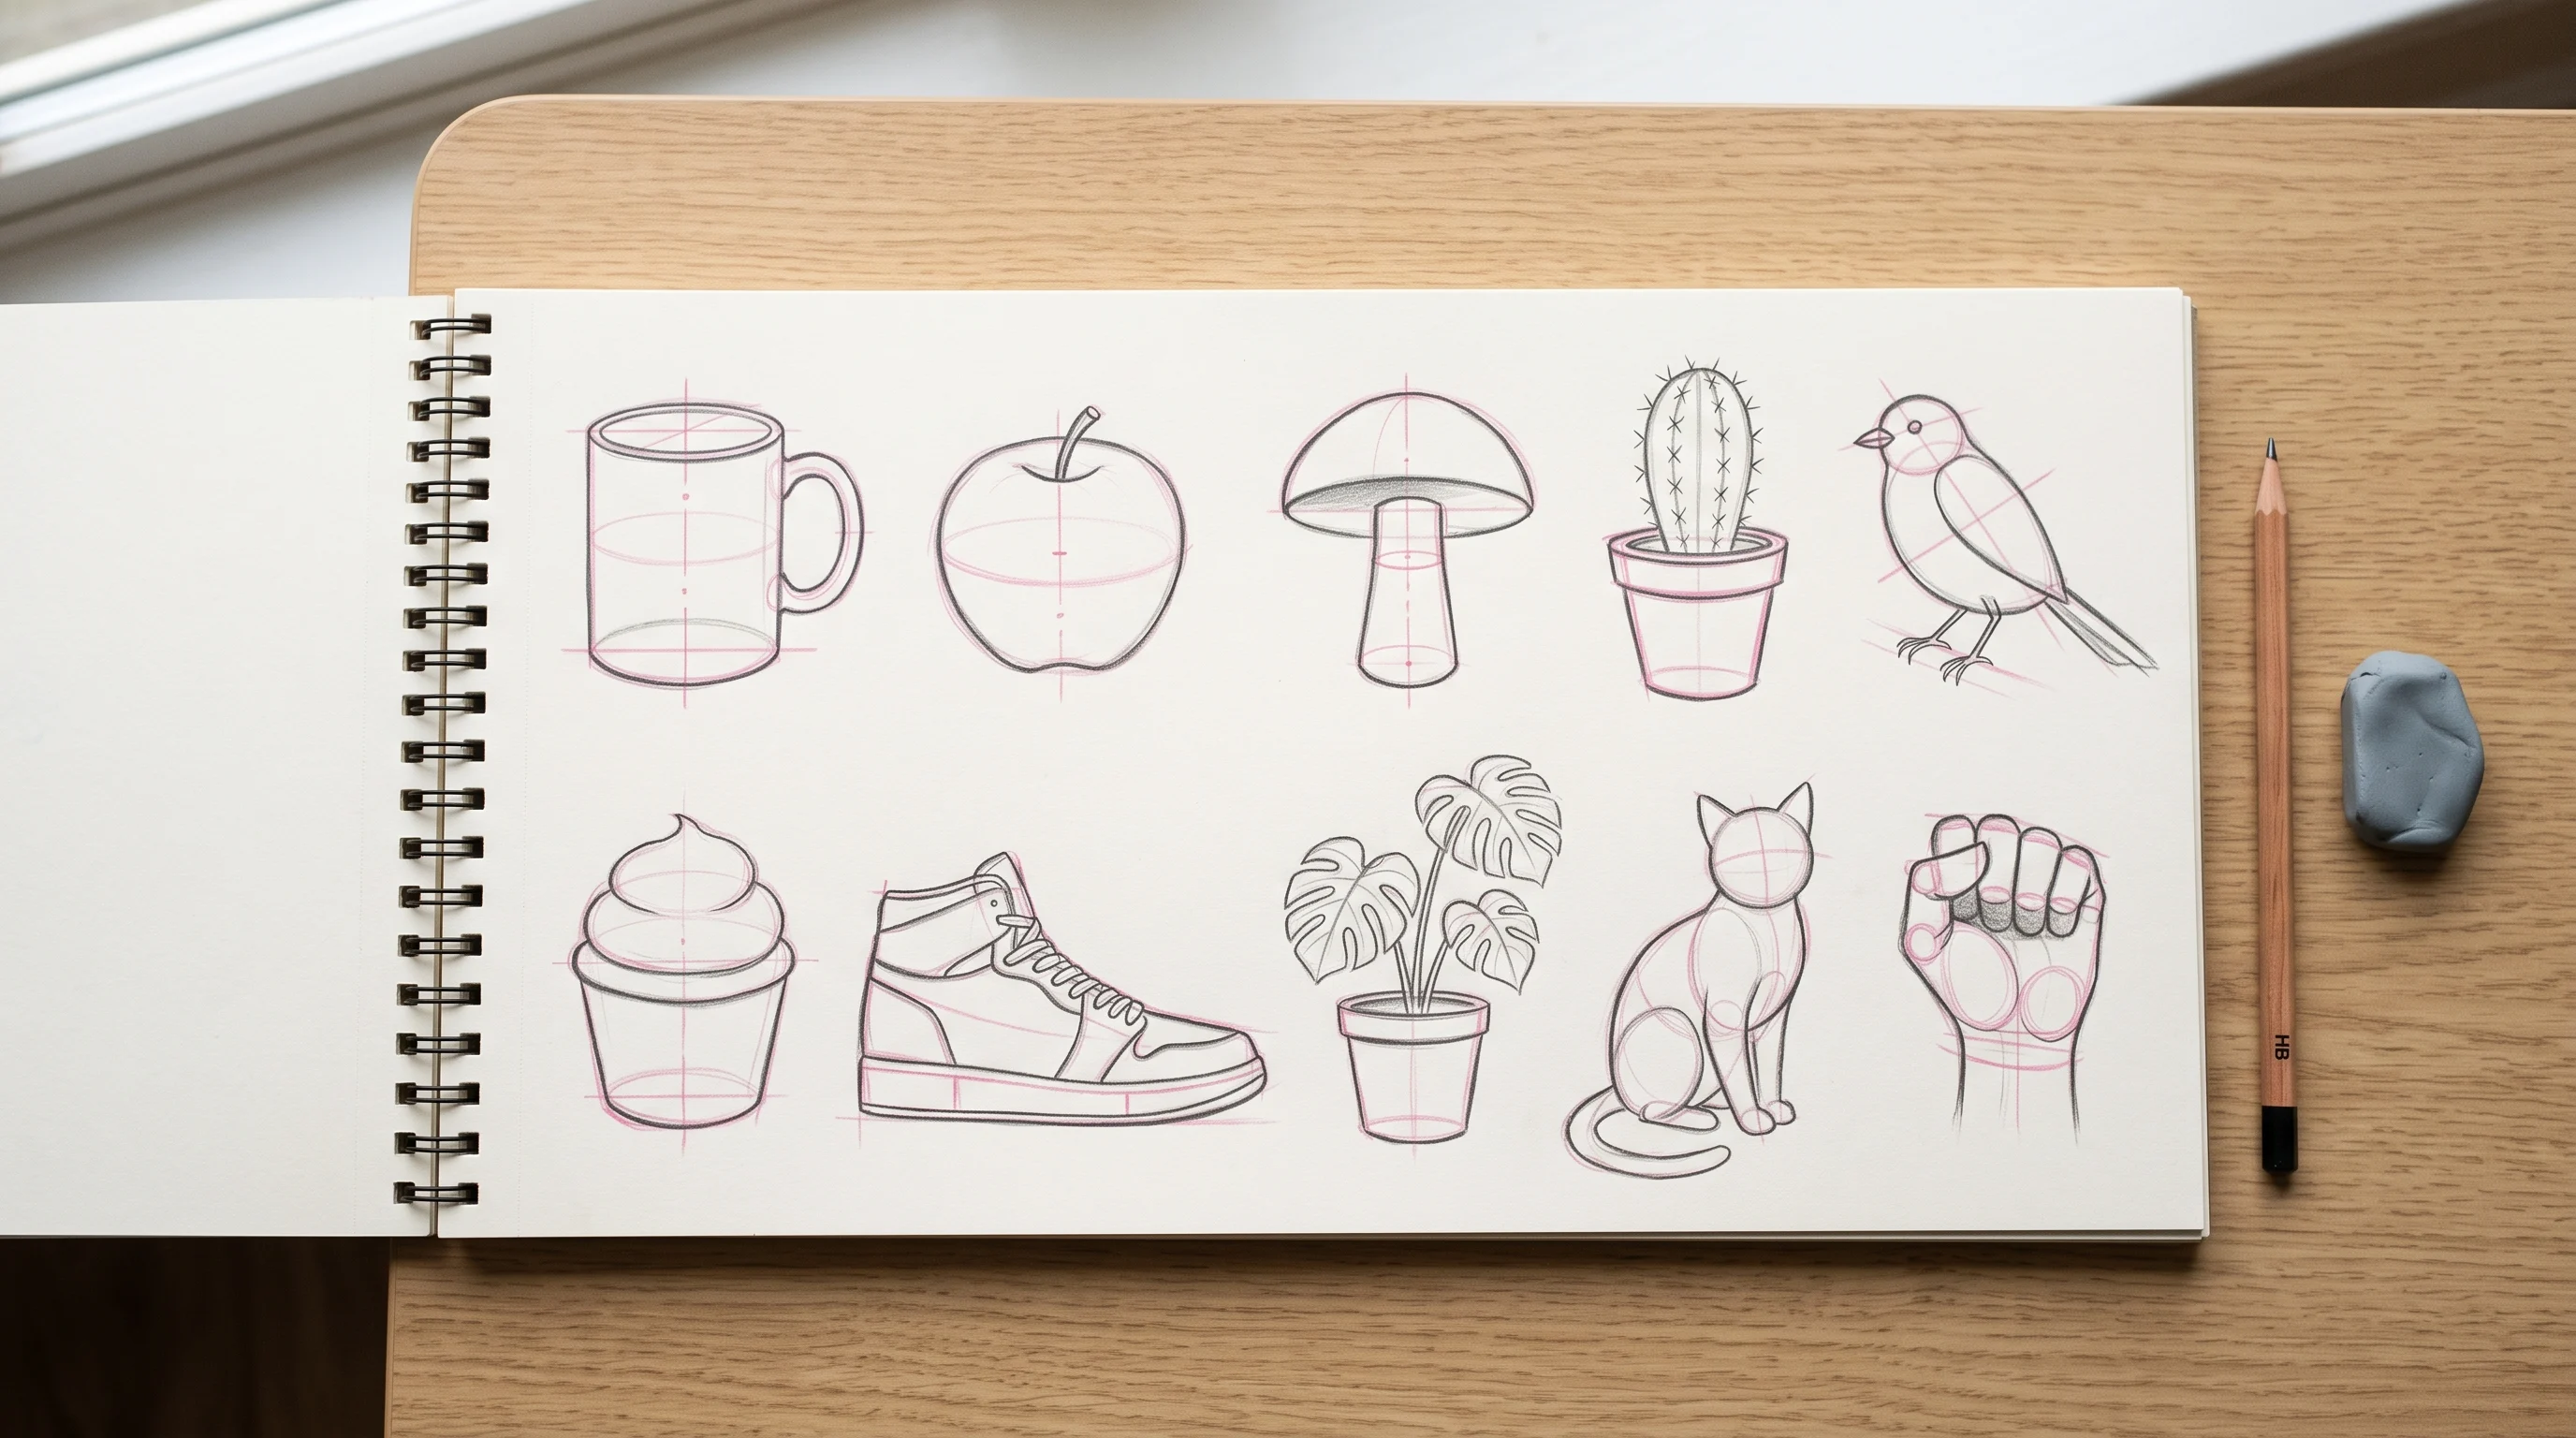
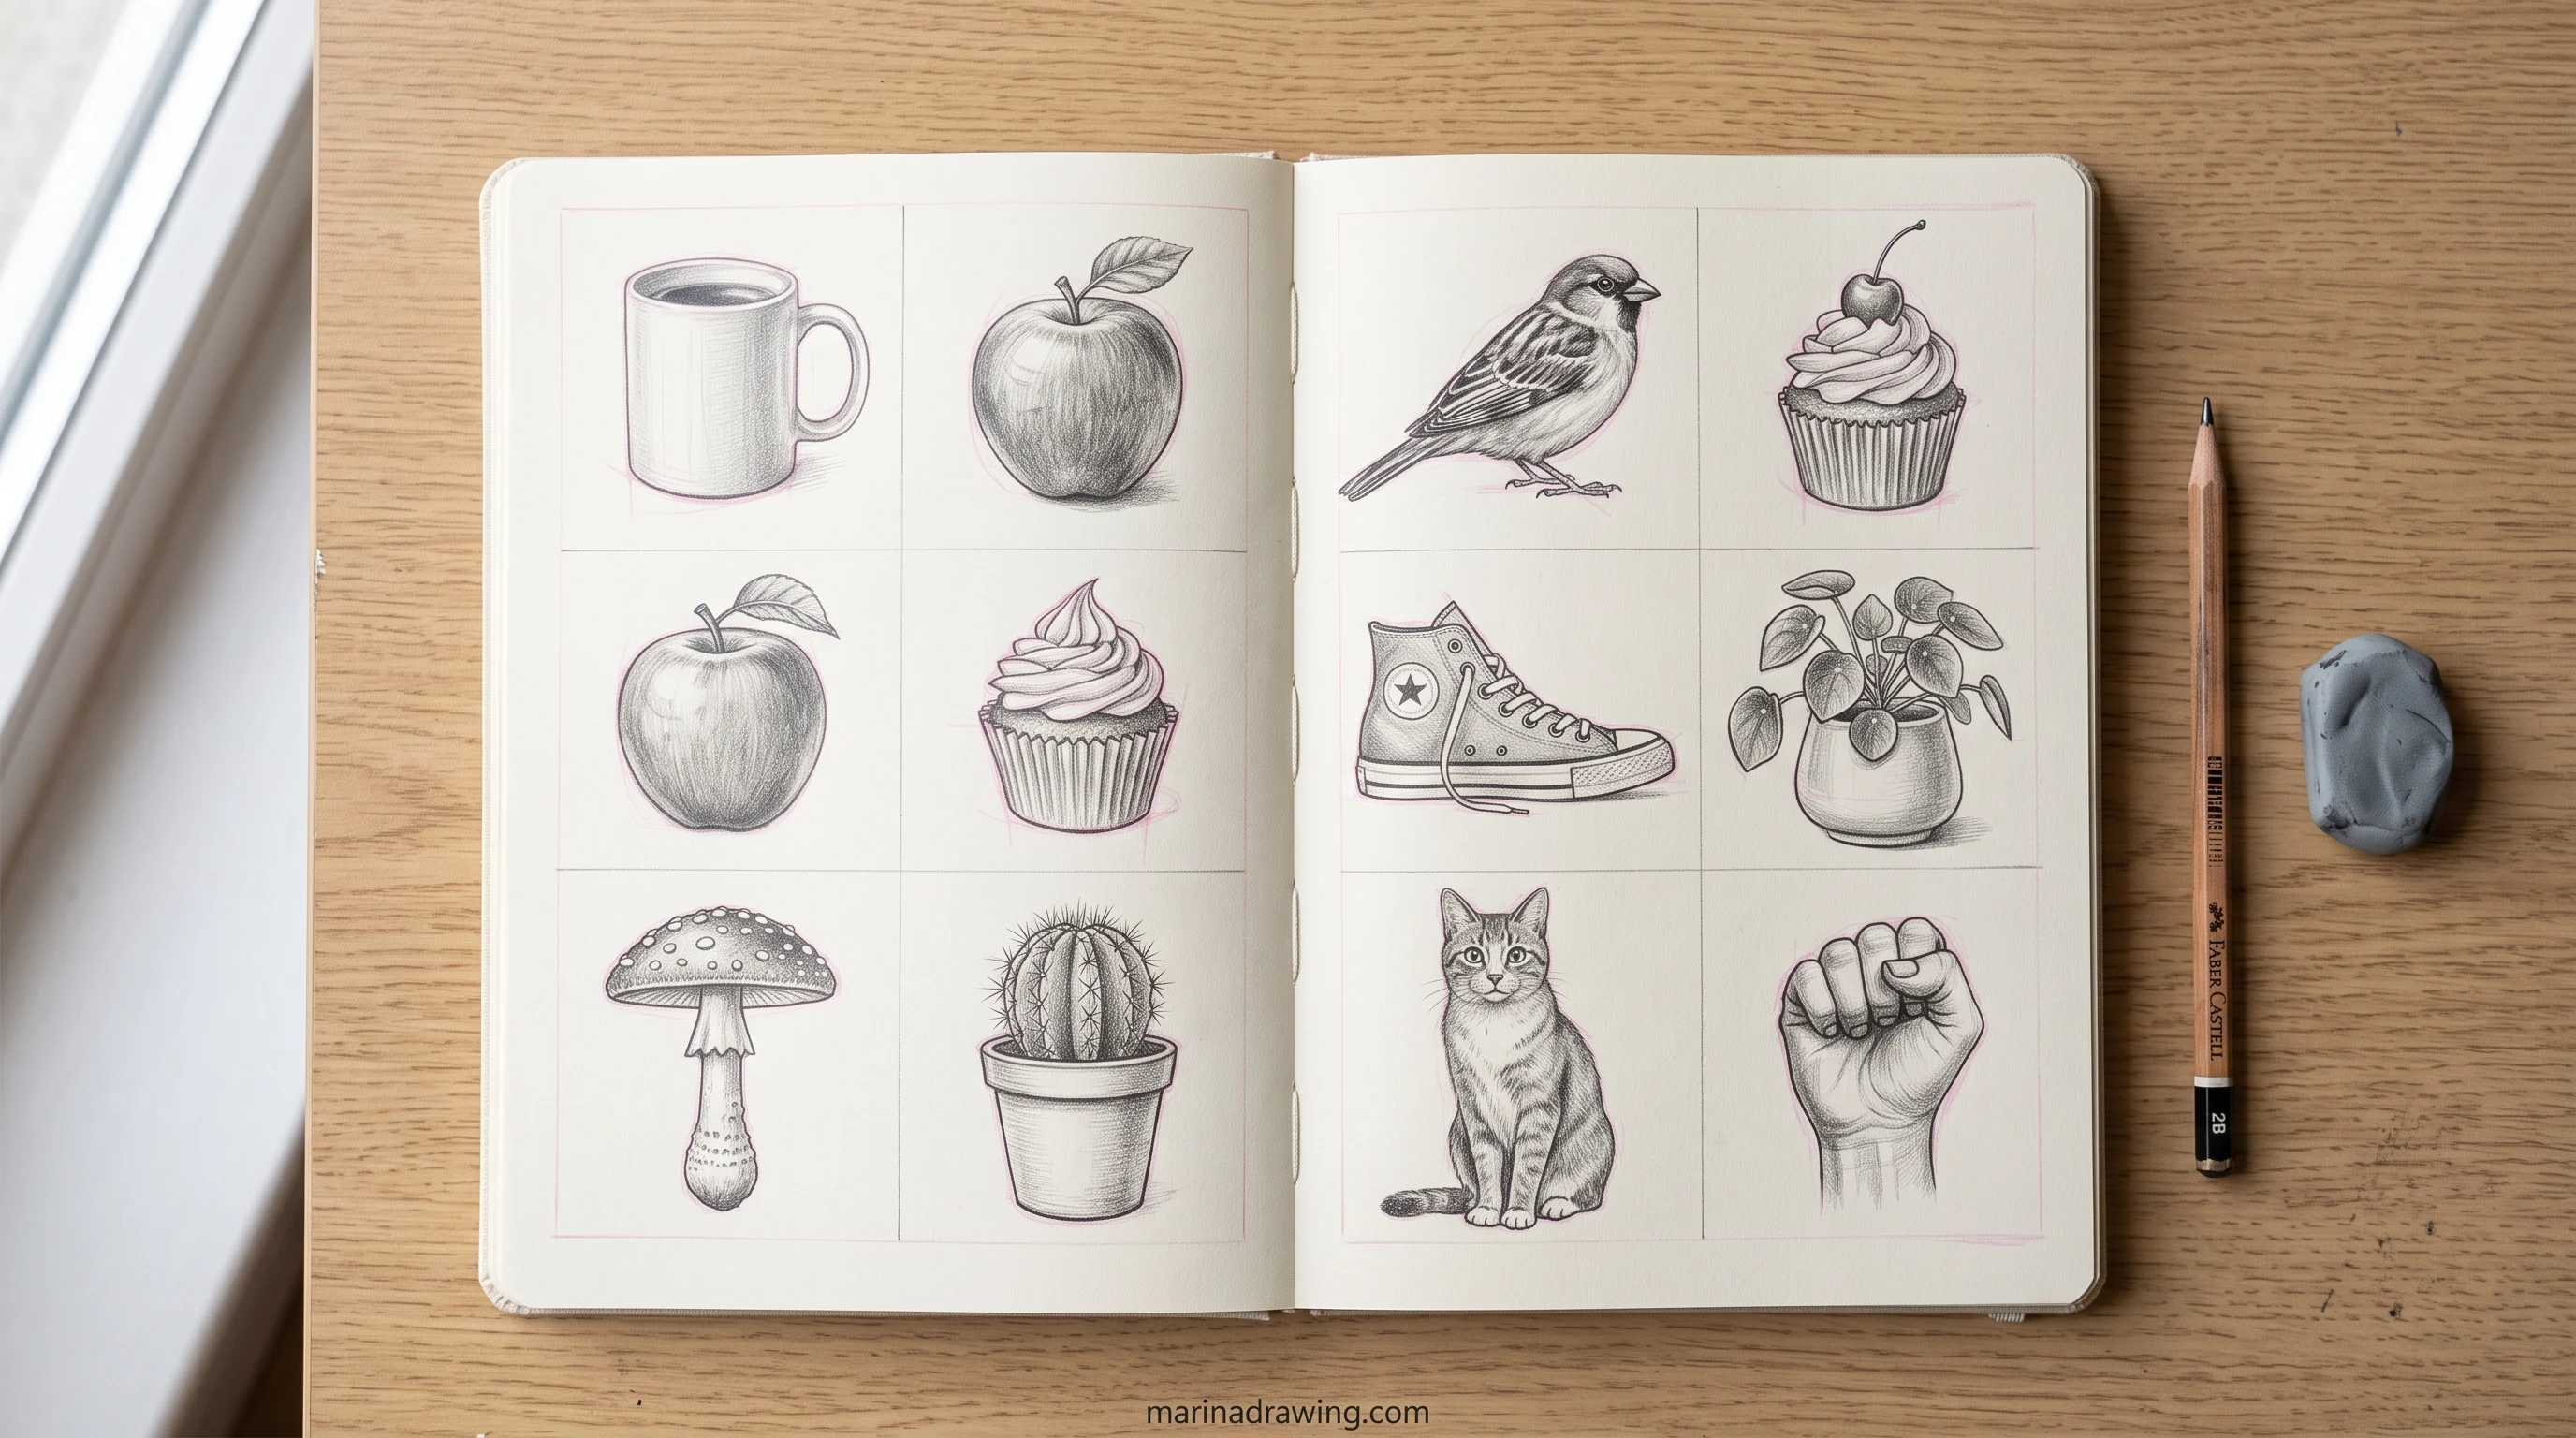
Ten rungs, one spread.
| Rung | Subject | New problem | Passed when |
|---|---|---|---|
| 1 | Mug | A cylinder and two ellipses that agree | Top and bottom ellipses share one centre line |
| 2 | Apple | A sphere that isn’t a circle | The dip at the stem sits on a curved surface, not on the edge |
| 3 | Mushroom | A form sitting on another form | The cap’s underside ellipse wraps around the stalk |
| 4 | Cactus in a pot | Two forms of different sizes touching | The cactus sits inside the pot’s rim, not on top of it |
| 5 | Bird | Two forms joined at an angle | The head turns without breaking the neck line |
| 6 | Cupcake | A soft form on a hard one | The frosting overhangs the liner on every side |
| 7 | Sneaker | A long form seen in perspective | The far end is smaller than the near end, and the sole curves up at the toe |
| 8 | Houseplant in a pot | Leaves overlapping each other | You can say which leaf is in front, for every leaf |
| 9 | Sitting cat | Overlap plus the space between forms | The gap between tail and body reads as a real gap |
| 10 | Fist | Four forms pressed together, one overlapping | The knuckles step down in a curve, not in a straight row |
Read the last column twice before you start. It’s the part nobody puts next to a list of easy drawing ideas, and without it a beginner has no way to know whether to draw the mug again or move on.
The same climb, rung by rung, is what the pencil course spends its first hours on.
Rungs 1 to 3: One Solid Form
42 hours of pencil drawing training, lifetime access
The video course I point plateaued students to — full lessons on portraits, hands, and realistic shading, not another short tutorial.

The first three rungs each hold one main form. They’re very easy drawings for beginners on purpose, because the only thing being tested is whether the form goes down before the outline.
Get these right and every later rung you draw has something to stand on.
1. The Mug
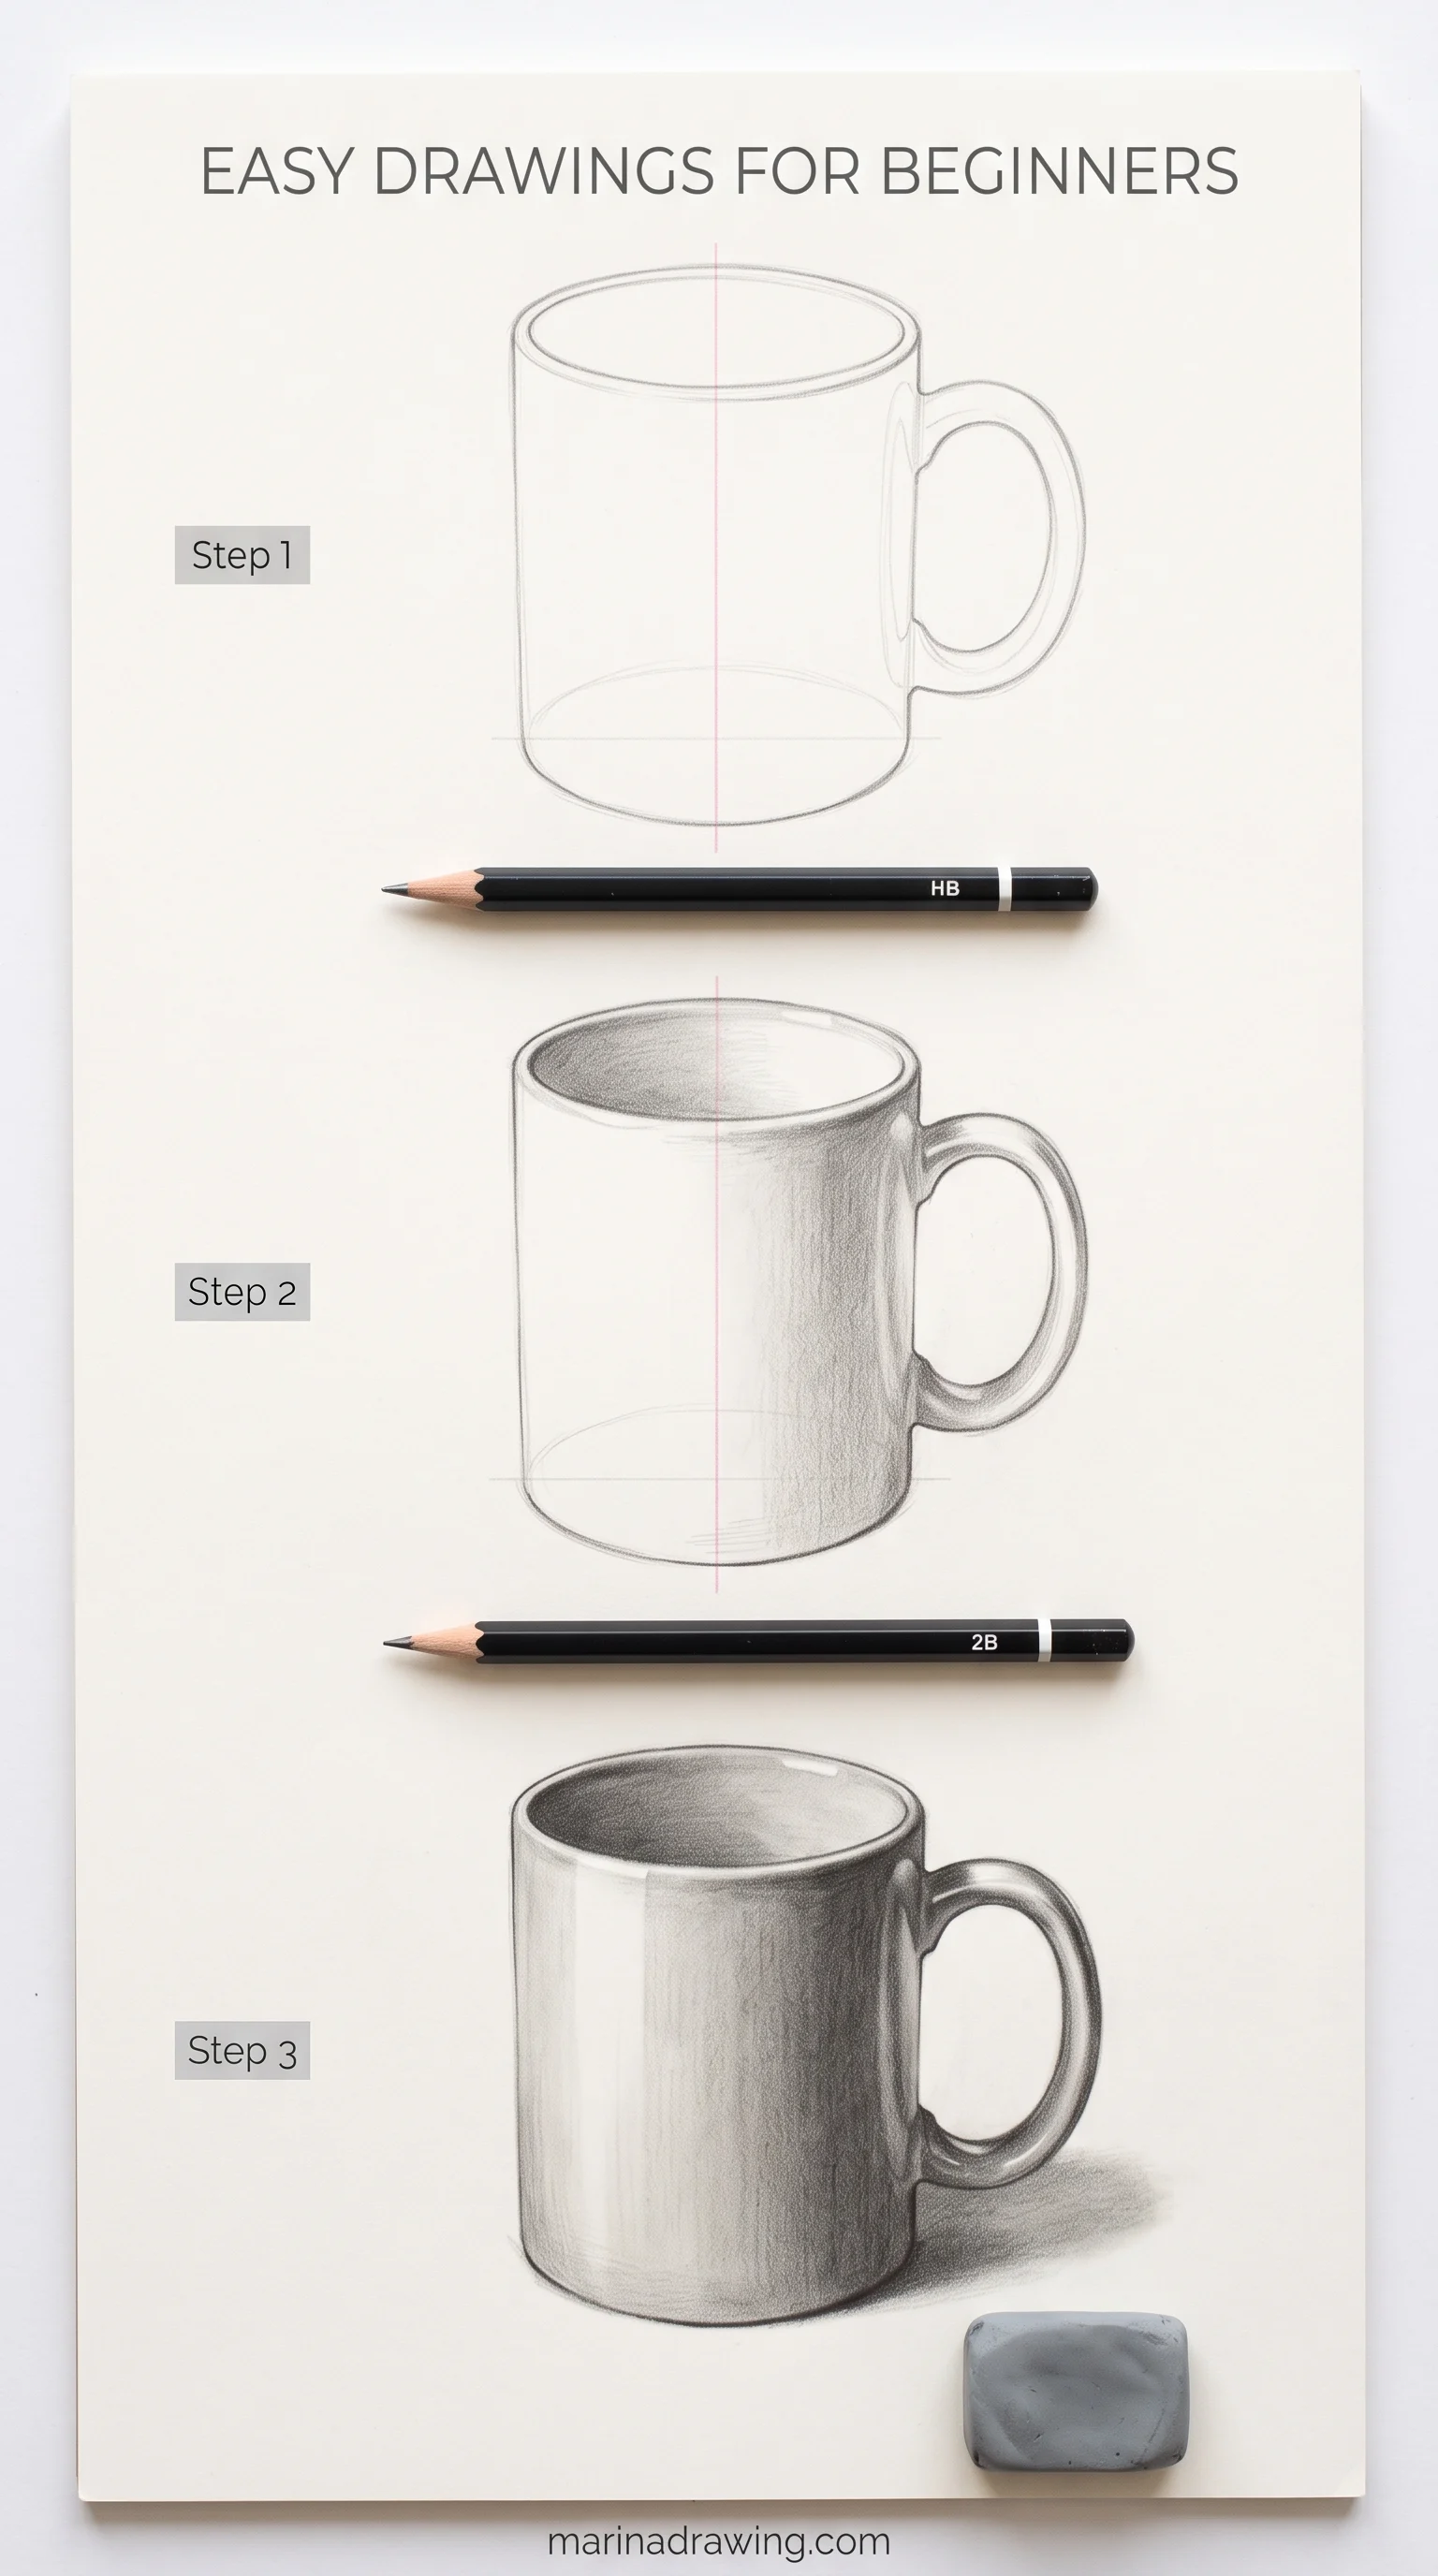
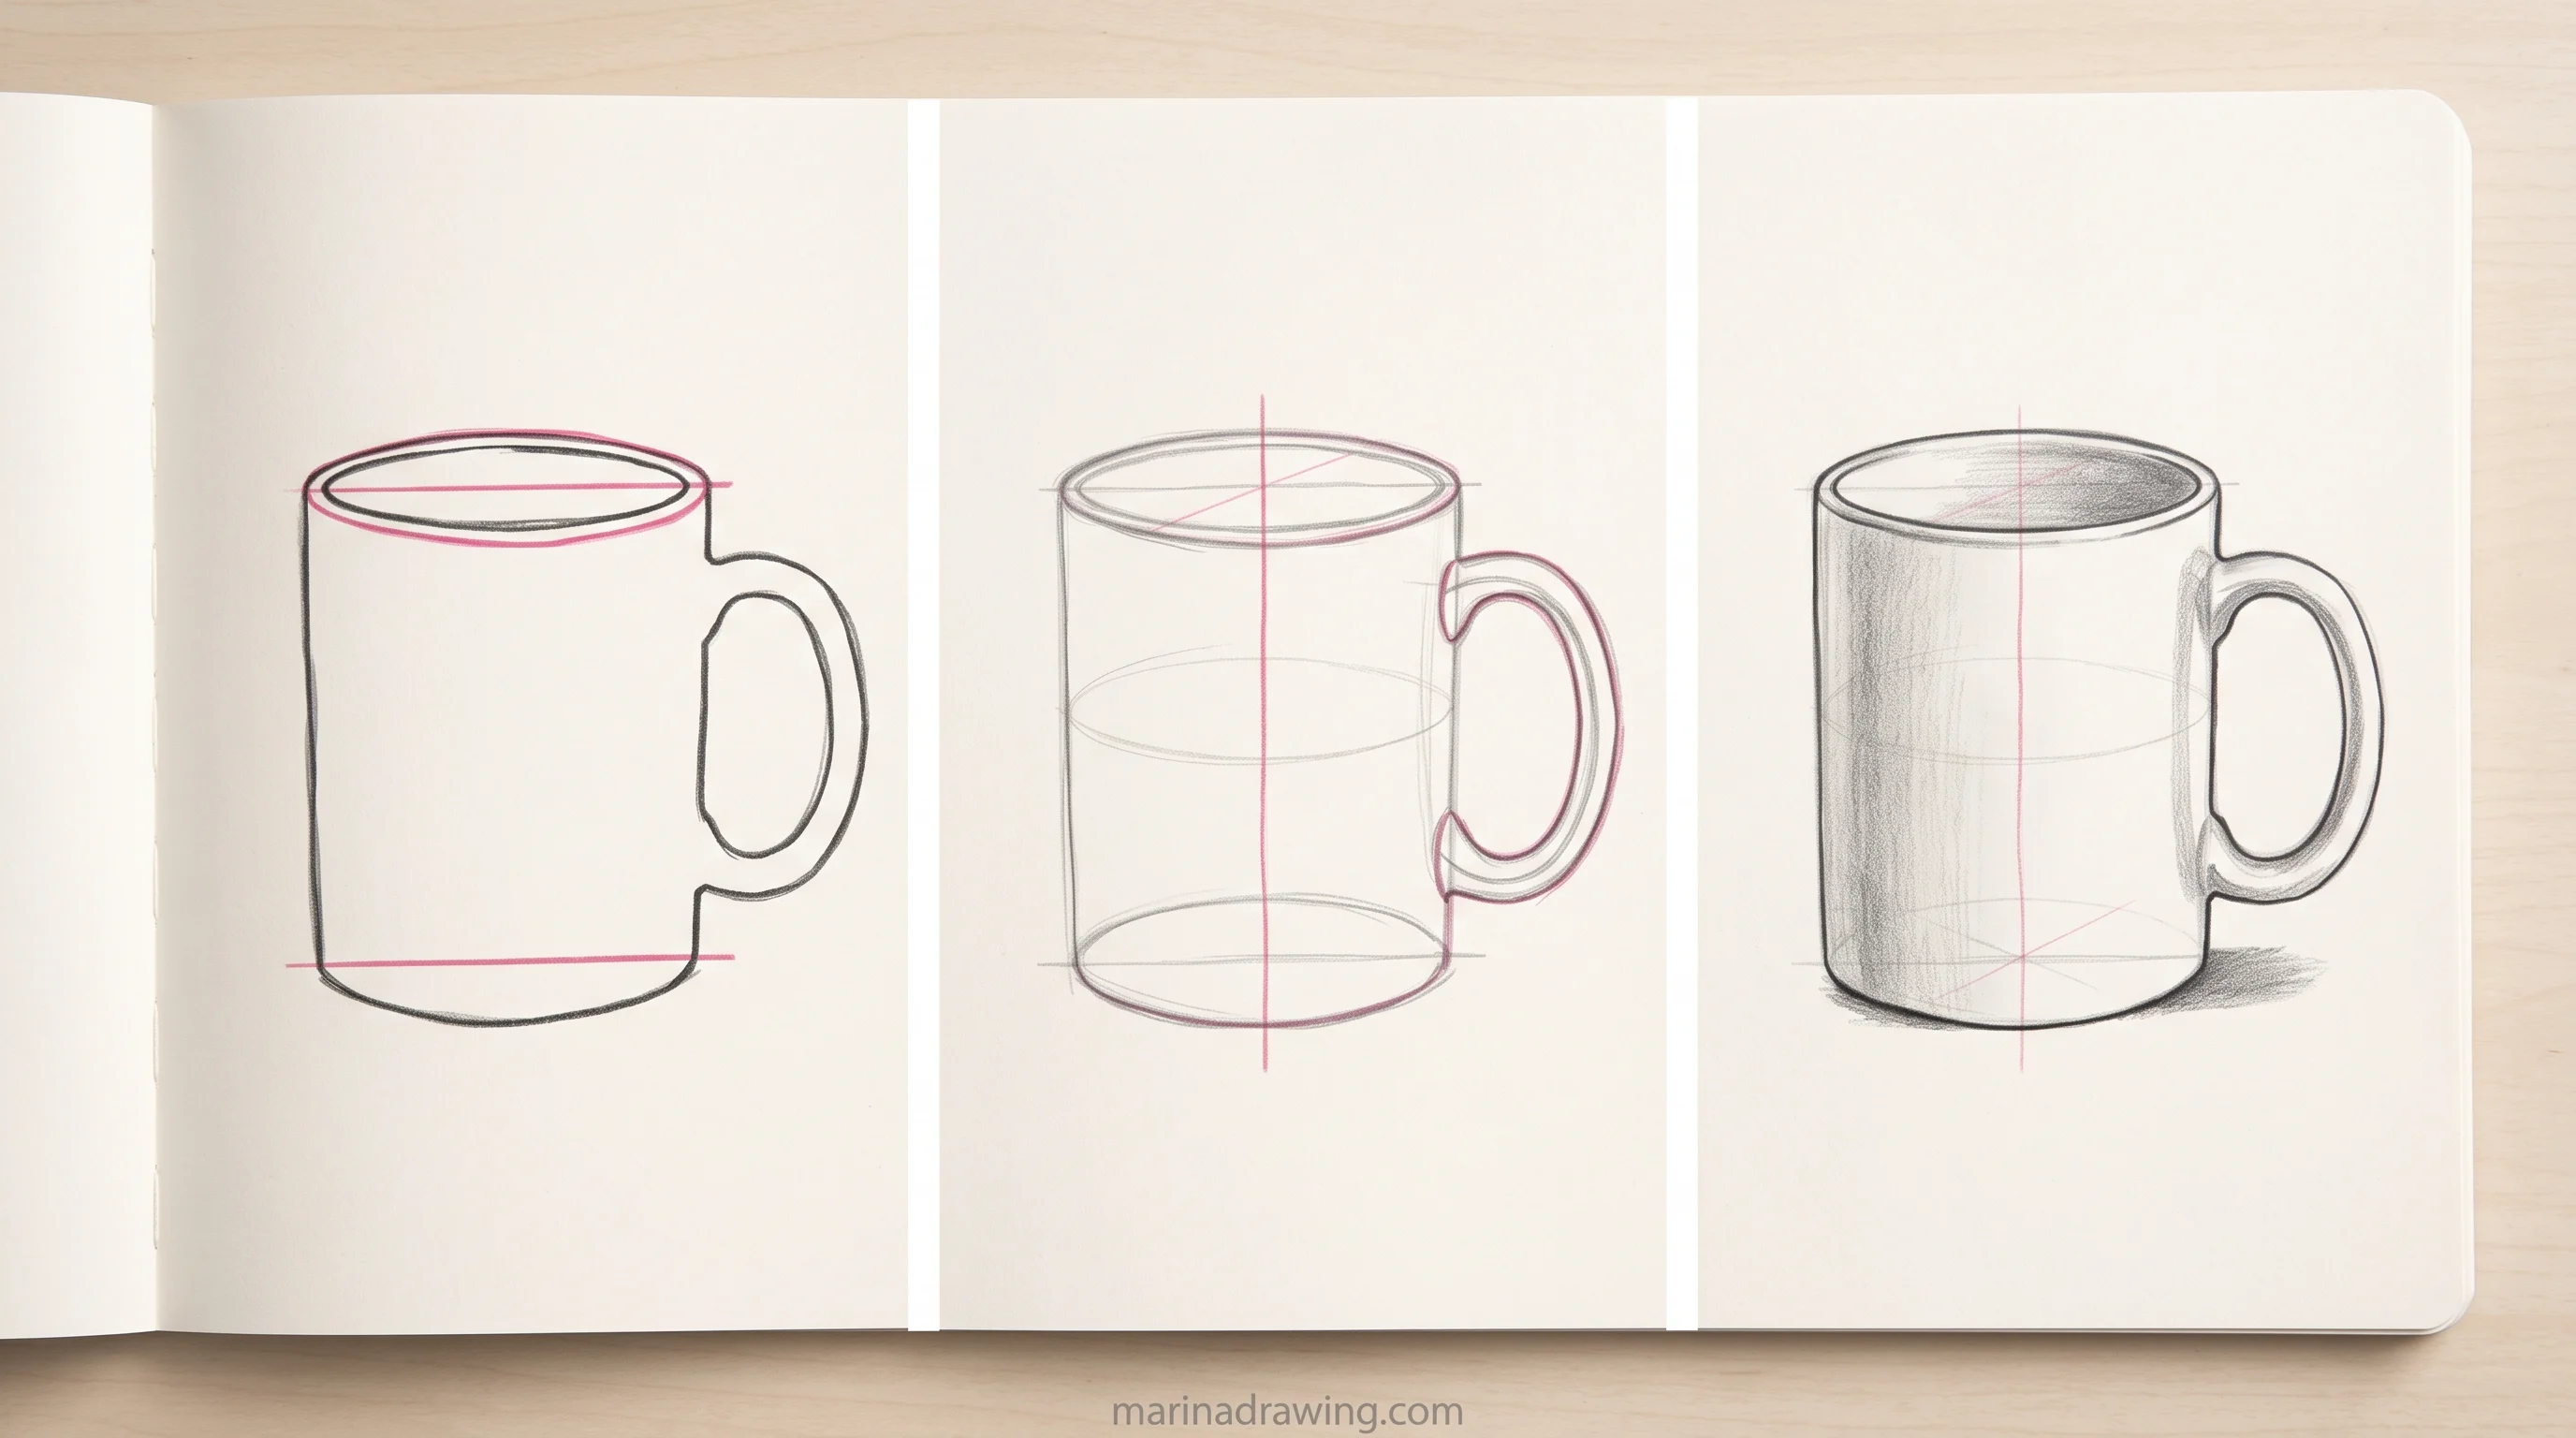
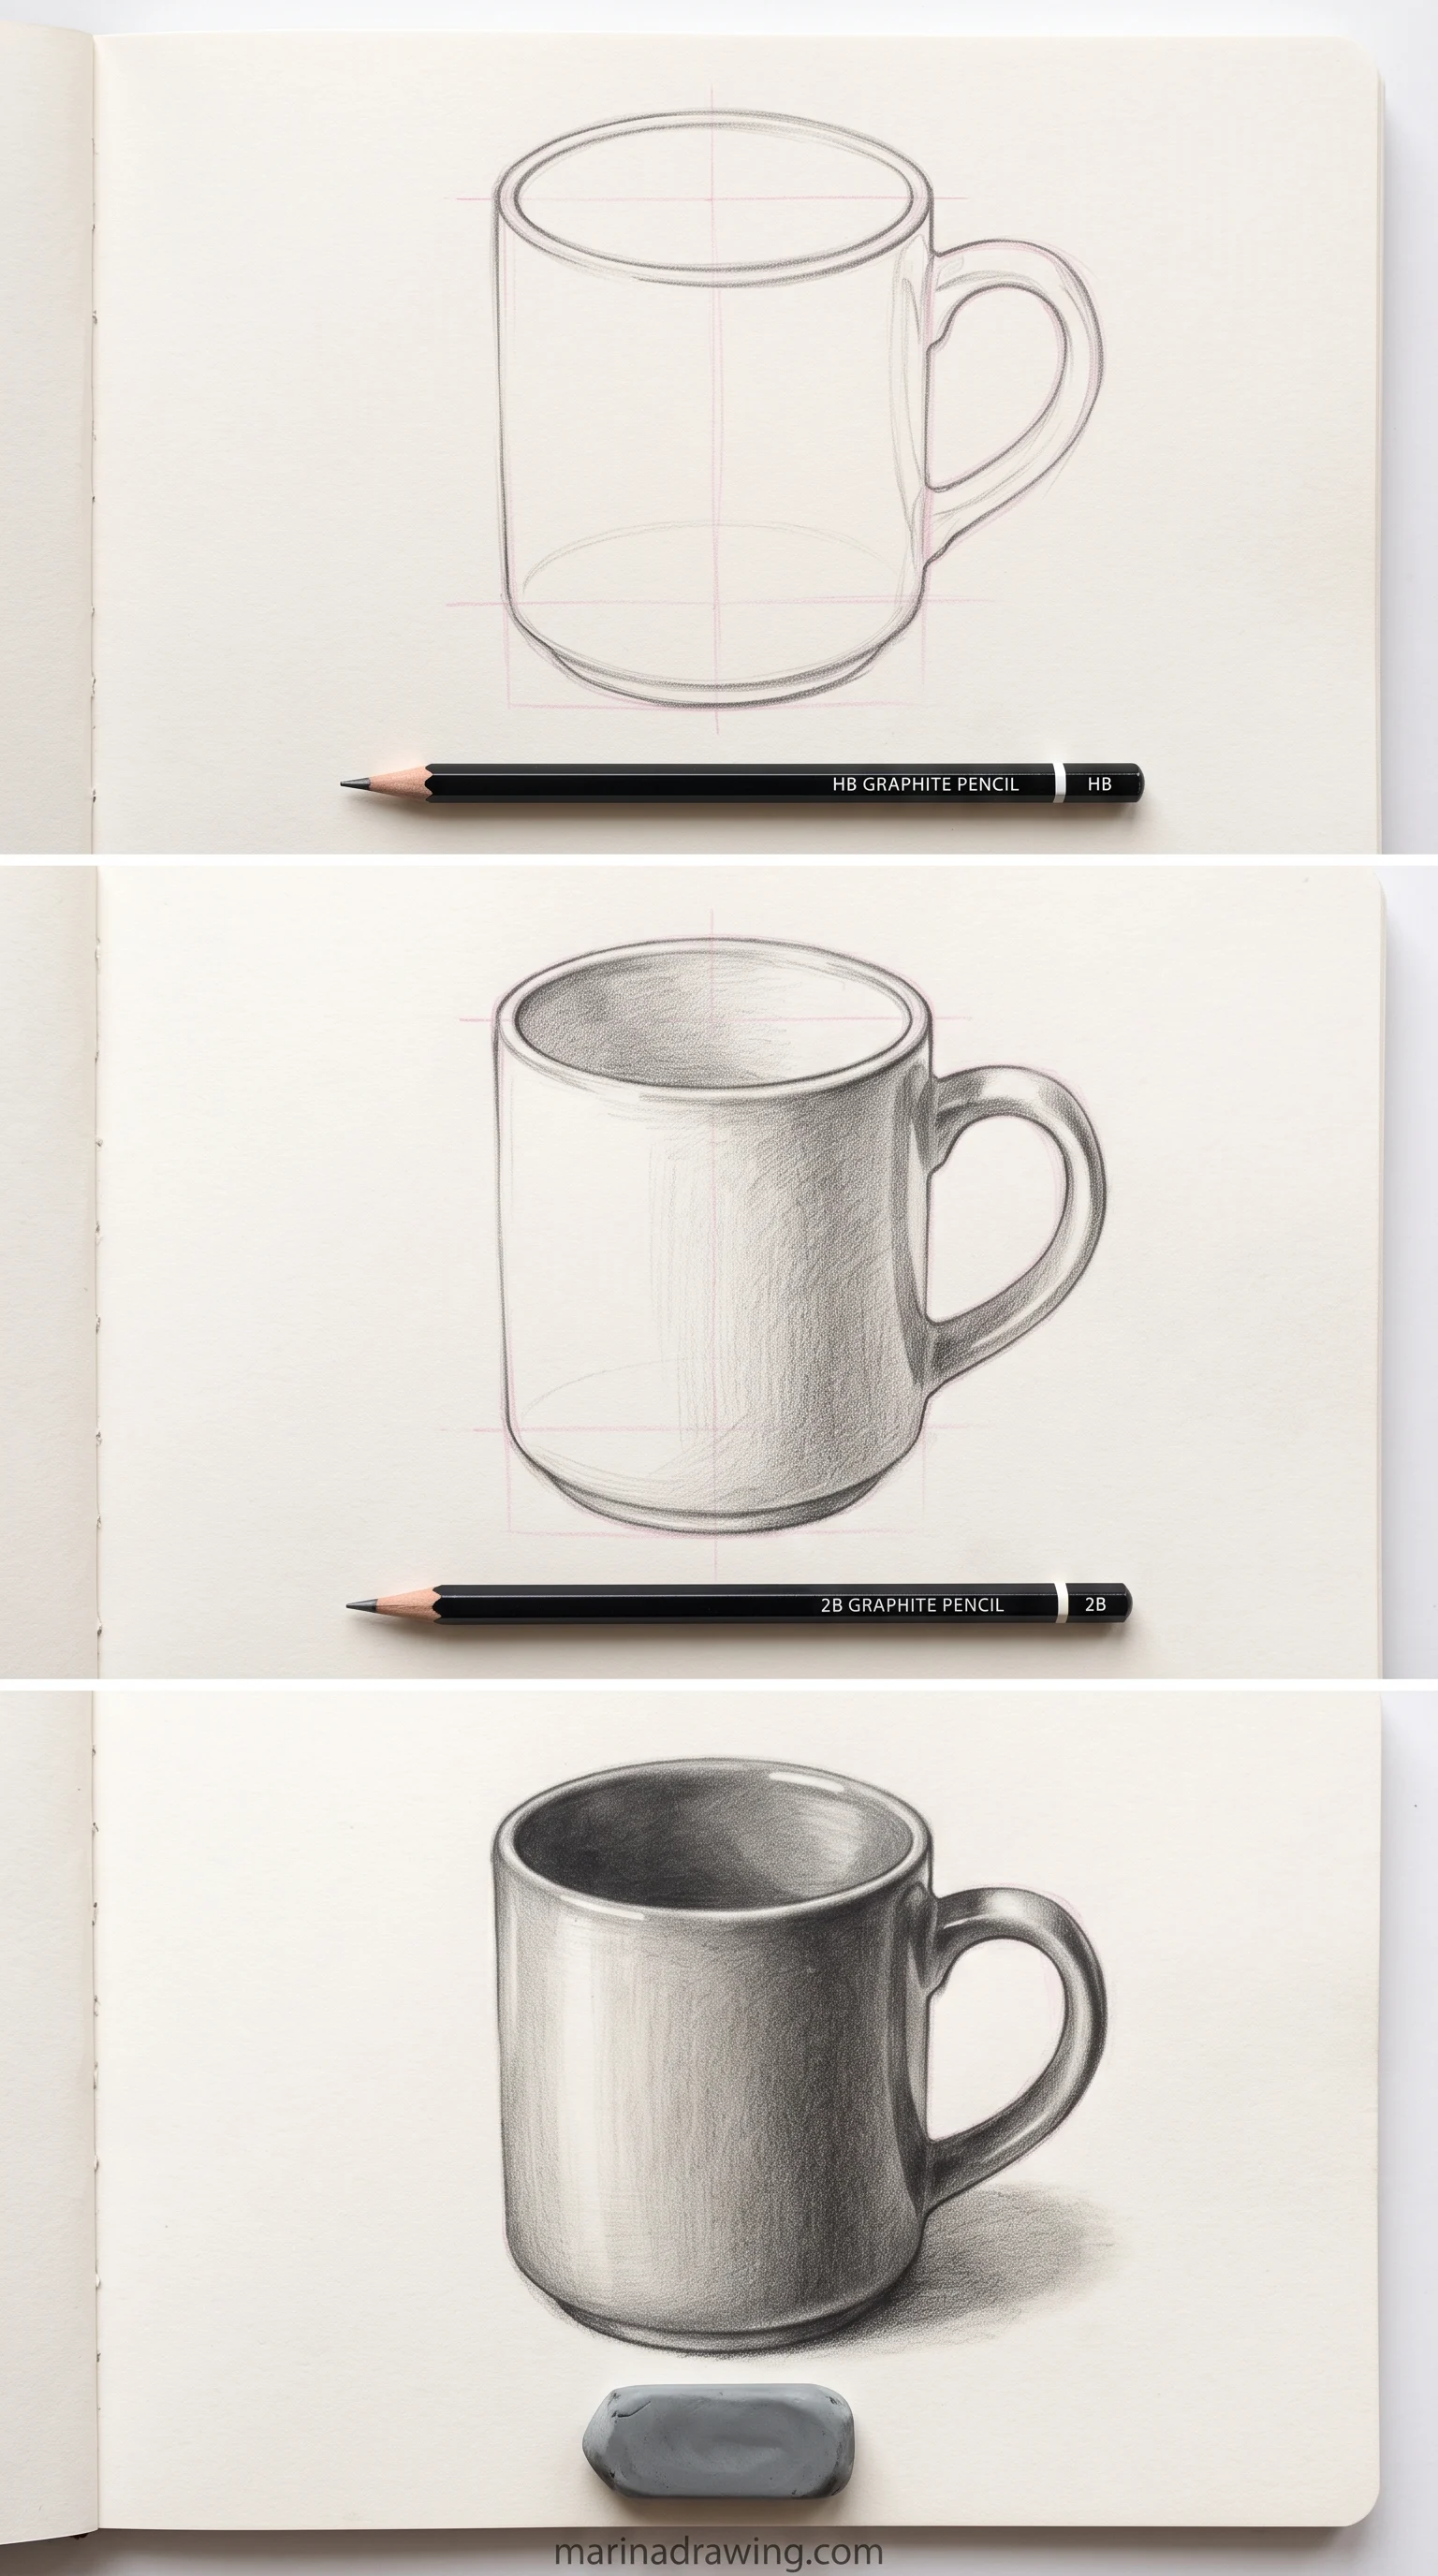
A mug is a cylinder with a handle. First on the paper: a light vertical centre line, then the top ellipse, then the bottom ellipse, both cut in half by that line.
Then you connect them with two straight sides. The handle comes last, and you stick it on as a flattened ring on the cylinder’s side.
The typical error you’ll make is a flat top. Beginners draw the rim as a straight line with a curve under it, like a smile. A rim is a full ellipse, and the bottom ellipse is always a little rounder than the top one, because you look down at it more steeply.
The mug is passed when you can draw three in a row and both ellipses sit on the same centre line each time without erasing. If your ellipses keep drifting, watching one drawn at speed helps more than another sheet: the graphite lessons open on simple objects like this one.
 Pin it
 Pin it
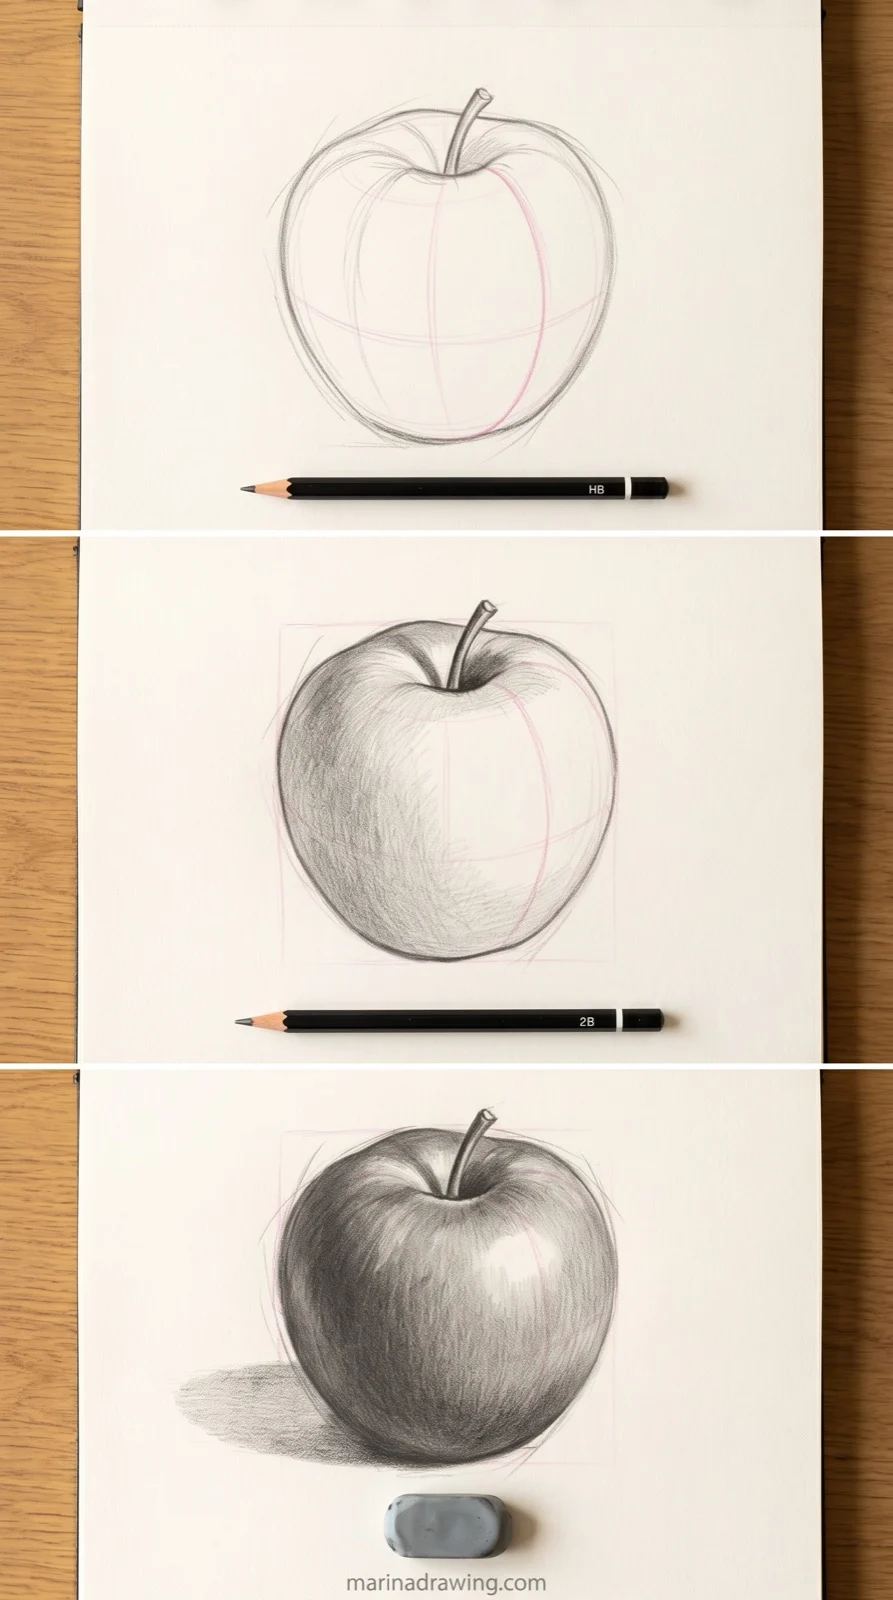
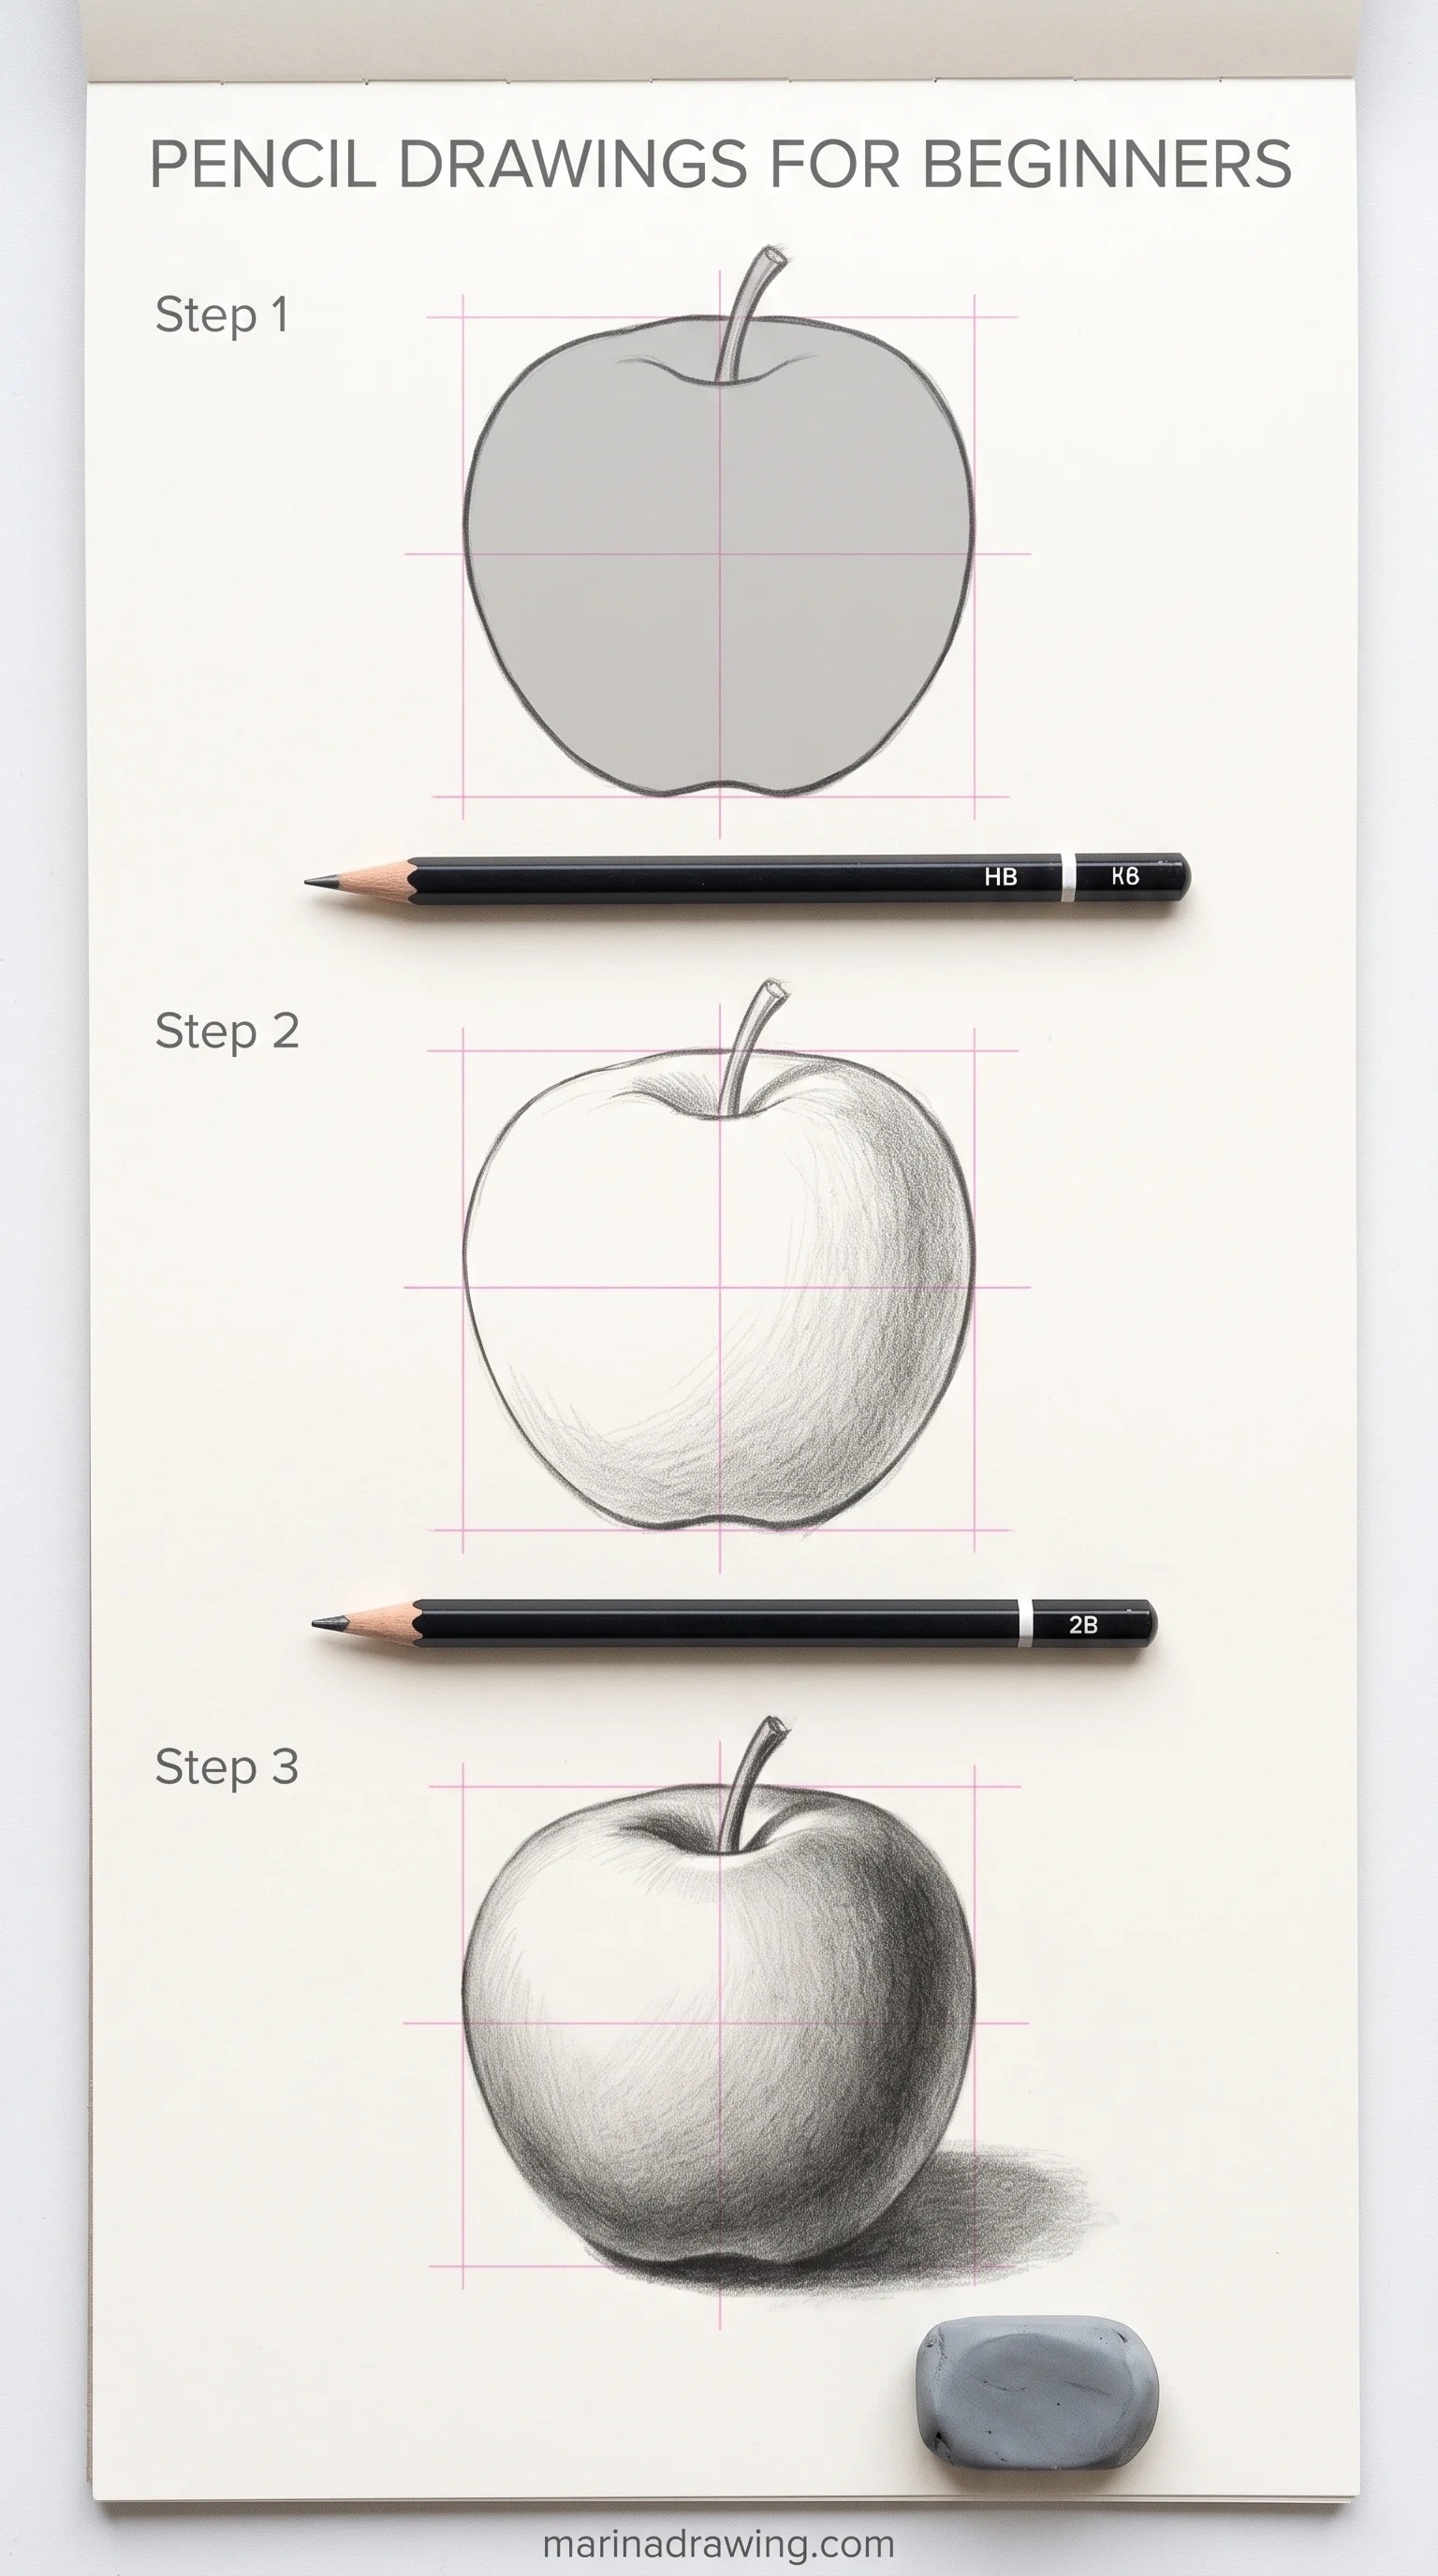
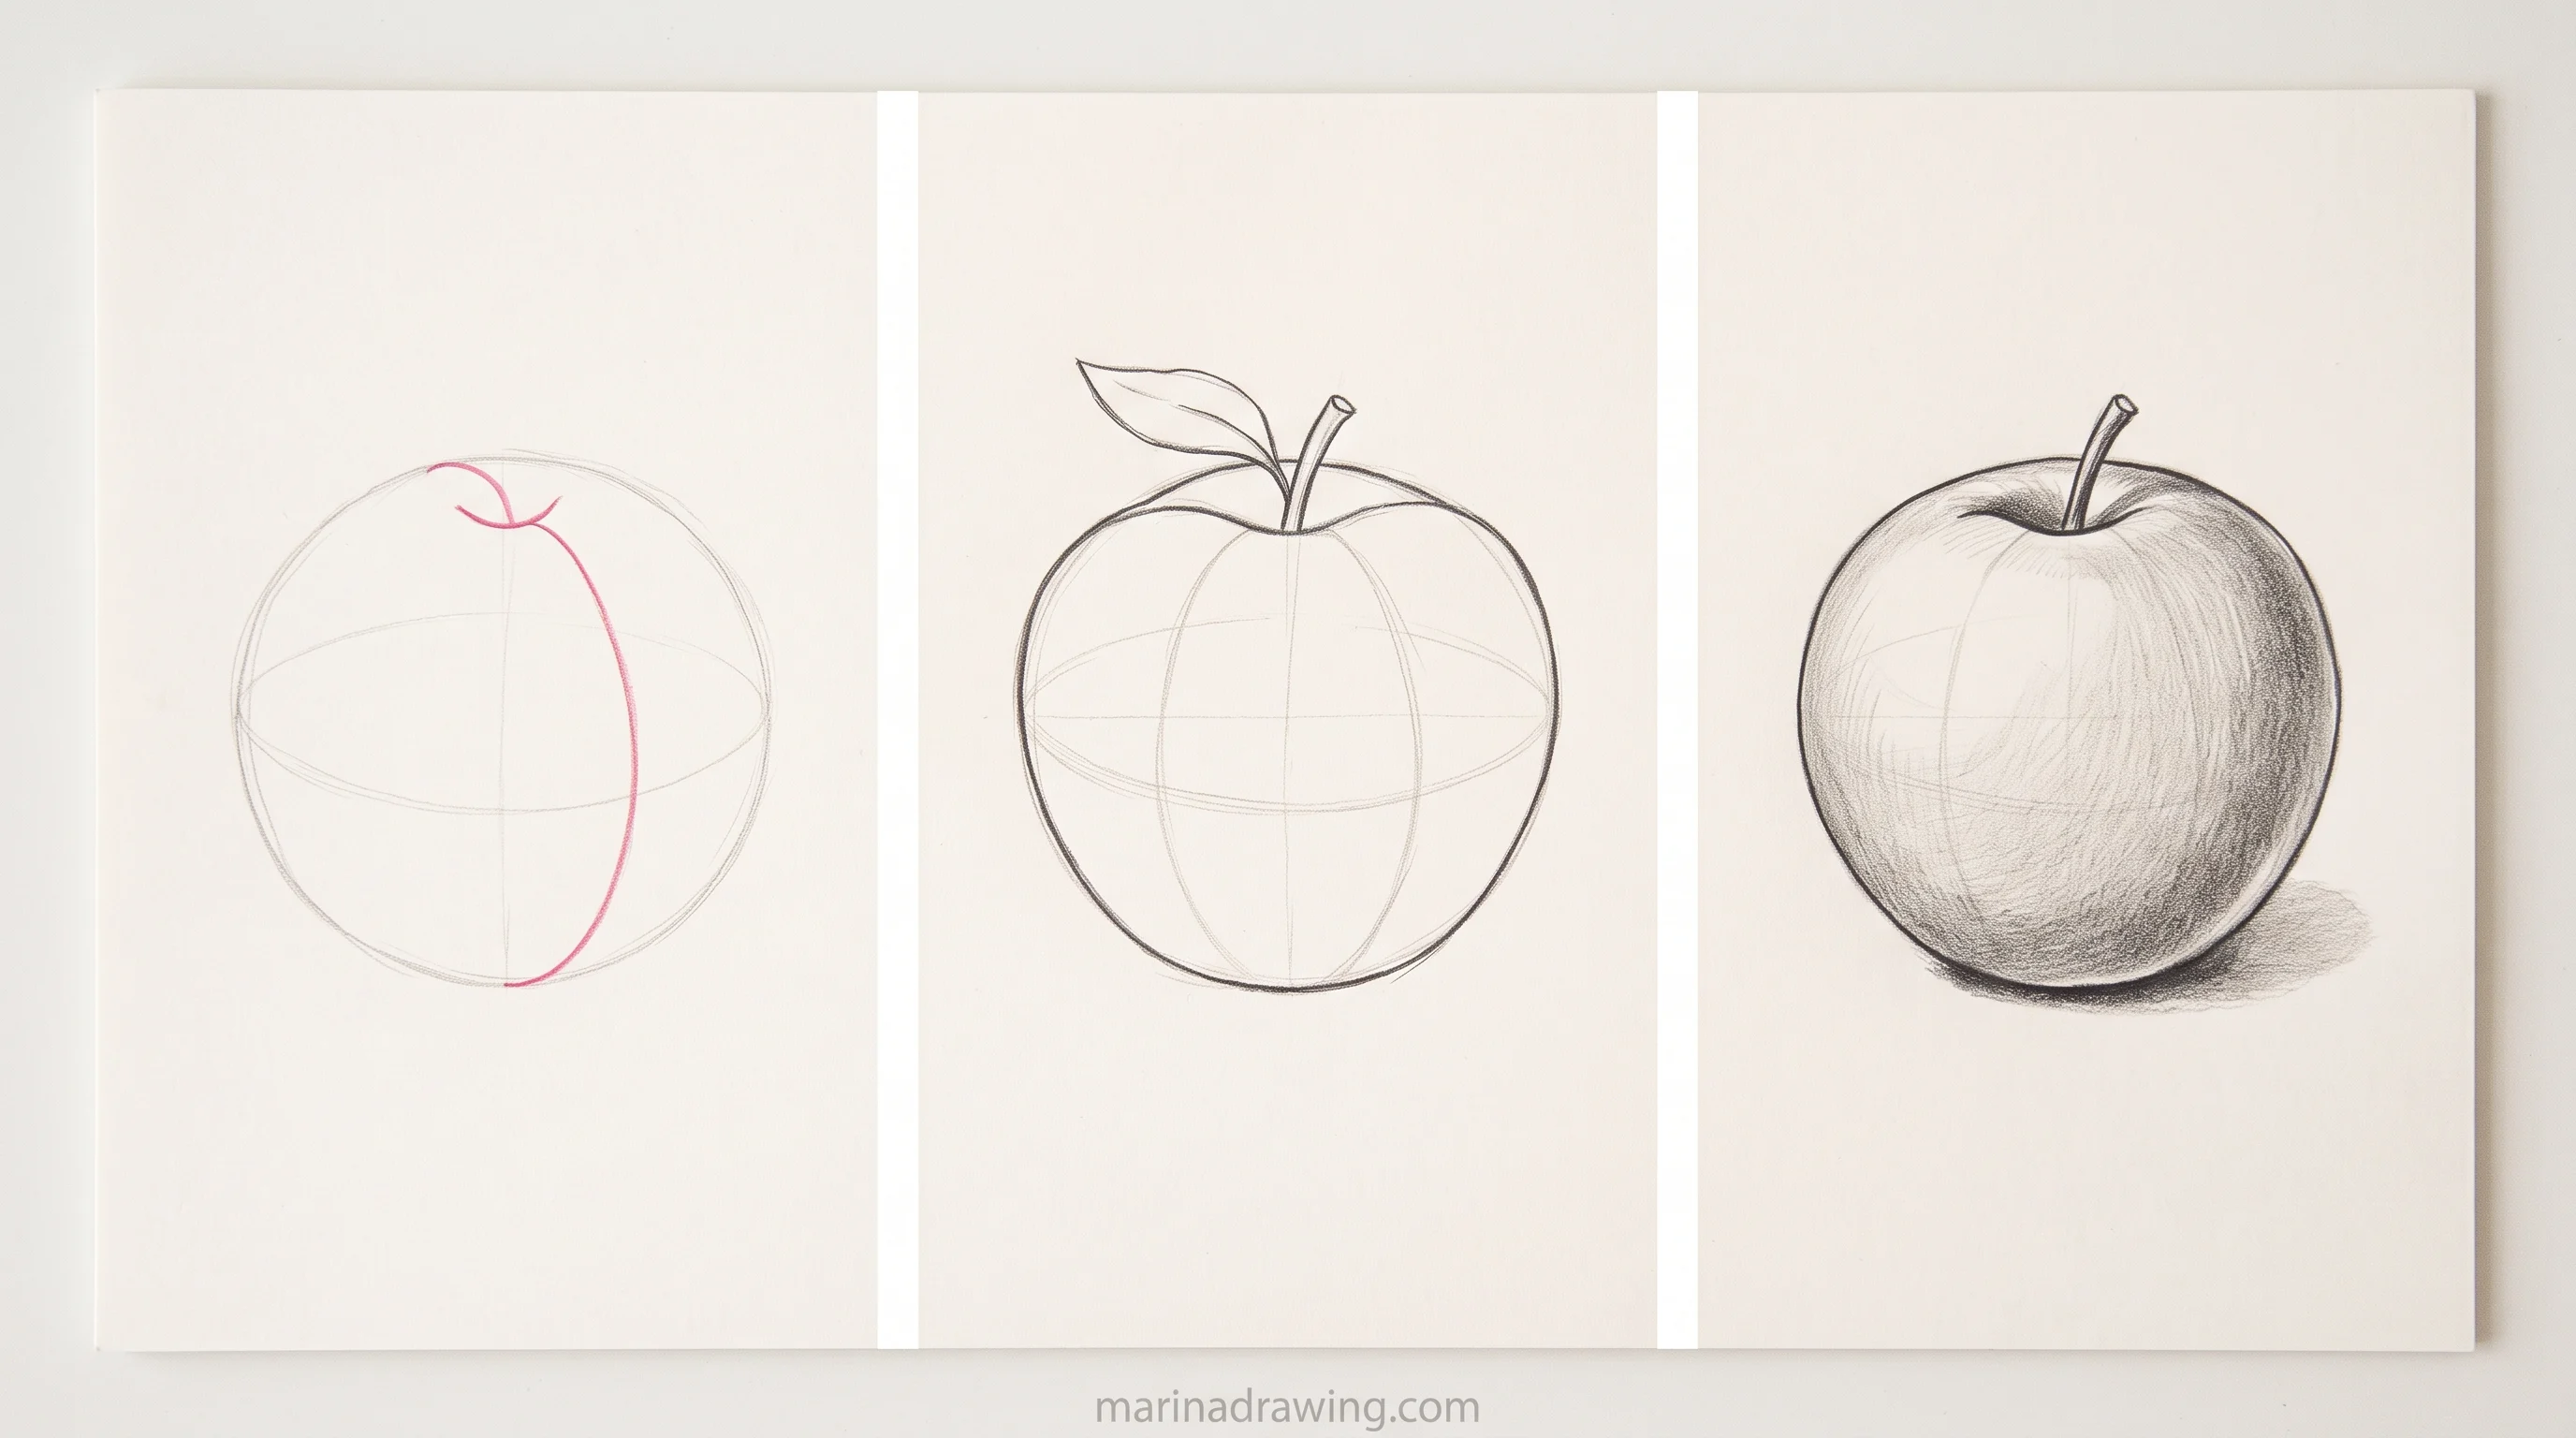
2. The Apple
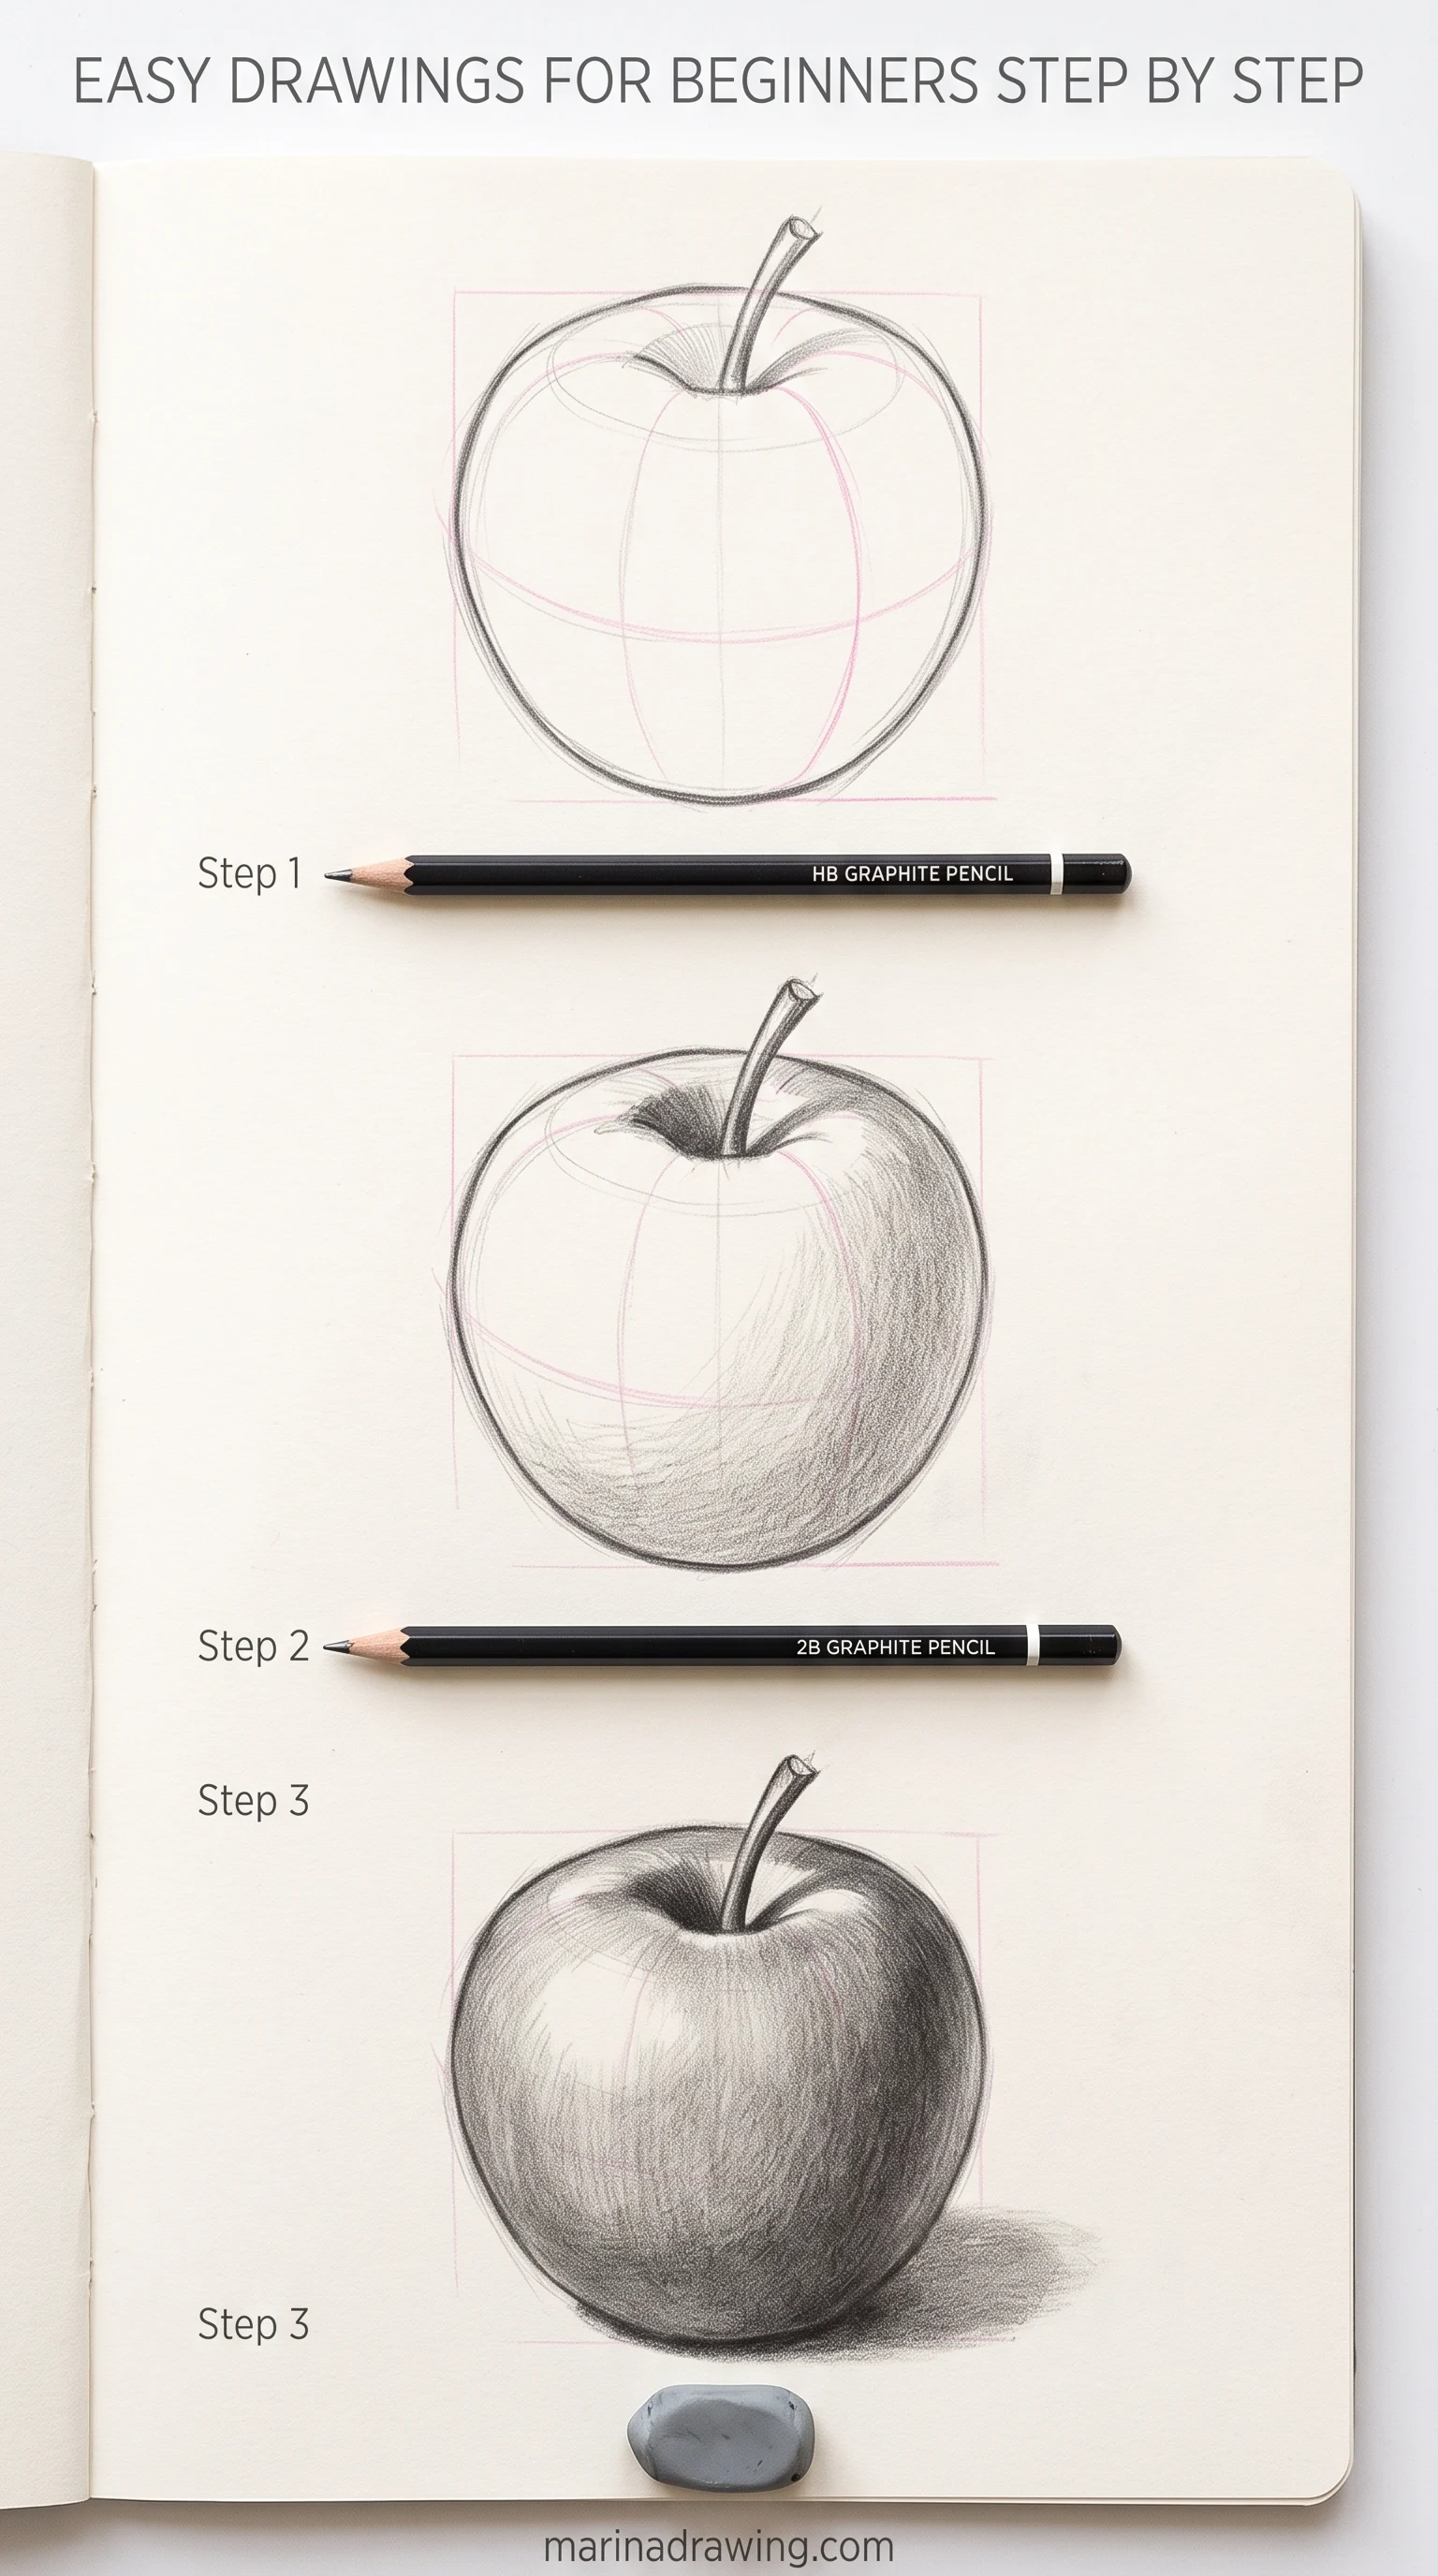
An apple is a sphere that isn’t round. First on the paper: a circle, then a slightly squashed version of it pushed a little wider at the top.
Draw a curved line across the middle, the way an equator wraps a globe. The stem sits in a dip on that curved surface.
 Pin it
The typical error is the stem stuck on the edge of the silhouette. It makes your apple look like a flat cut-out. The stem goes a short way inside the top edge, because the top of an apple turns toward you.
Passed when the apple still reads as round with the outline erased and only the equator line left.
 Pin it
 Pin it
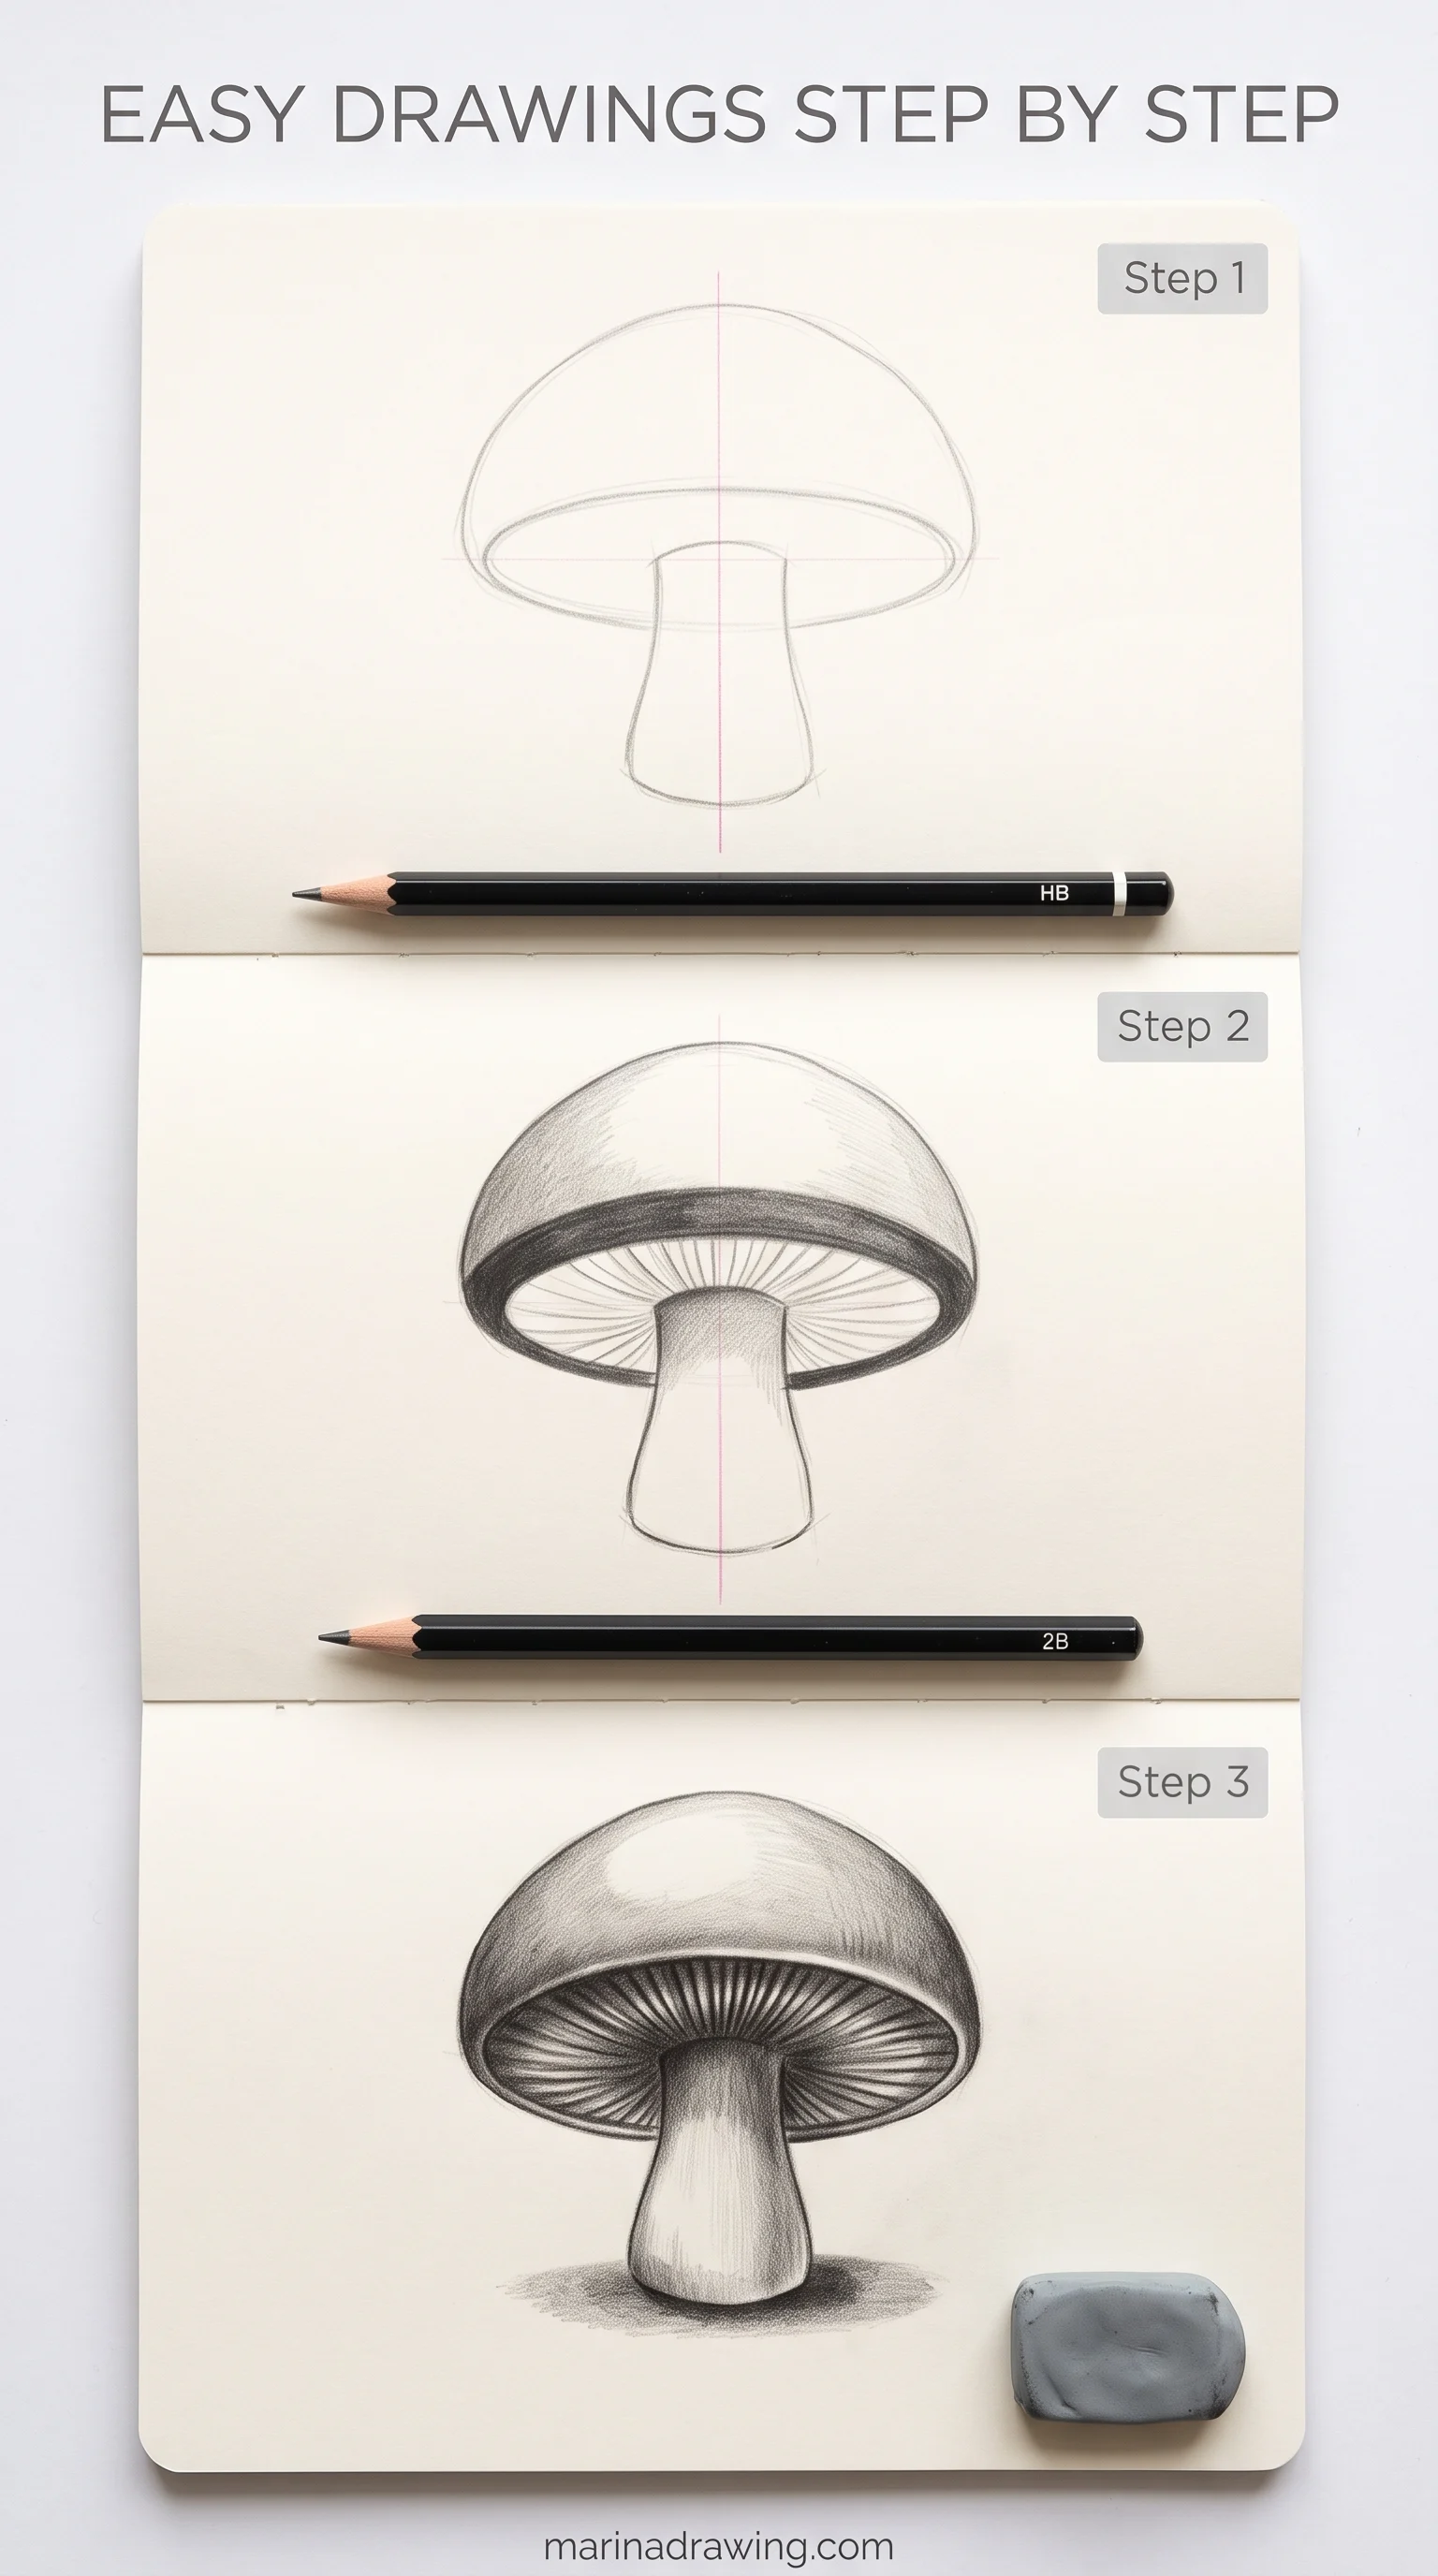
3. The Mushroom
A mushroom is the first form sitting on another form: a half-dome cap on a short cylinder stalk. First on the paper: the stalk as a cylinder with its own top ellipse, then the underside of the cap as a wide ellipse around that top.
The typical error is a cap drawn as a flat lid that ends where the stalk begins. Look underneath a real mushroom: the cap wraps around and hangs below the join. If your underside isn’t an ellipse, the cap floats.
Passed when the underside ellipse and the stalk’s top ellipse share a centre line, three times running.
 Pin it
These three are easy pencil drawings for beginners in the truest sense: one pencil, one form, a handful of lines. That’s exactly why they show your outline-first habit so clearly.
If your ellipses keep wobbling, watching someone draw one at speed helps more than another sheet: the first lessons are all cylinders and spheres.
Rungs 4 to 6: Two Forms That Touch
Now two forms meet on your page. The first three rungs asked whether one form was solid. These three ask whether two solid forms agree about where they touch. It sounds small, but it’s the point where most easy simple drawings for beginners start to look off, because the join is where your eye checks first.
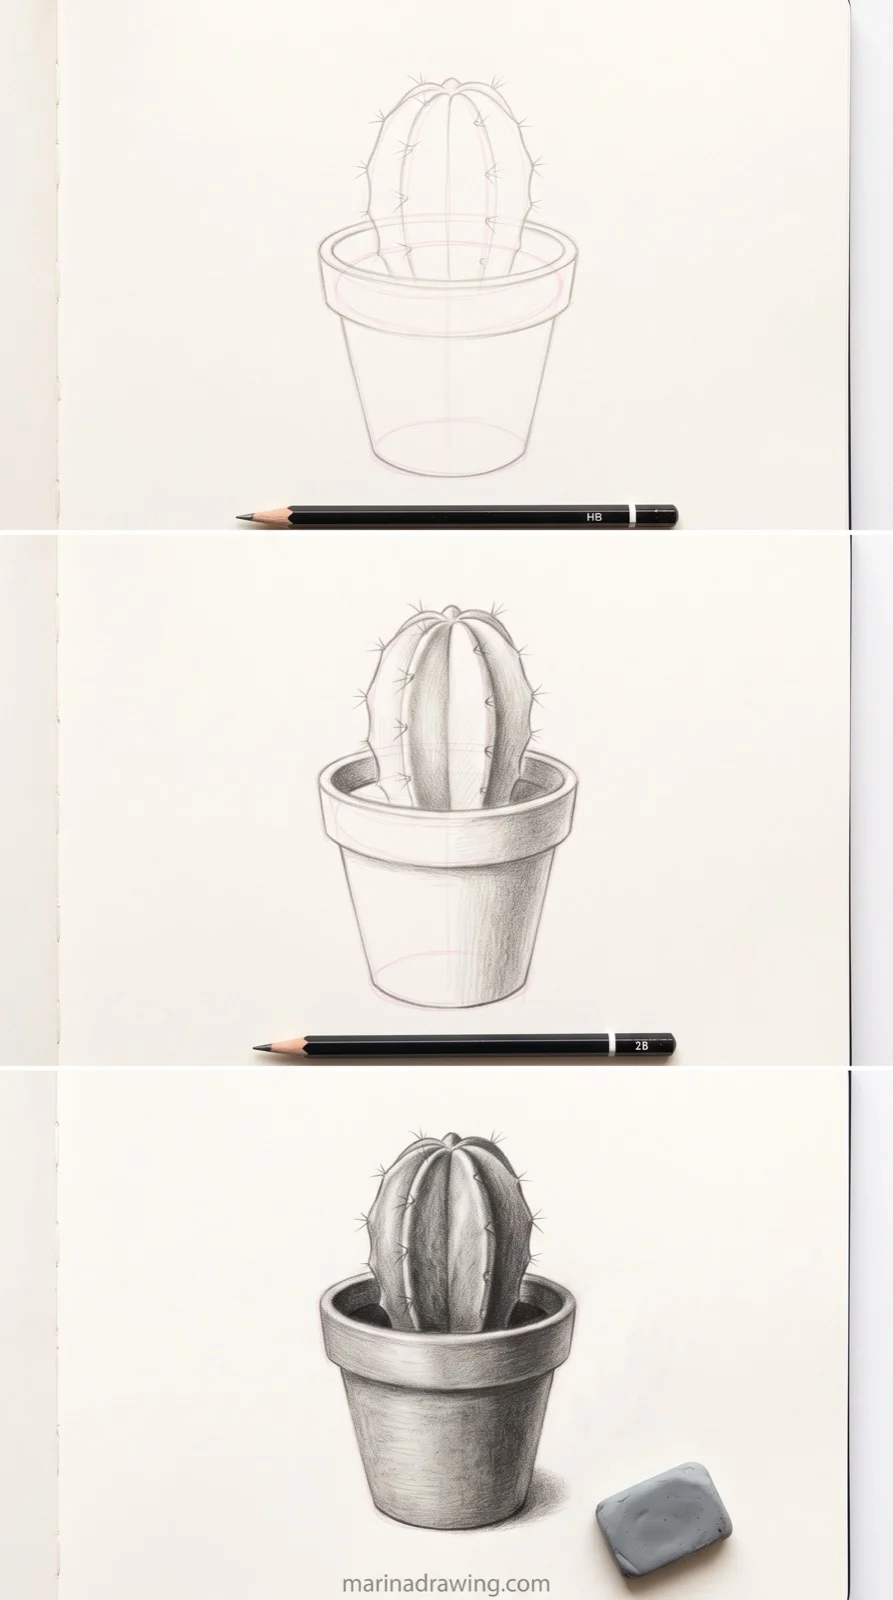
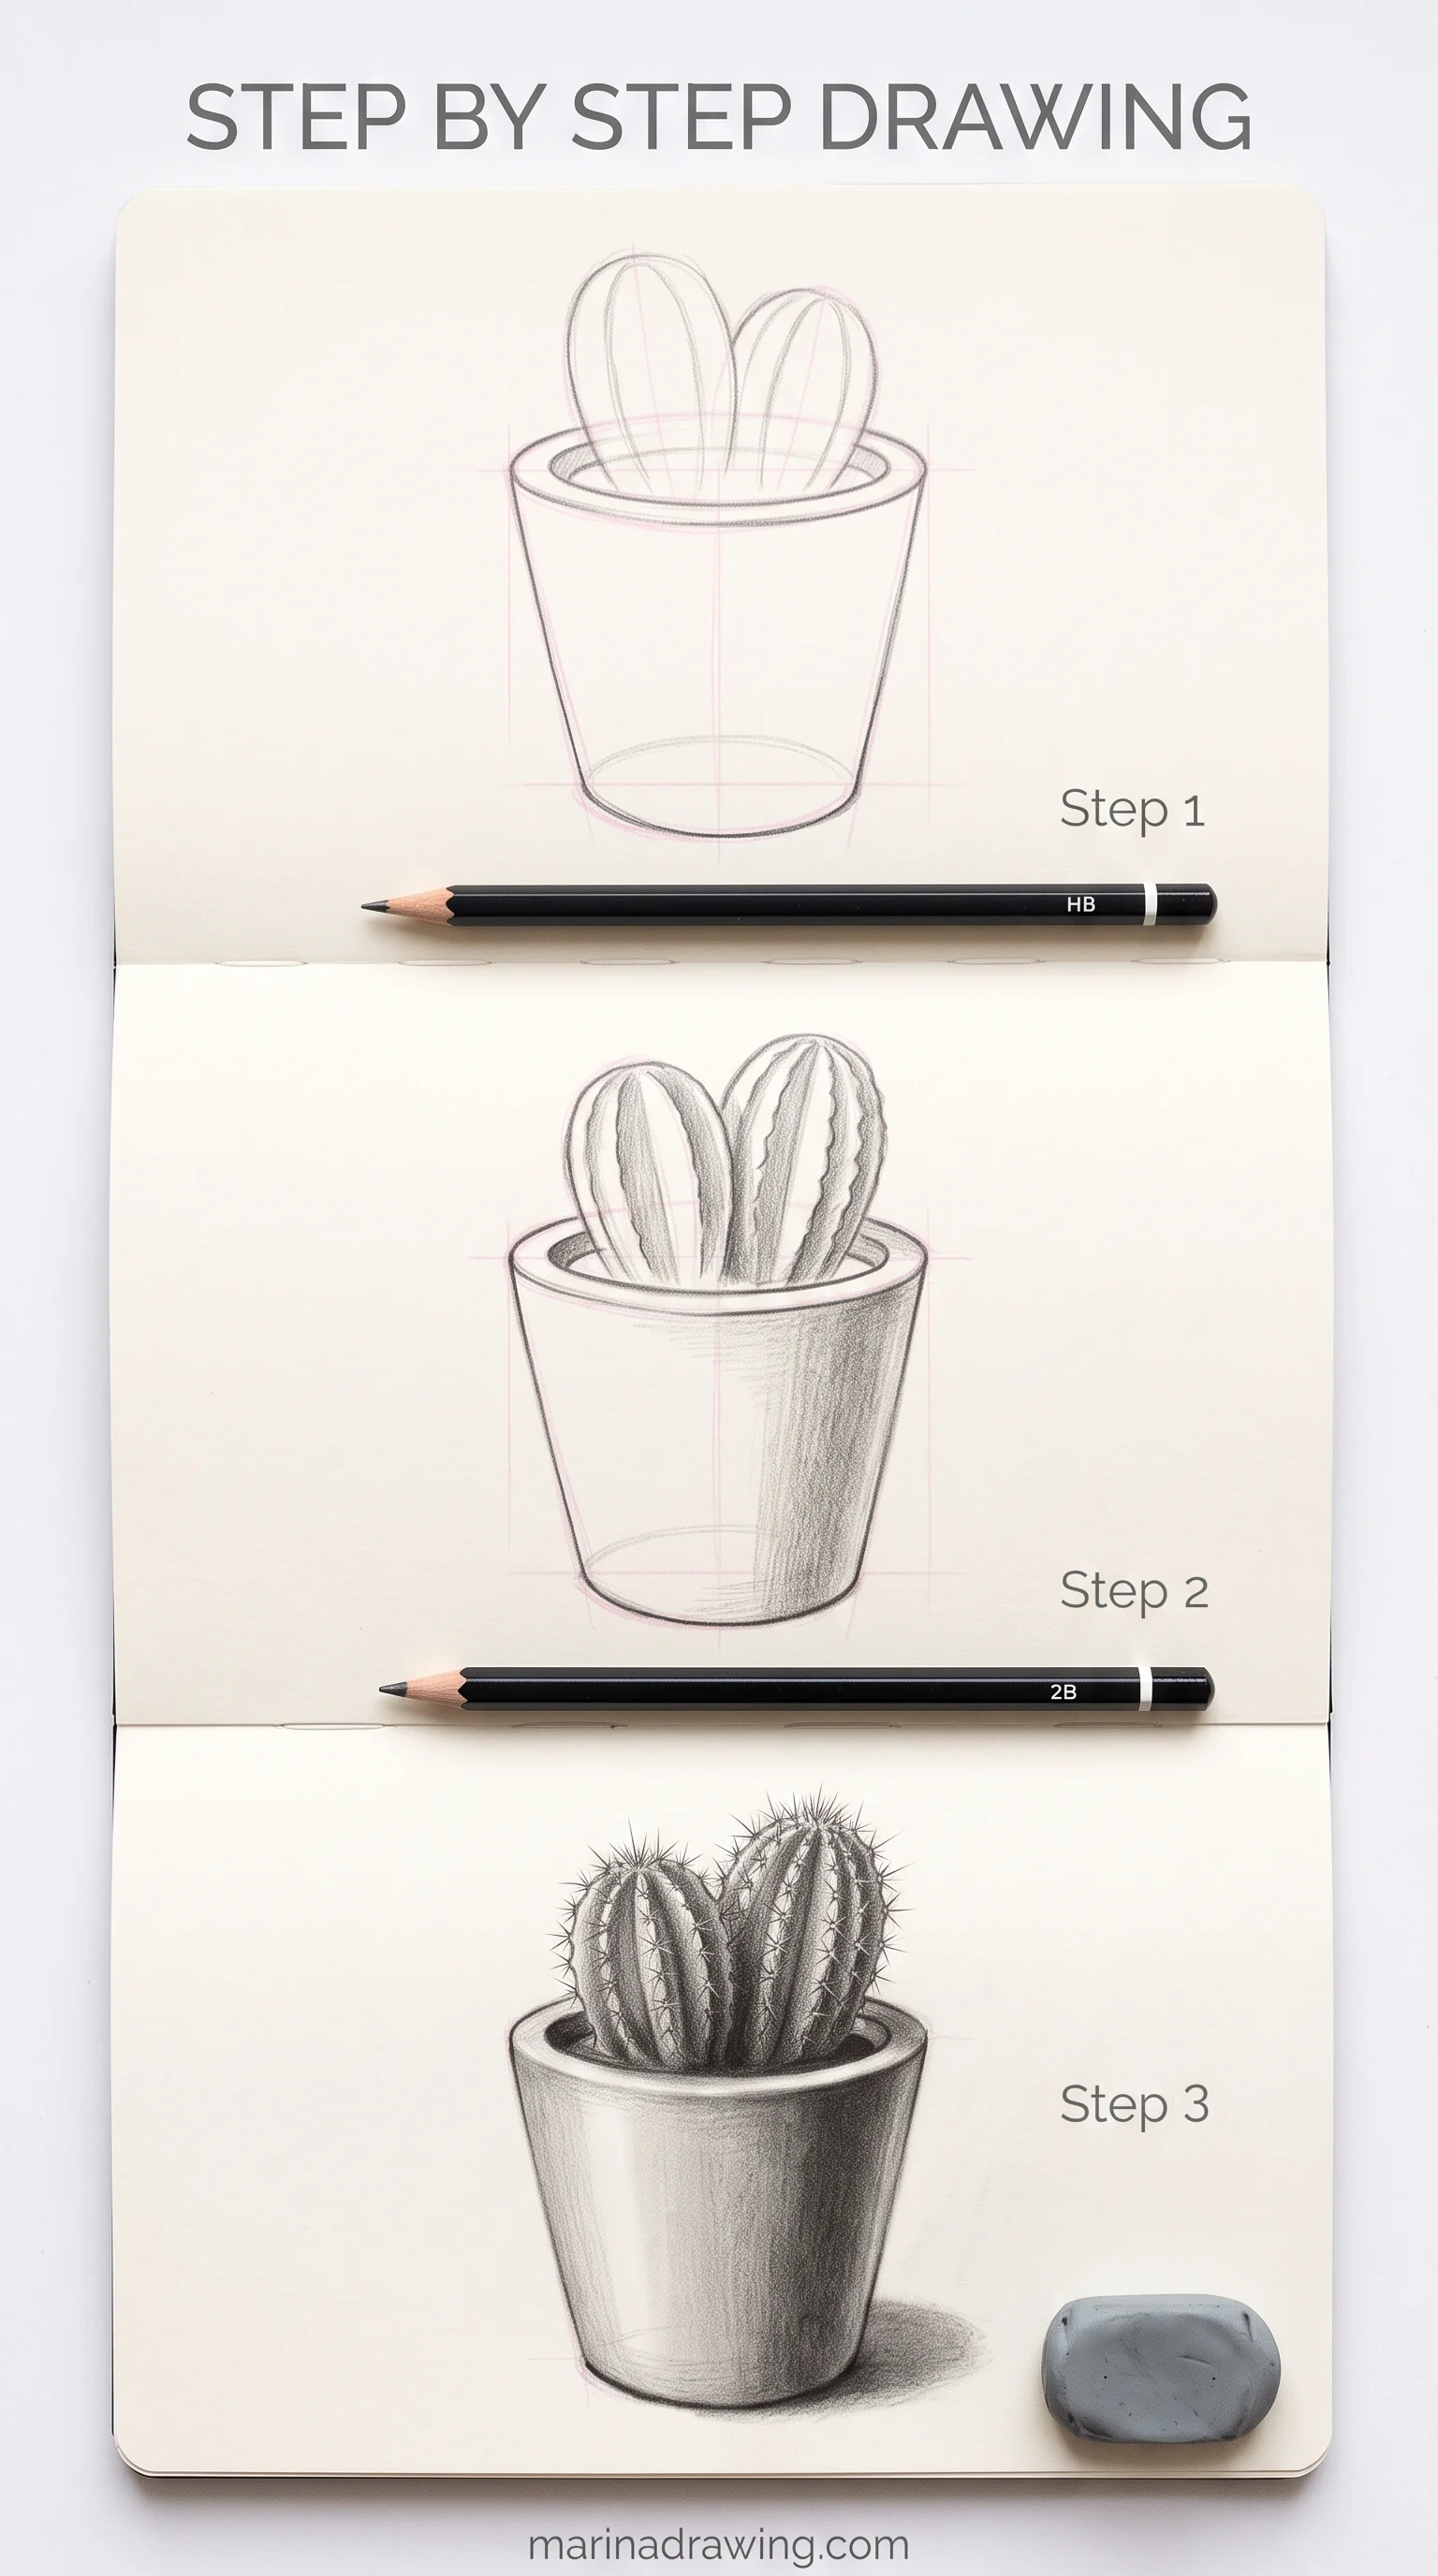
4. The Cactus in a Pot
A pot is a mug without a handle, turned into a cone. The cactus is a tall rounded cylinder. First on the paper: the pot’s rim ellipse, then the cactus base as a smaller ellipse inside that rim.
 Pin it
The typical error you’ll see is a cactus balanced on the rim like a candle on a jar lid. The base of the cactus disappears into the soil, below the rim, so the rim line crosses in front of it.
Passed when the rim clearly cuts across the front of the cactus and you didn’t have to fix the base ellipse.
 Pin it
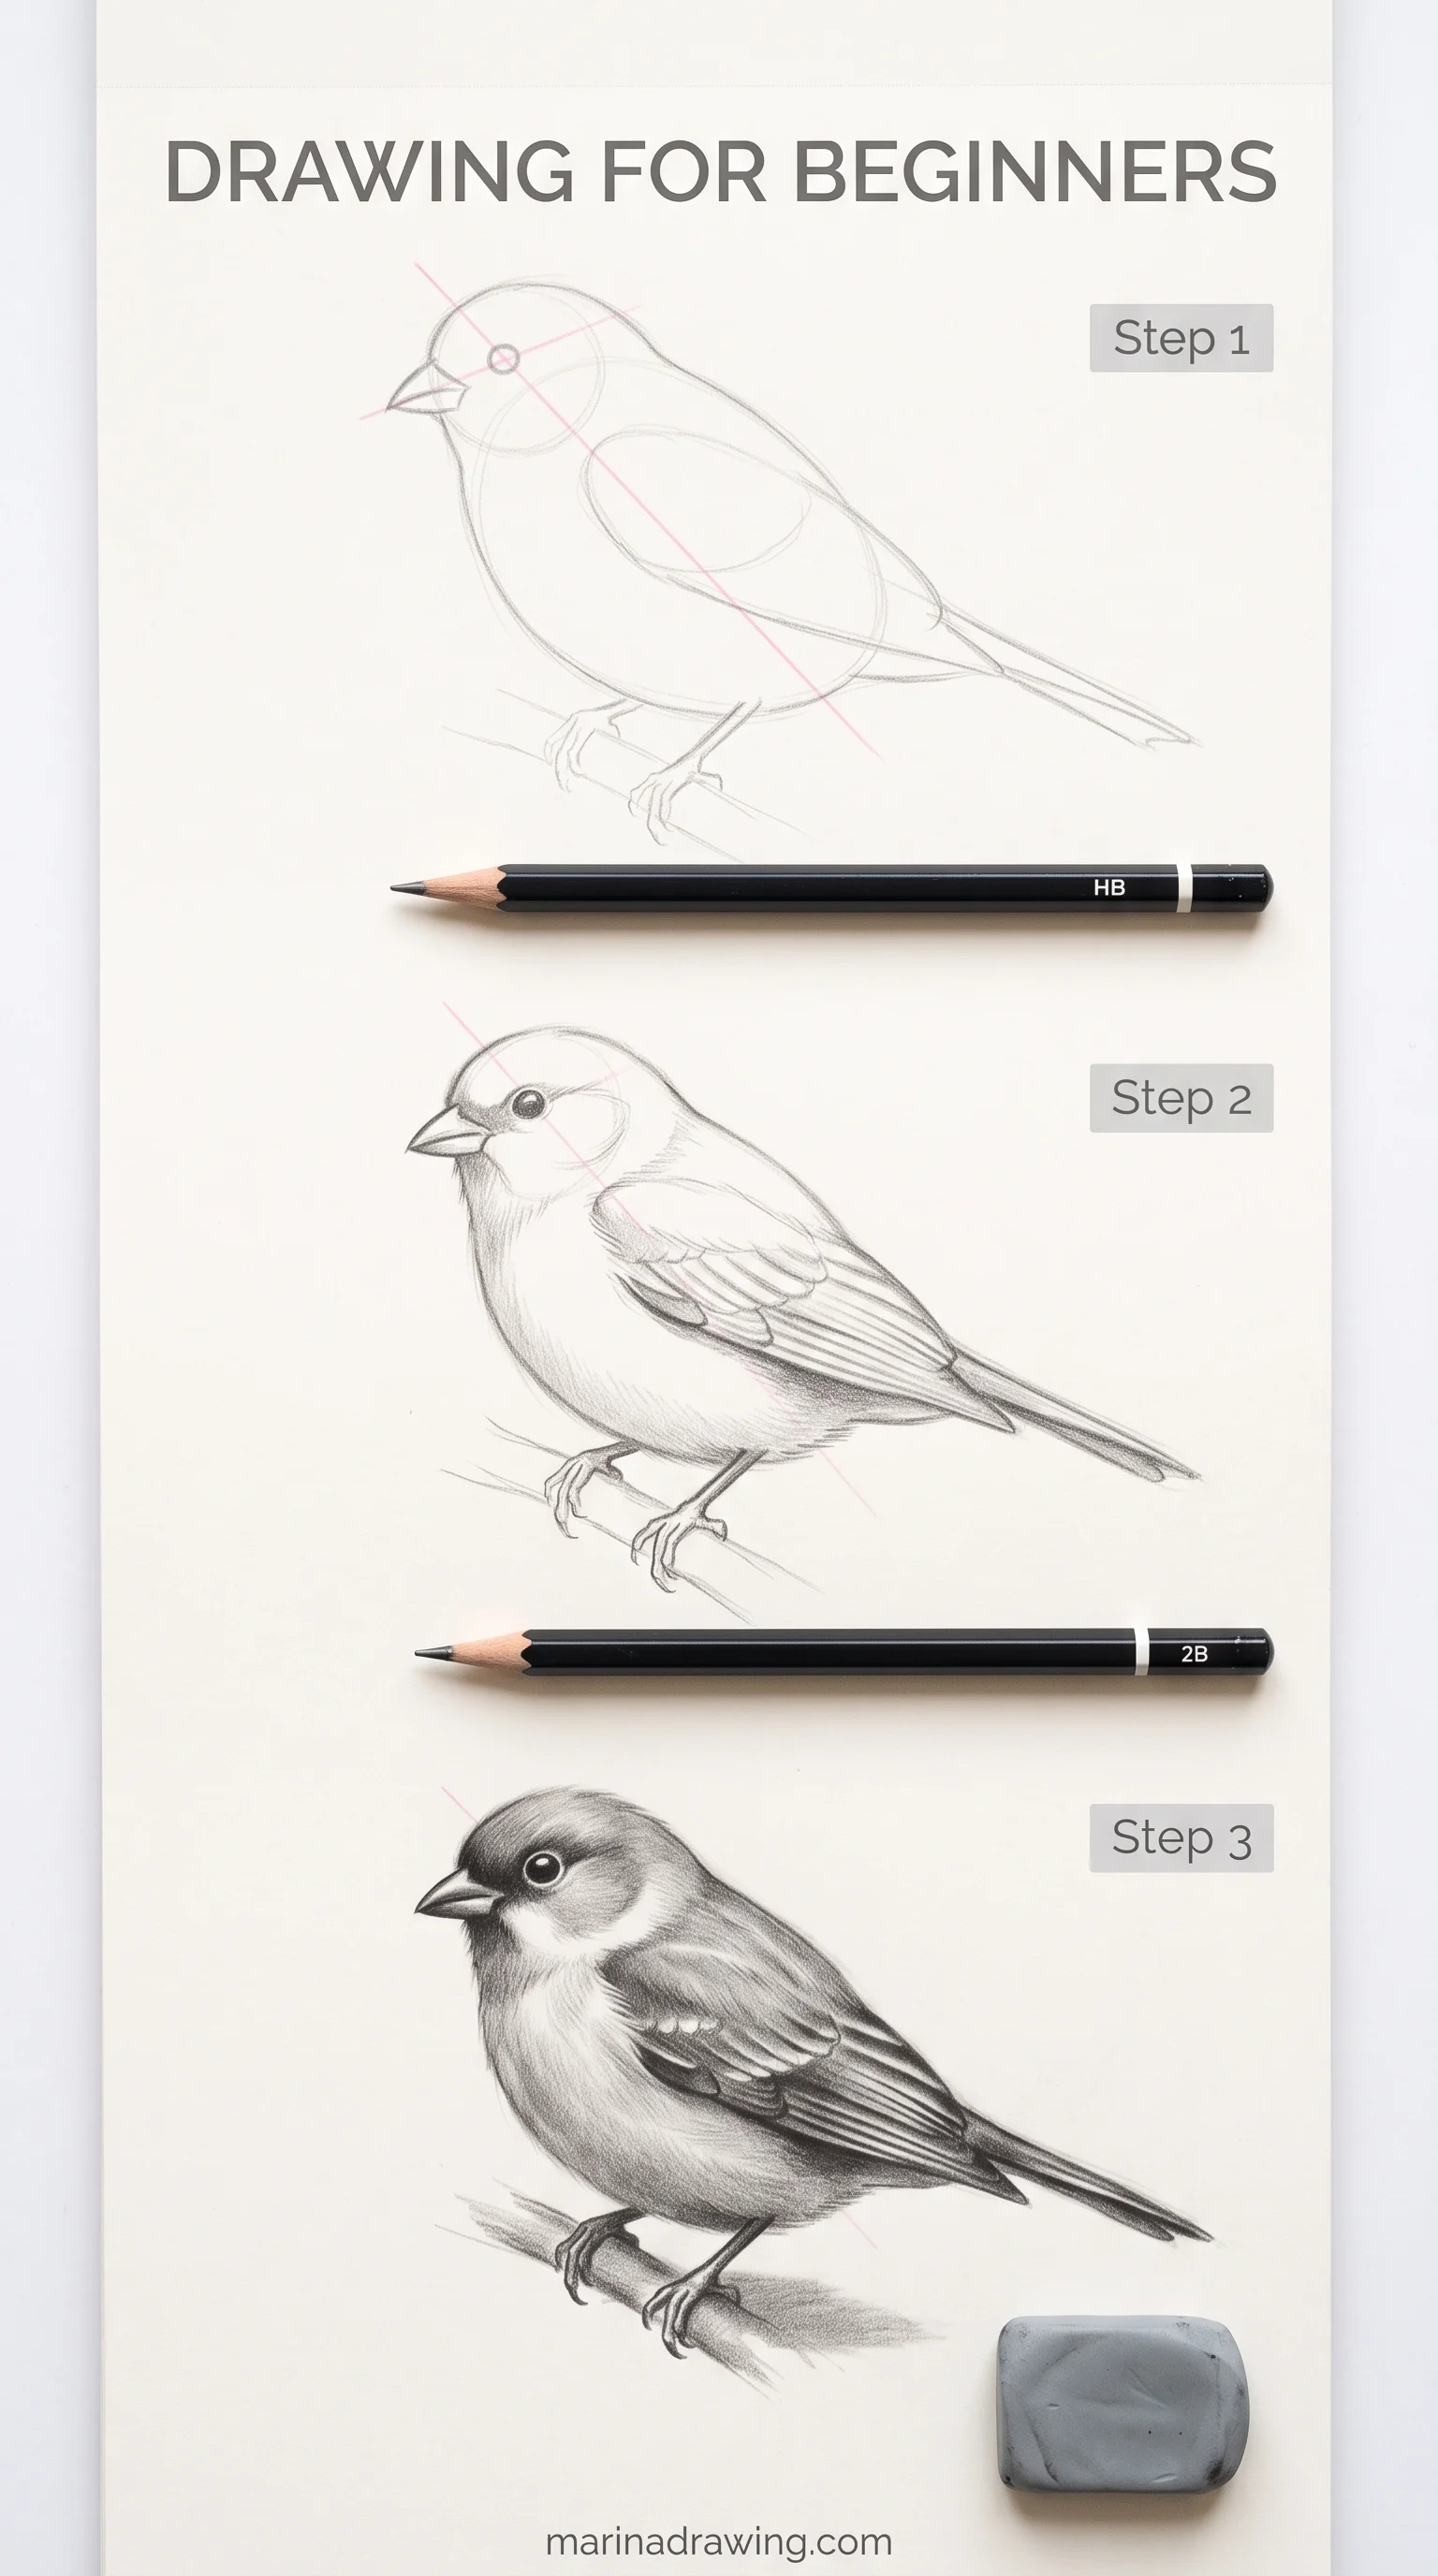
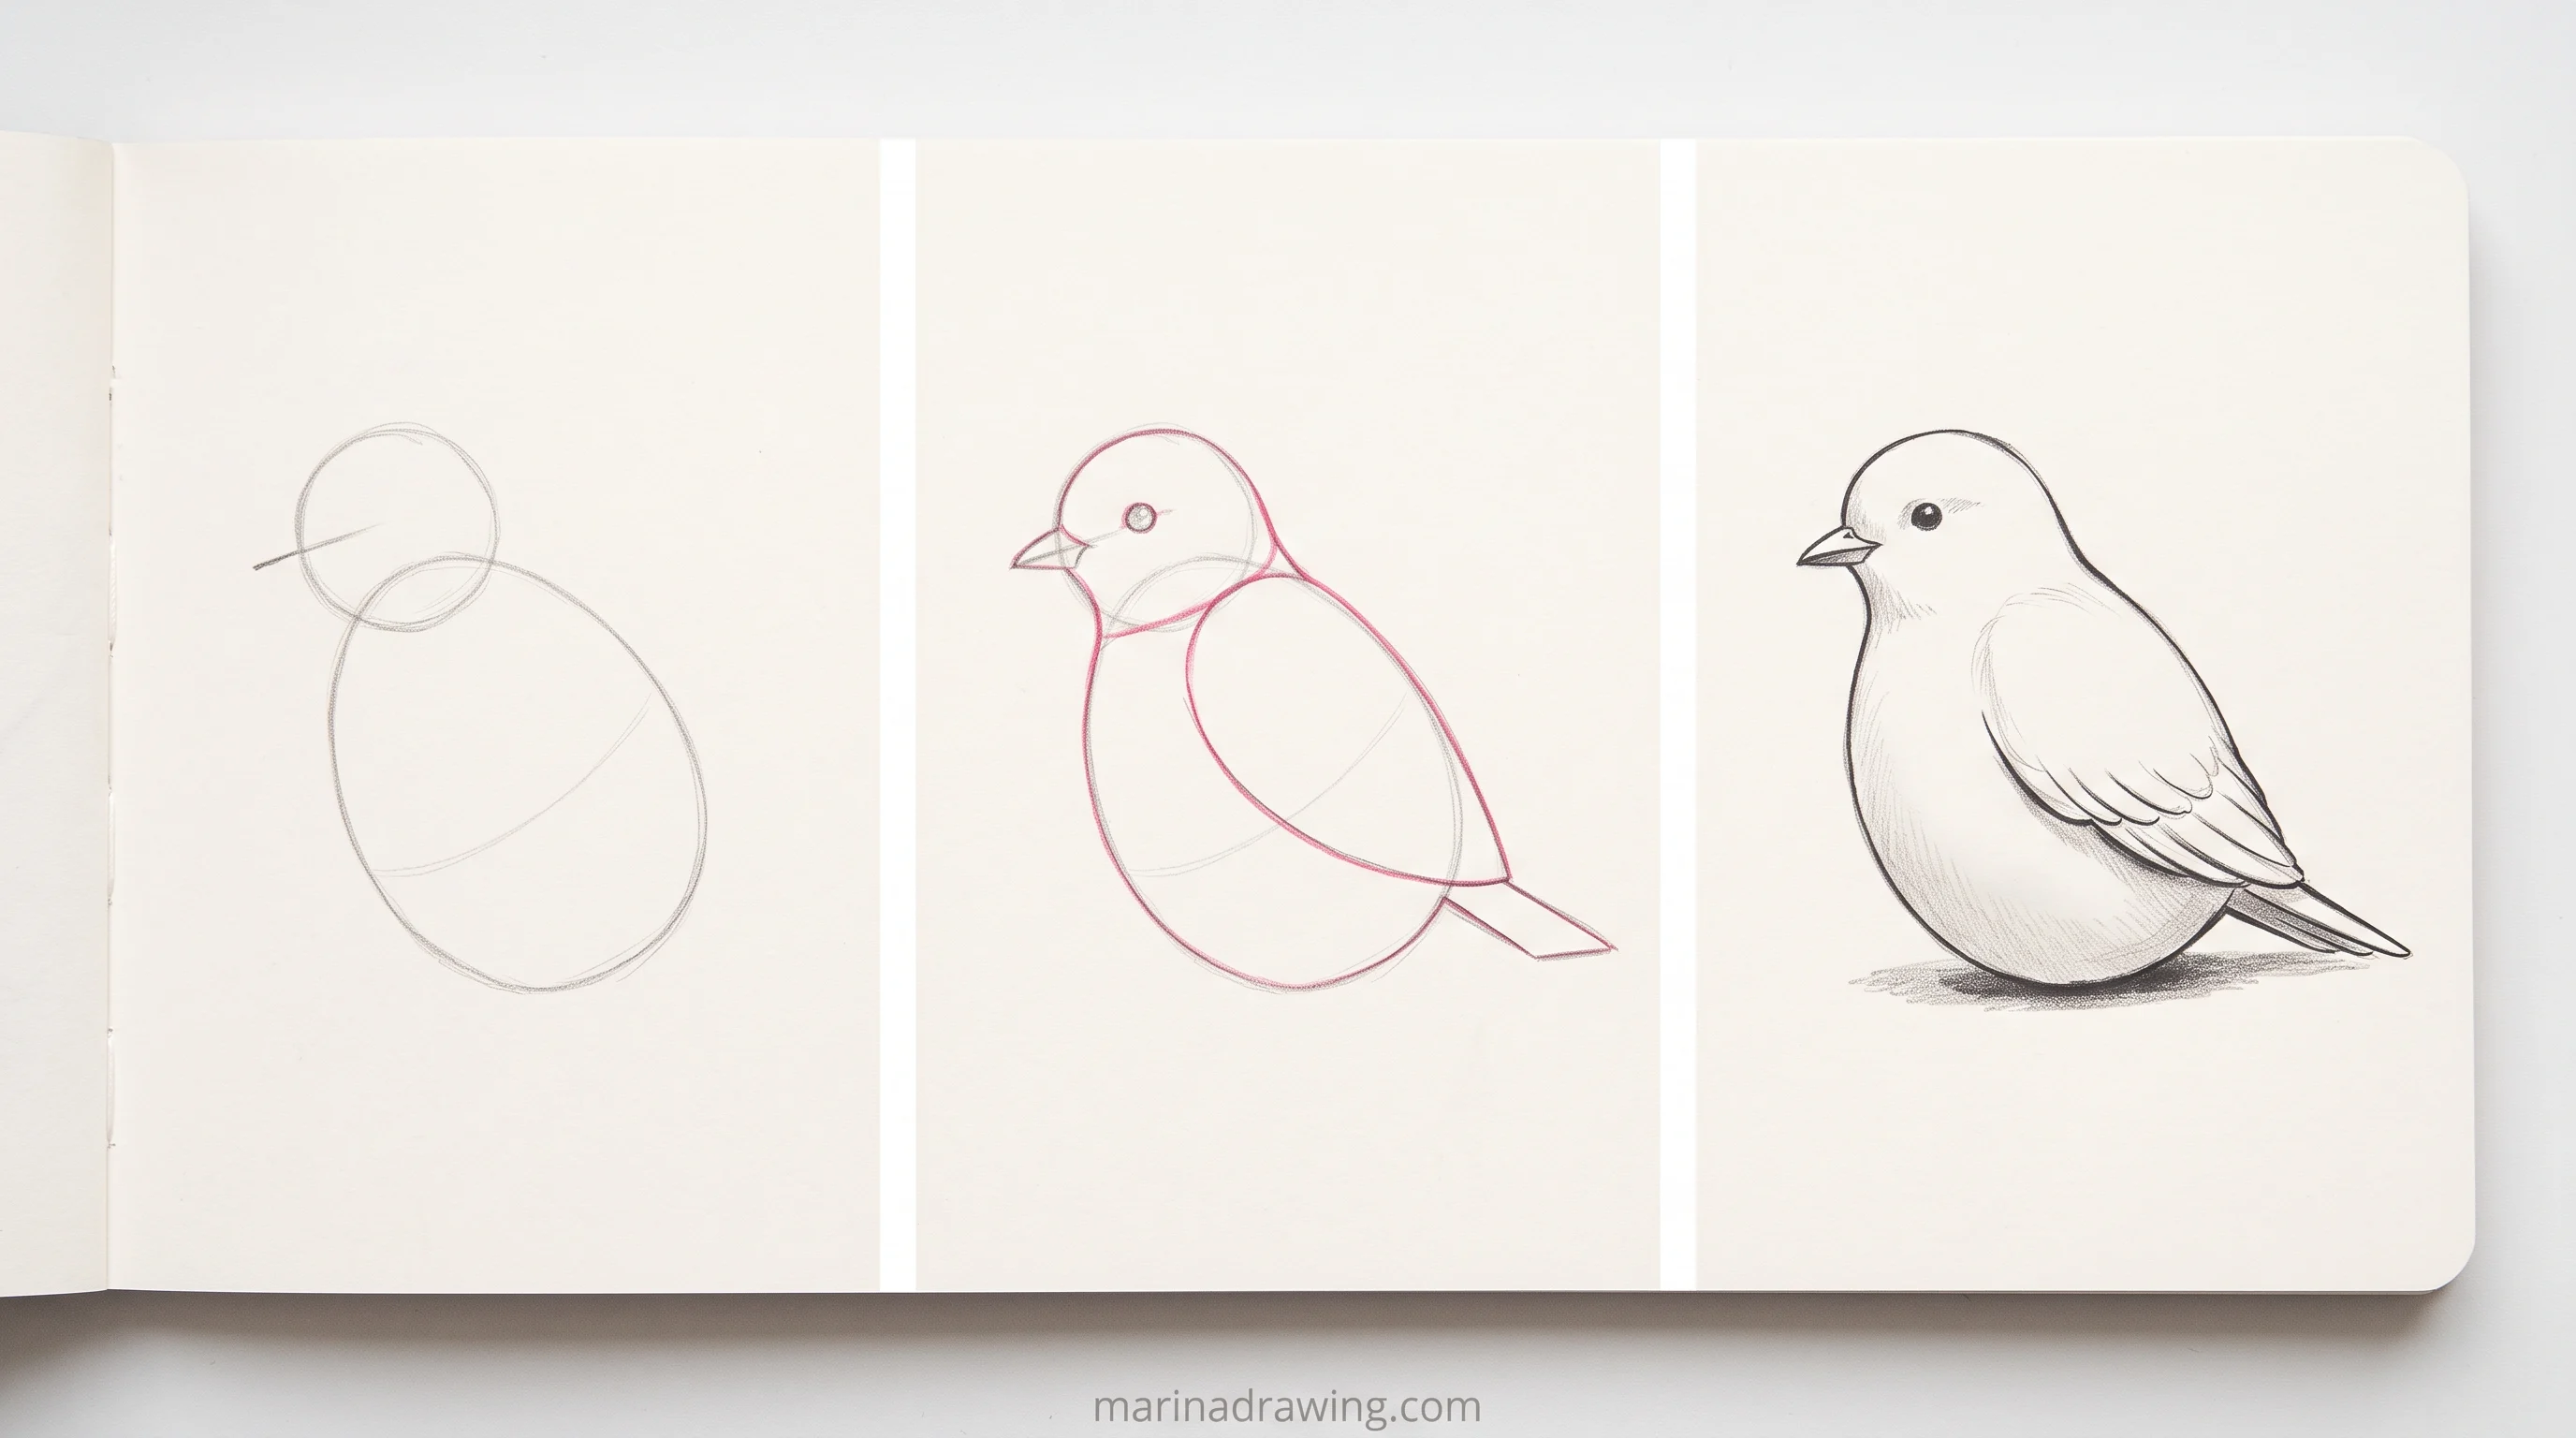
5. The Bird
A small sitting bird is a circle for the head and an egg for the body, joined at an angle. First on the paper: the egg, tilted, then the head circle overlapping its top end. A curved line through both shows you which way the bird faces.
The typical error is a head placed like a ball on top of the body, with a hard notch between them. Birds have no visible neck when they sit, and the duck drawing guide shows the same egg-and-circle start on a bigger bird.
The line of the back runs straight from the head into the body.
Passed when you can turn the head circle a little left or right and the back line still flows without a break.
 Pin it
 Pin it
6. The Cupcake
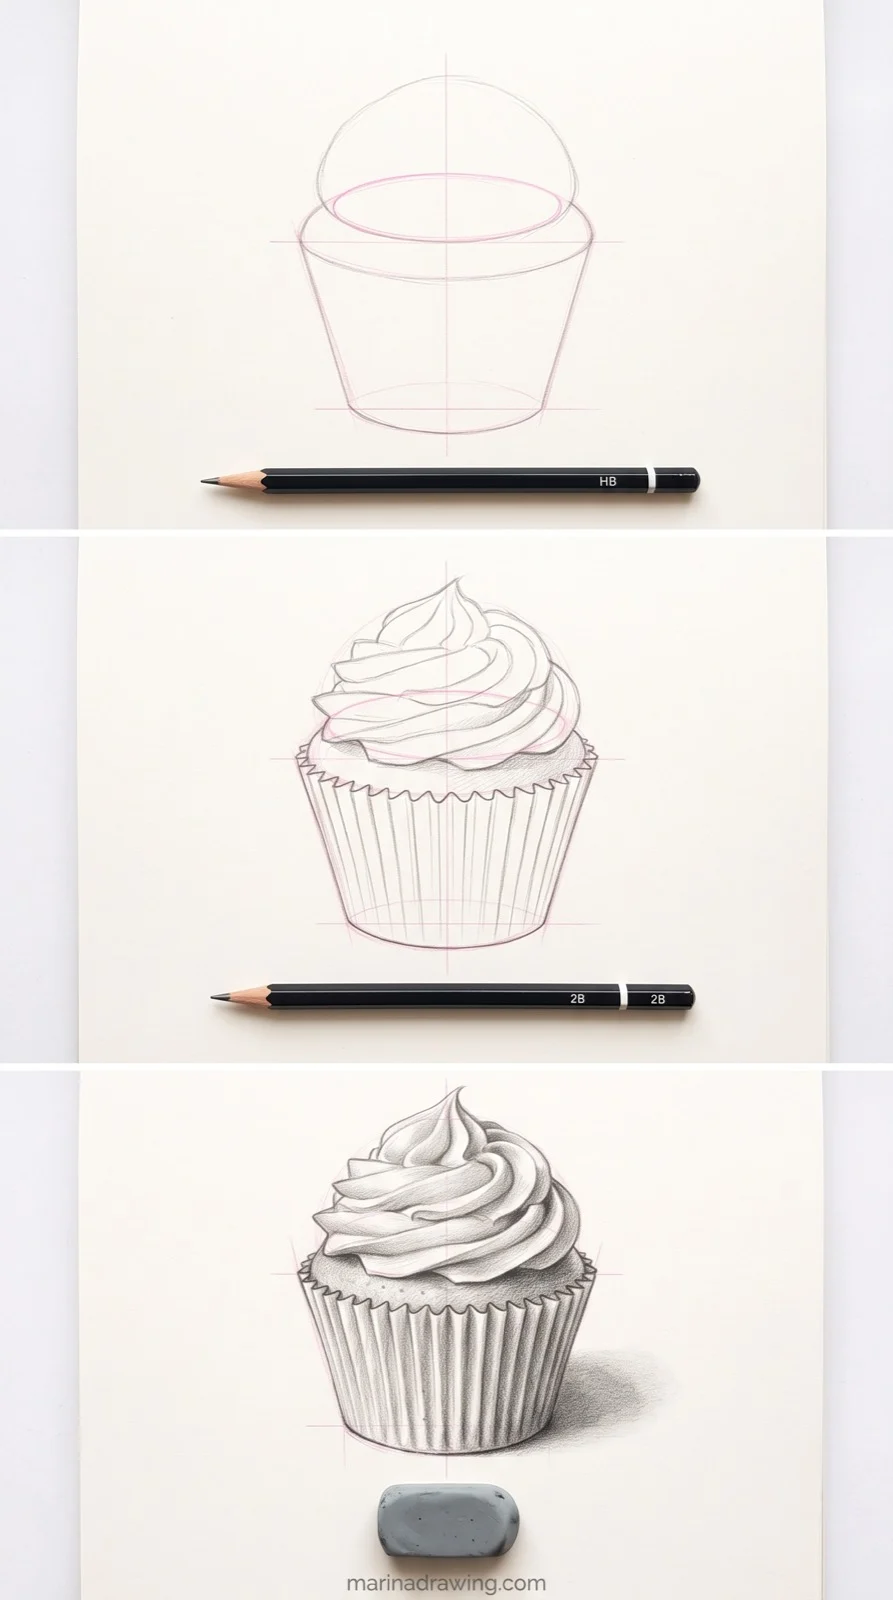
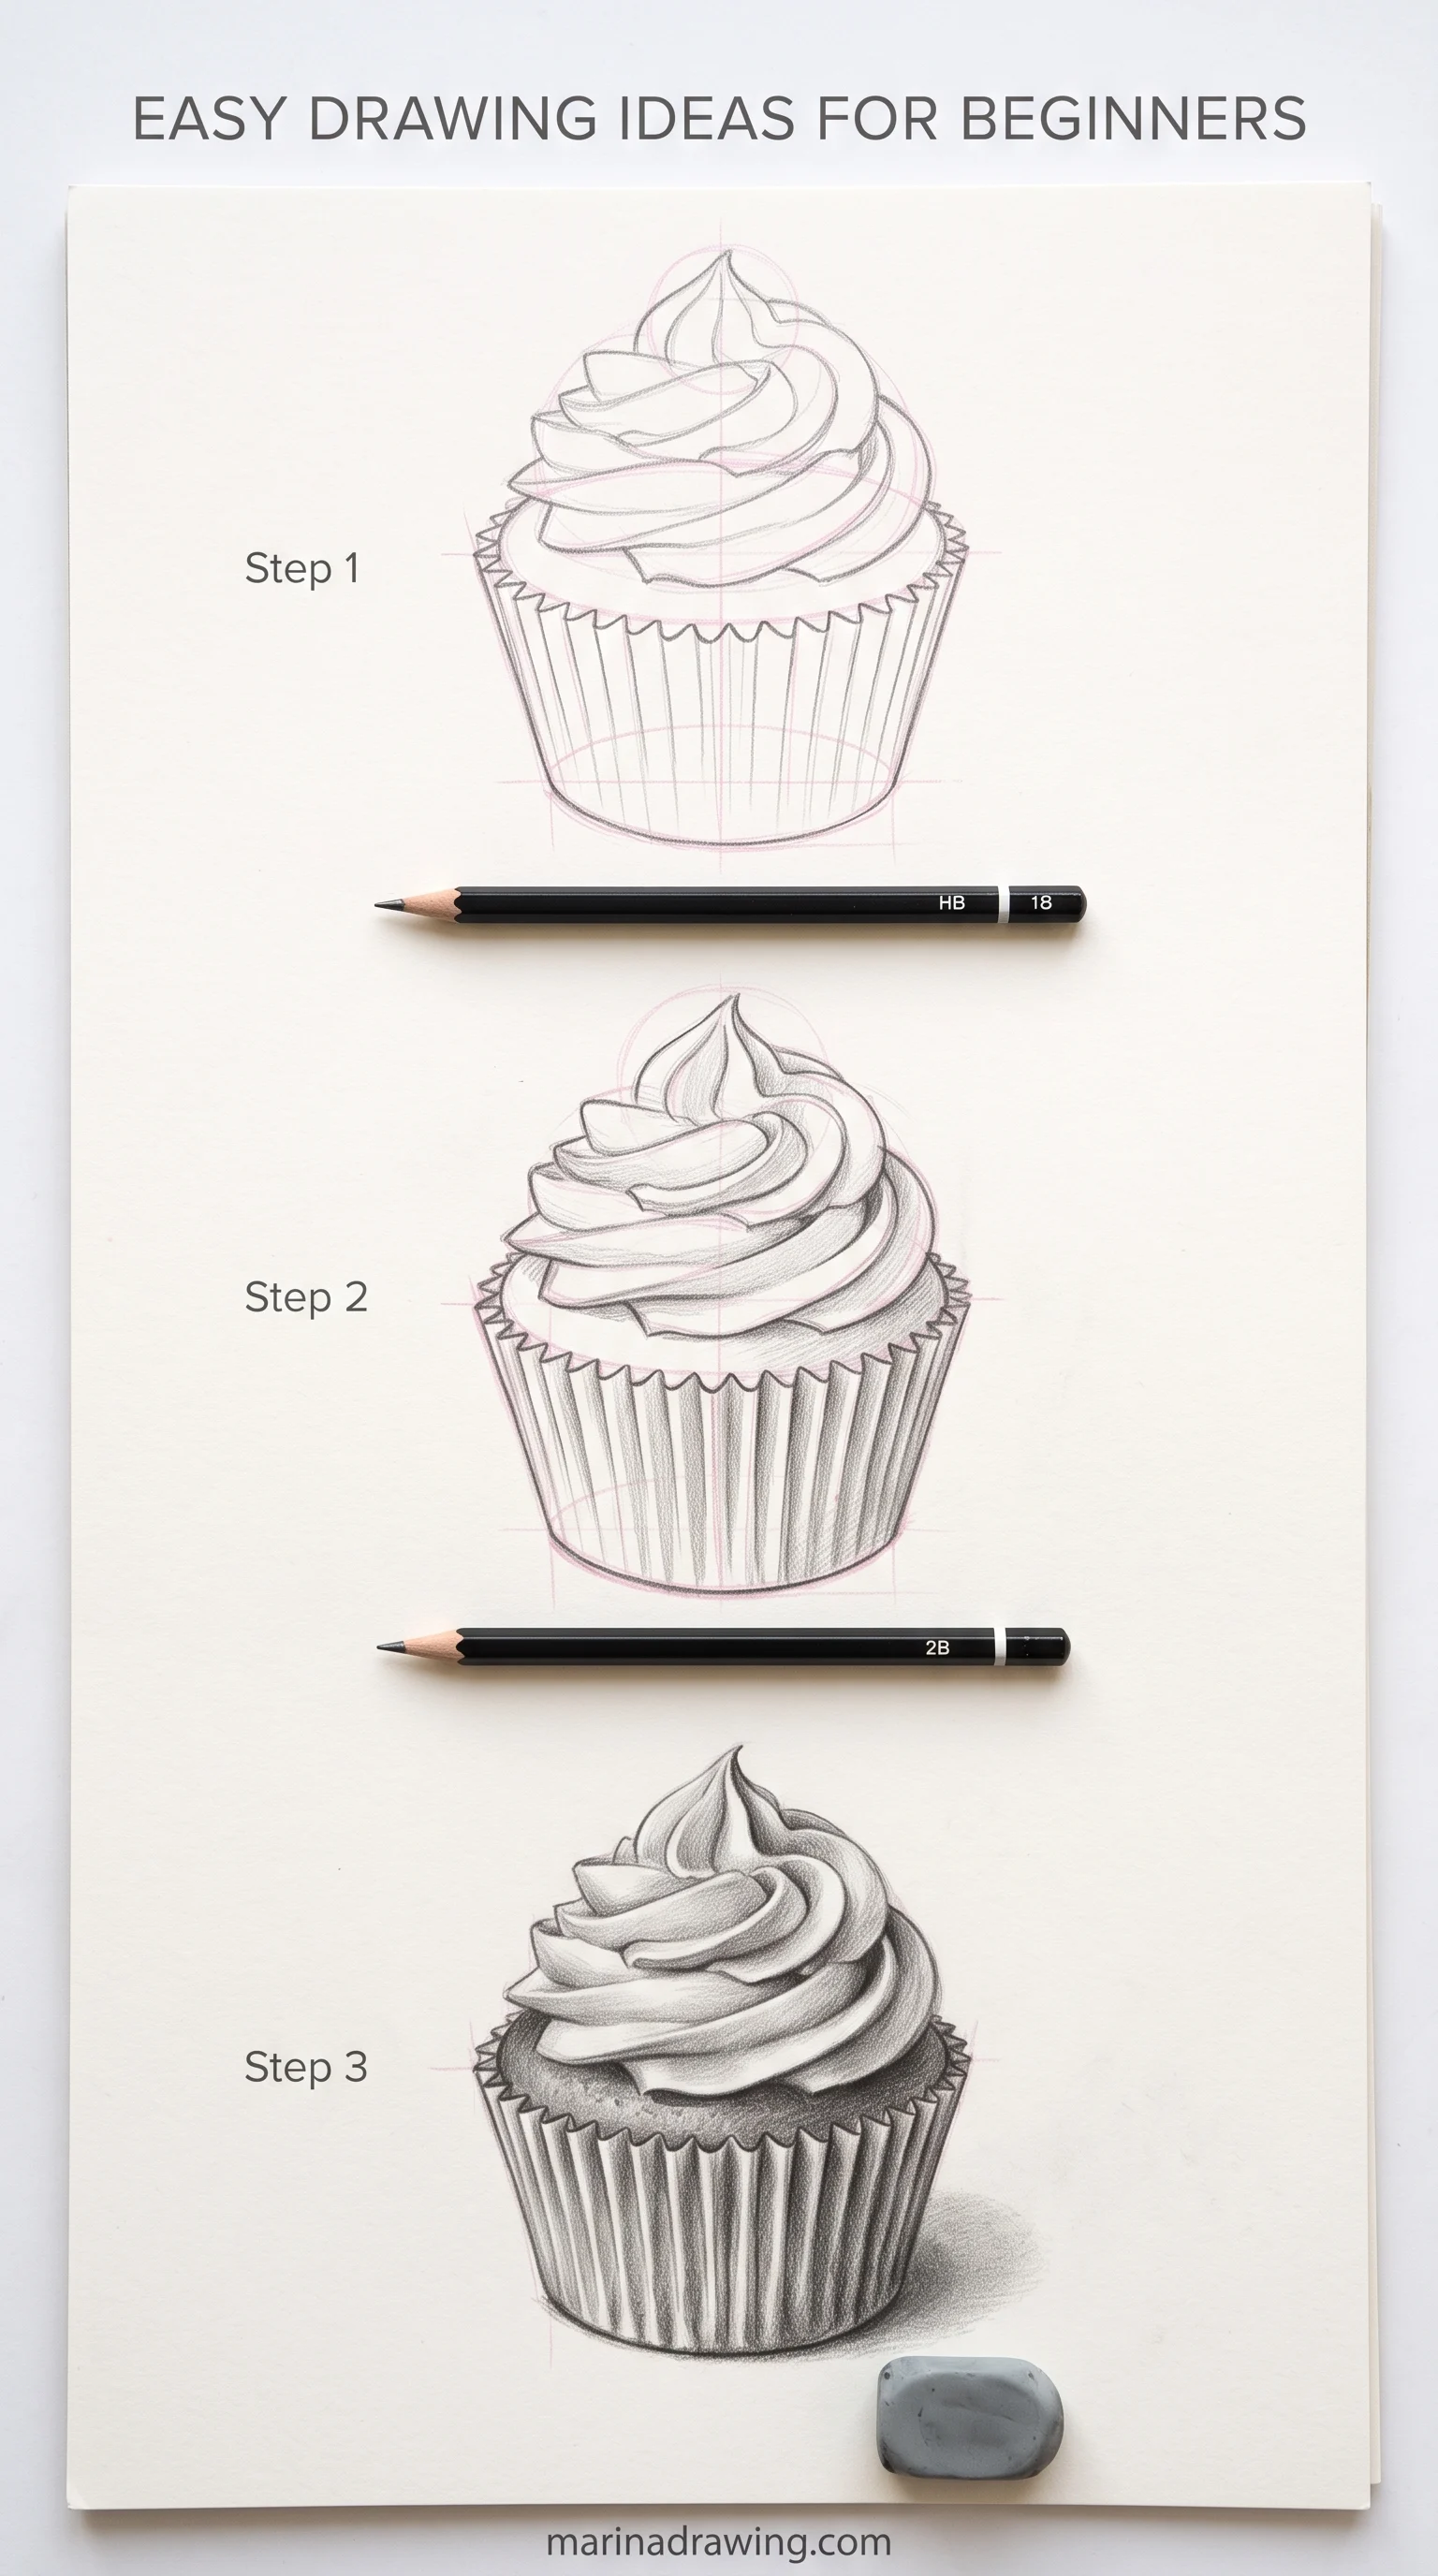
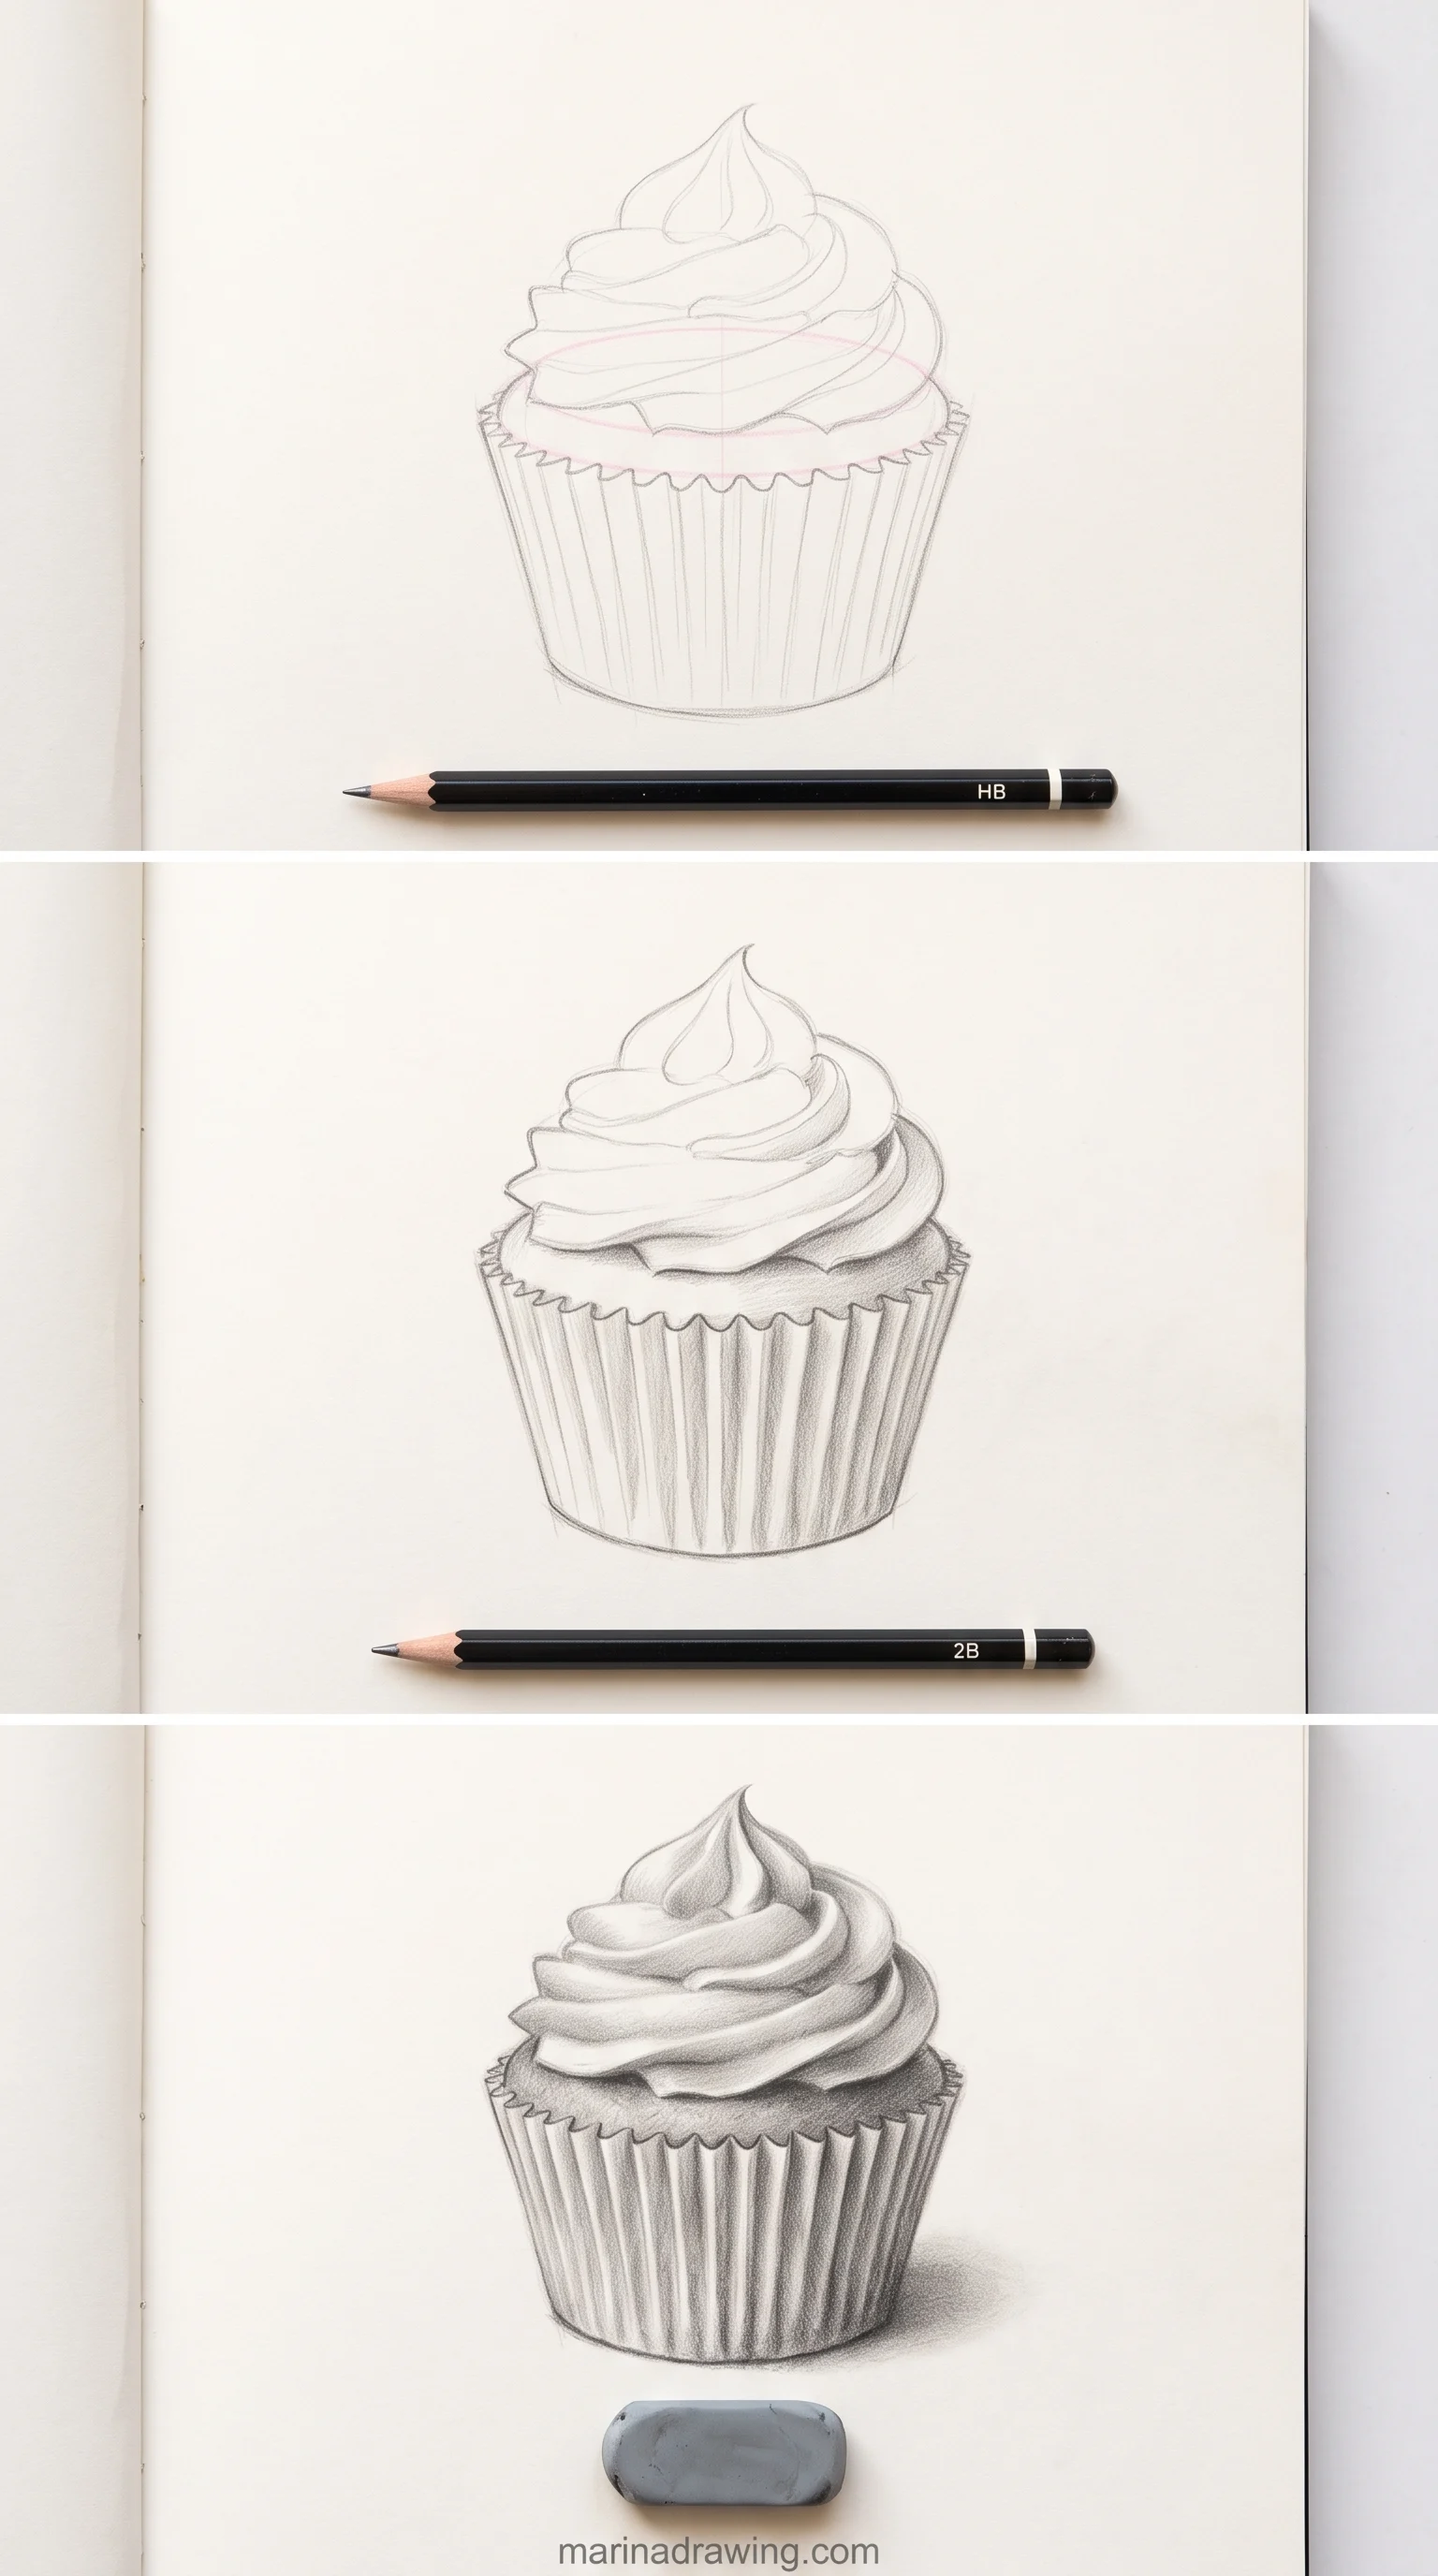
A cupcake is a soft form on a hard one: a cone liner with a puffy frosting on top. First on the paper: the liner as a cone upside down, with its own top ellipse, then the frosting as a loose dome that starts outside that ellipse.
 Pin it
The typical error is frosting you keep inside the liner’s edge, like a lid. Frosting overhangs. Its bottom edge dips below the liner rim at the front and hides it at the sides.
Passed when the overhang reads all the way round and the liner’s pleats follow the cone, not straight down.
 Pin it
 Pin it
Every join on these three rungs is checked the same way: one centre line, two ellipses that agree. On an iPad the grid overlays make that check a measurement instead of a guess.
Rungs 7 to 10: Overlap and the Negative Space Between
The last four rungs add overlap: one form in front of another, and the empty space left between them. This is where you’ll stall. It’s also the point where people go back to copying a finished picture line by line, because copying hides overlap and building exposes it.
7. The Sneaker
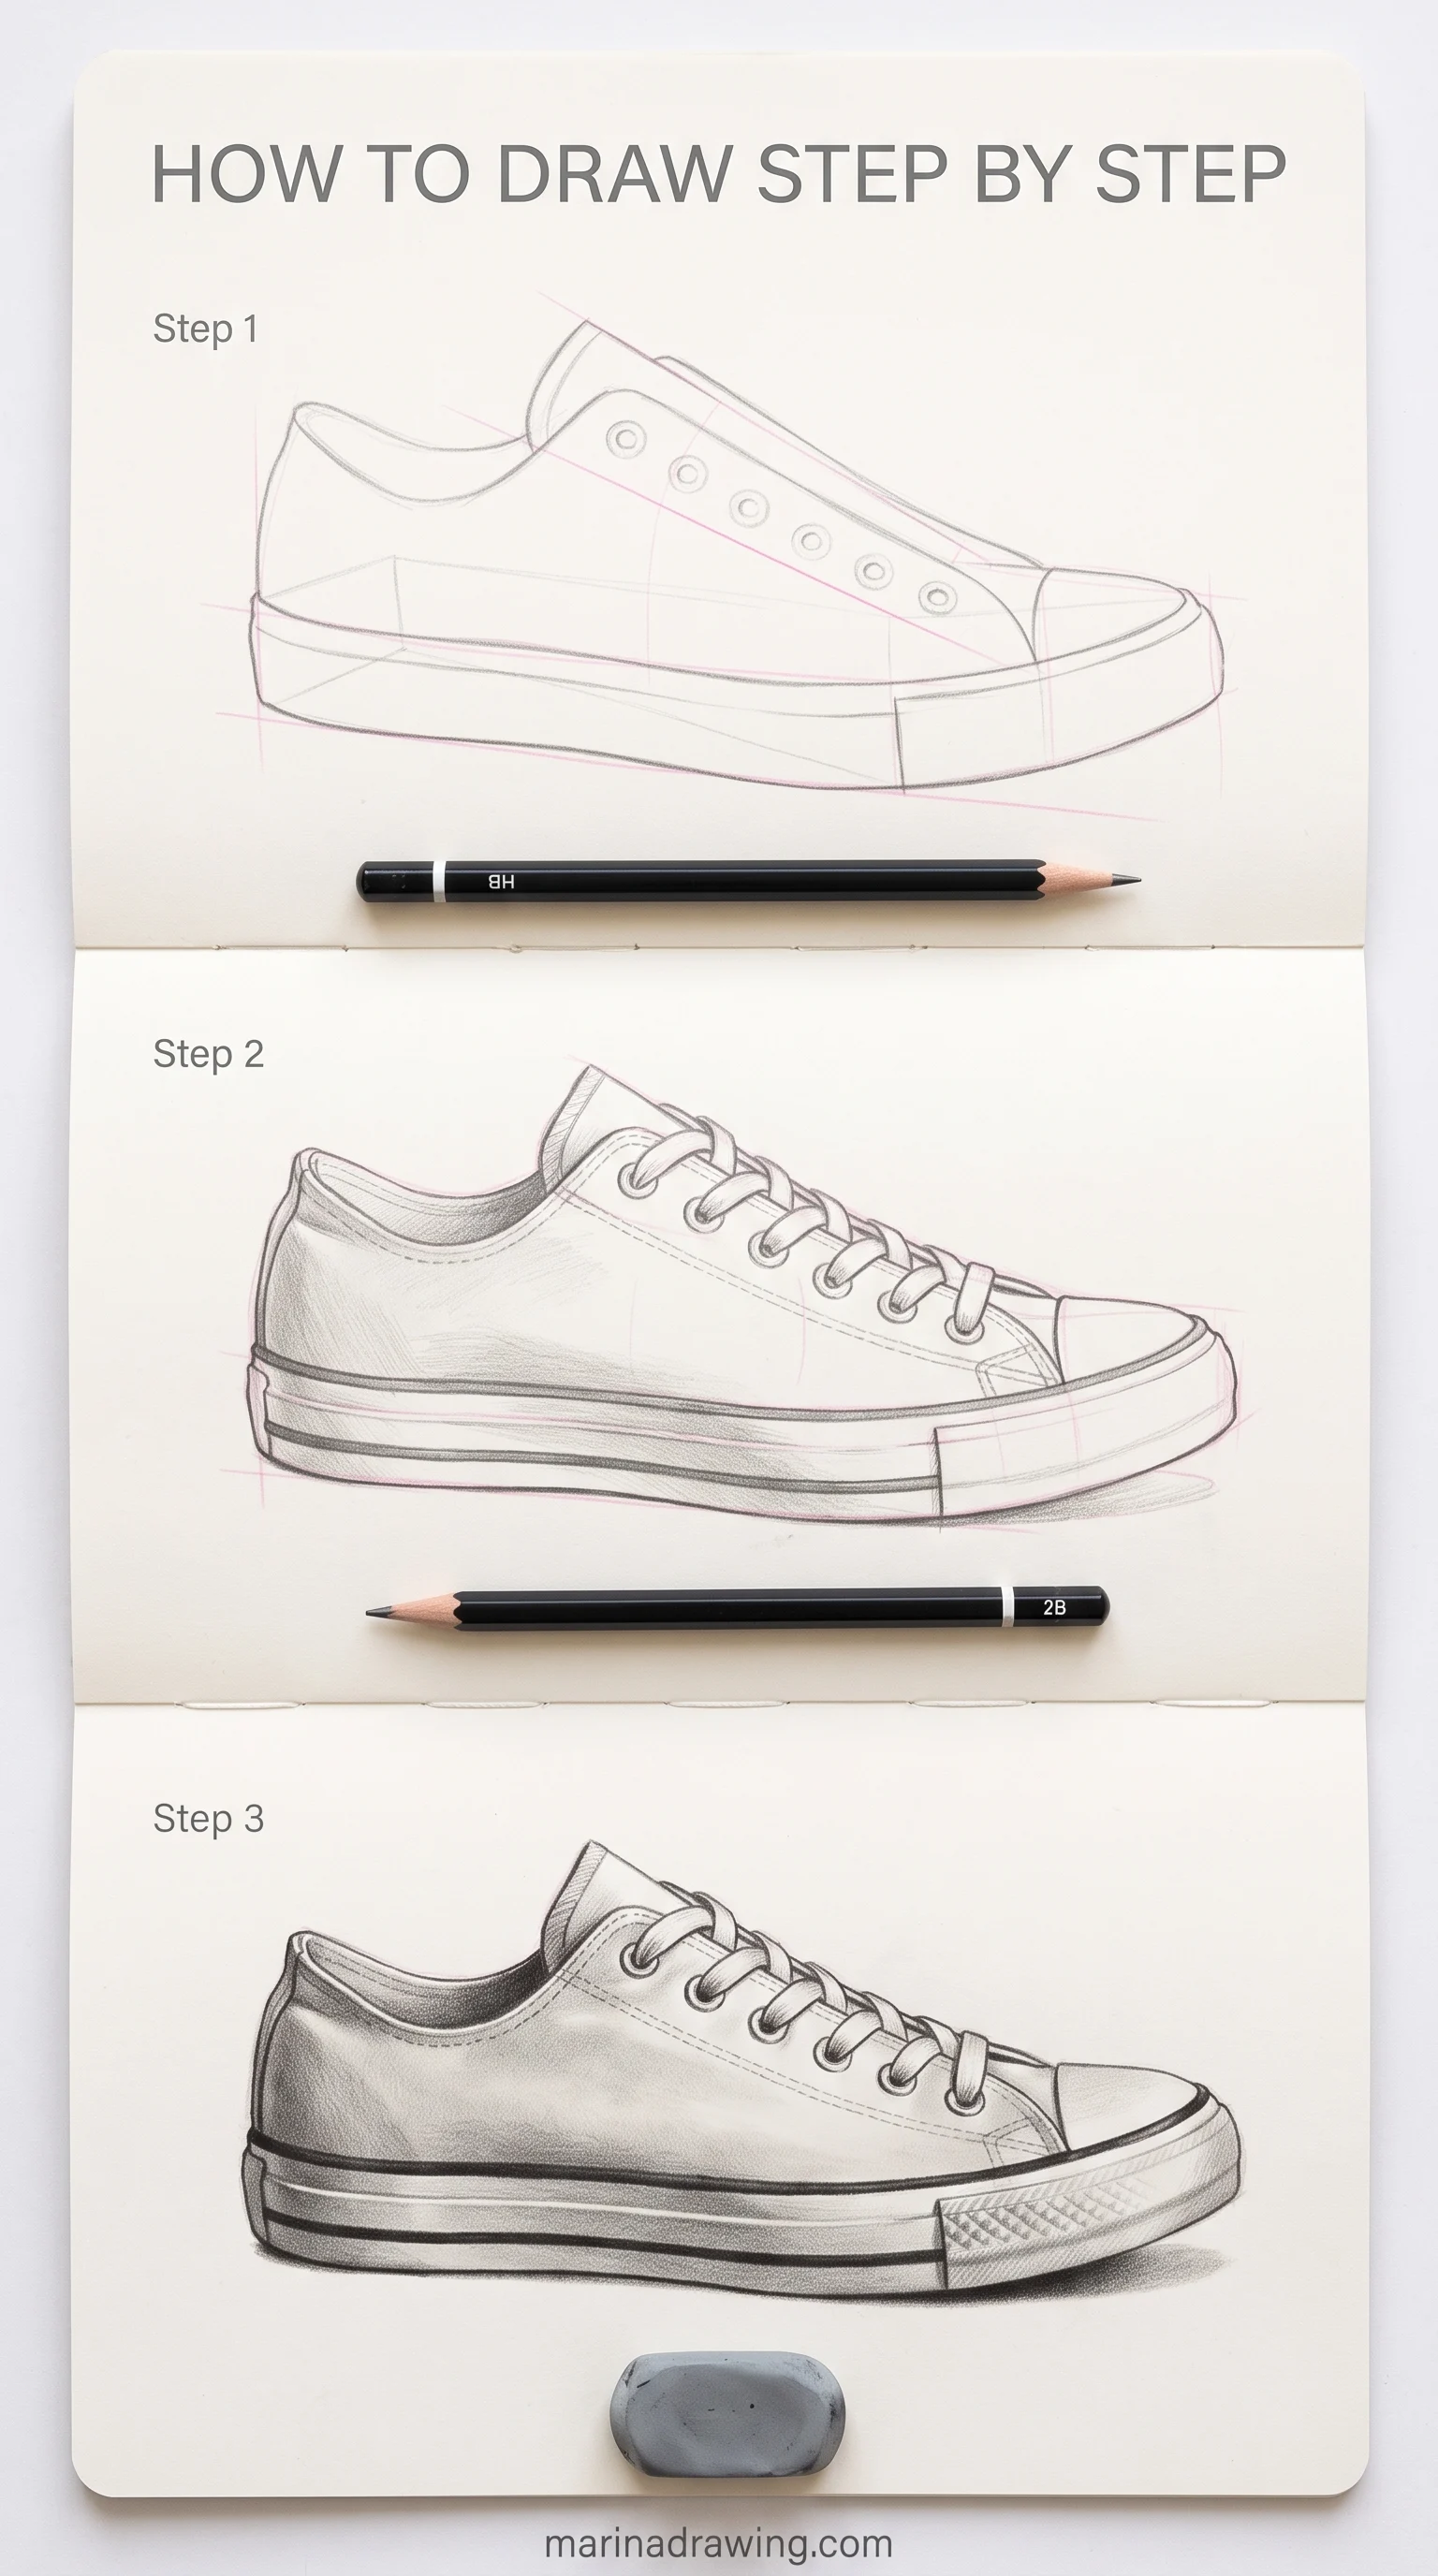
A sneaker is a long wedge seen from the side and a little from above. First on the paper: a box for the whole shoe, narrower at the toe, then a curved sole line that bends up at the front.
The typical error is both ends drawn the same size, a perspective problem in miniature. From any angle but flat side view, the far end you draw is smaller. The ankle opening is also an ellipse, and it’s the one you’ll draw as a flat line.
Passed when the laces follow the curve of the top and don’t sit in a straight row.
 Pin it
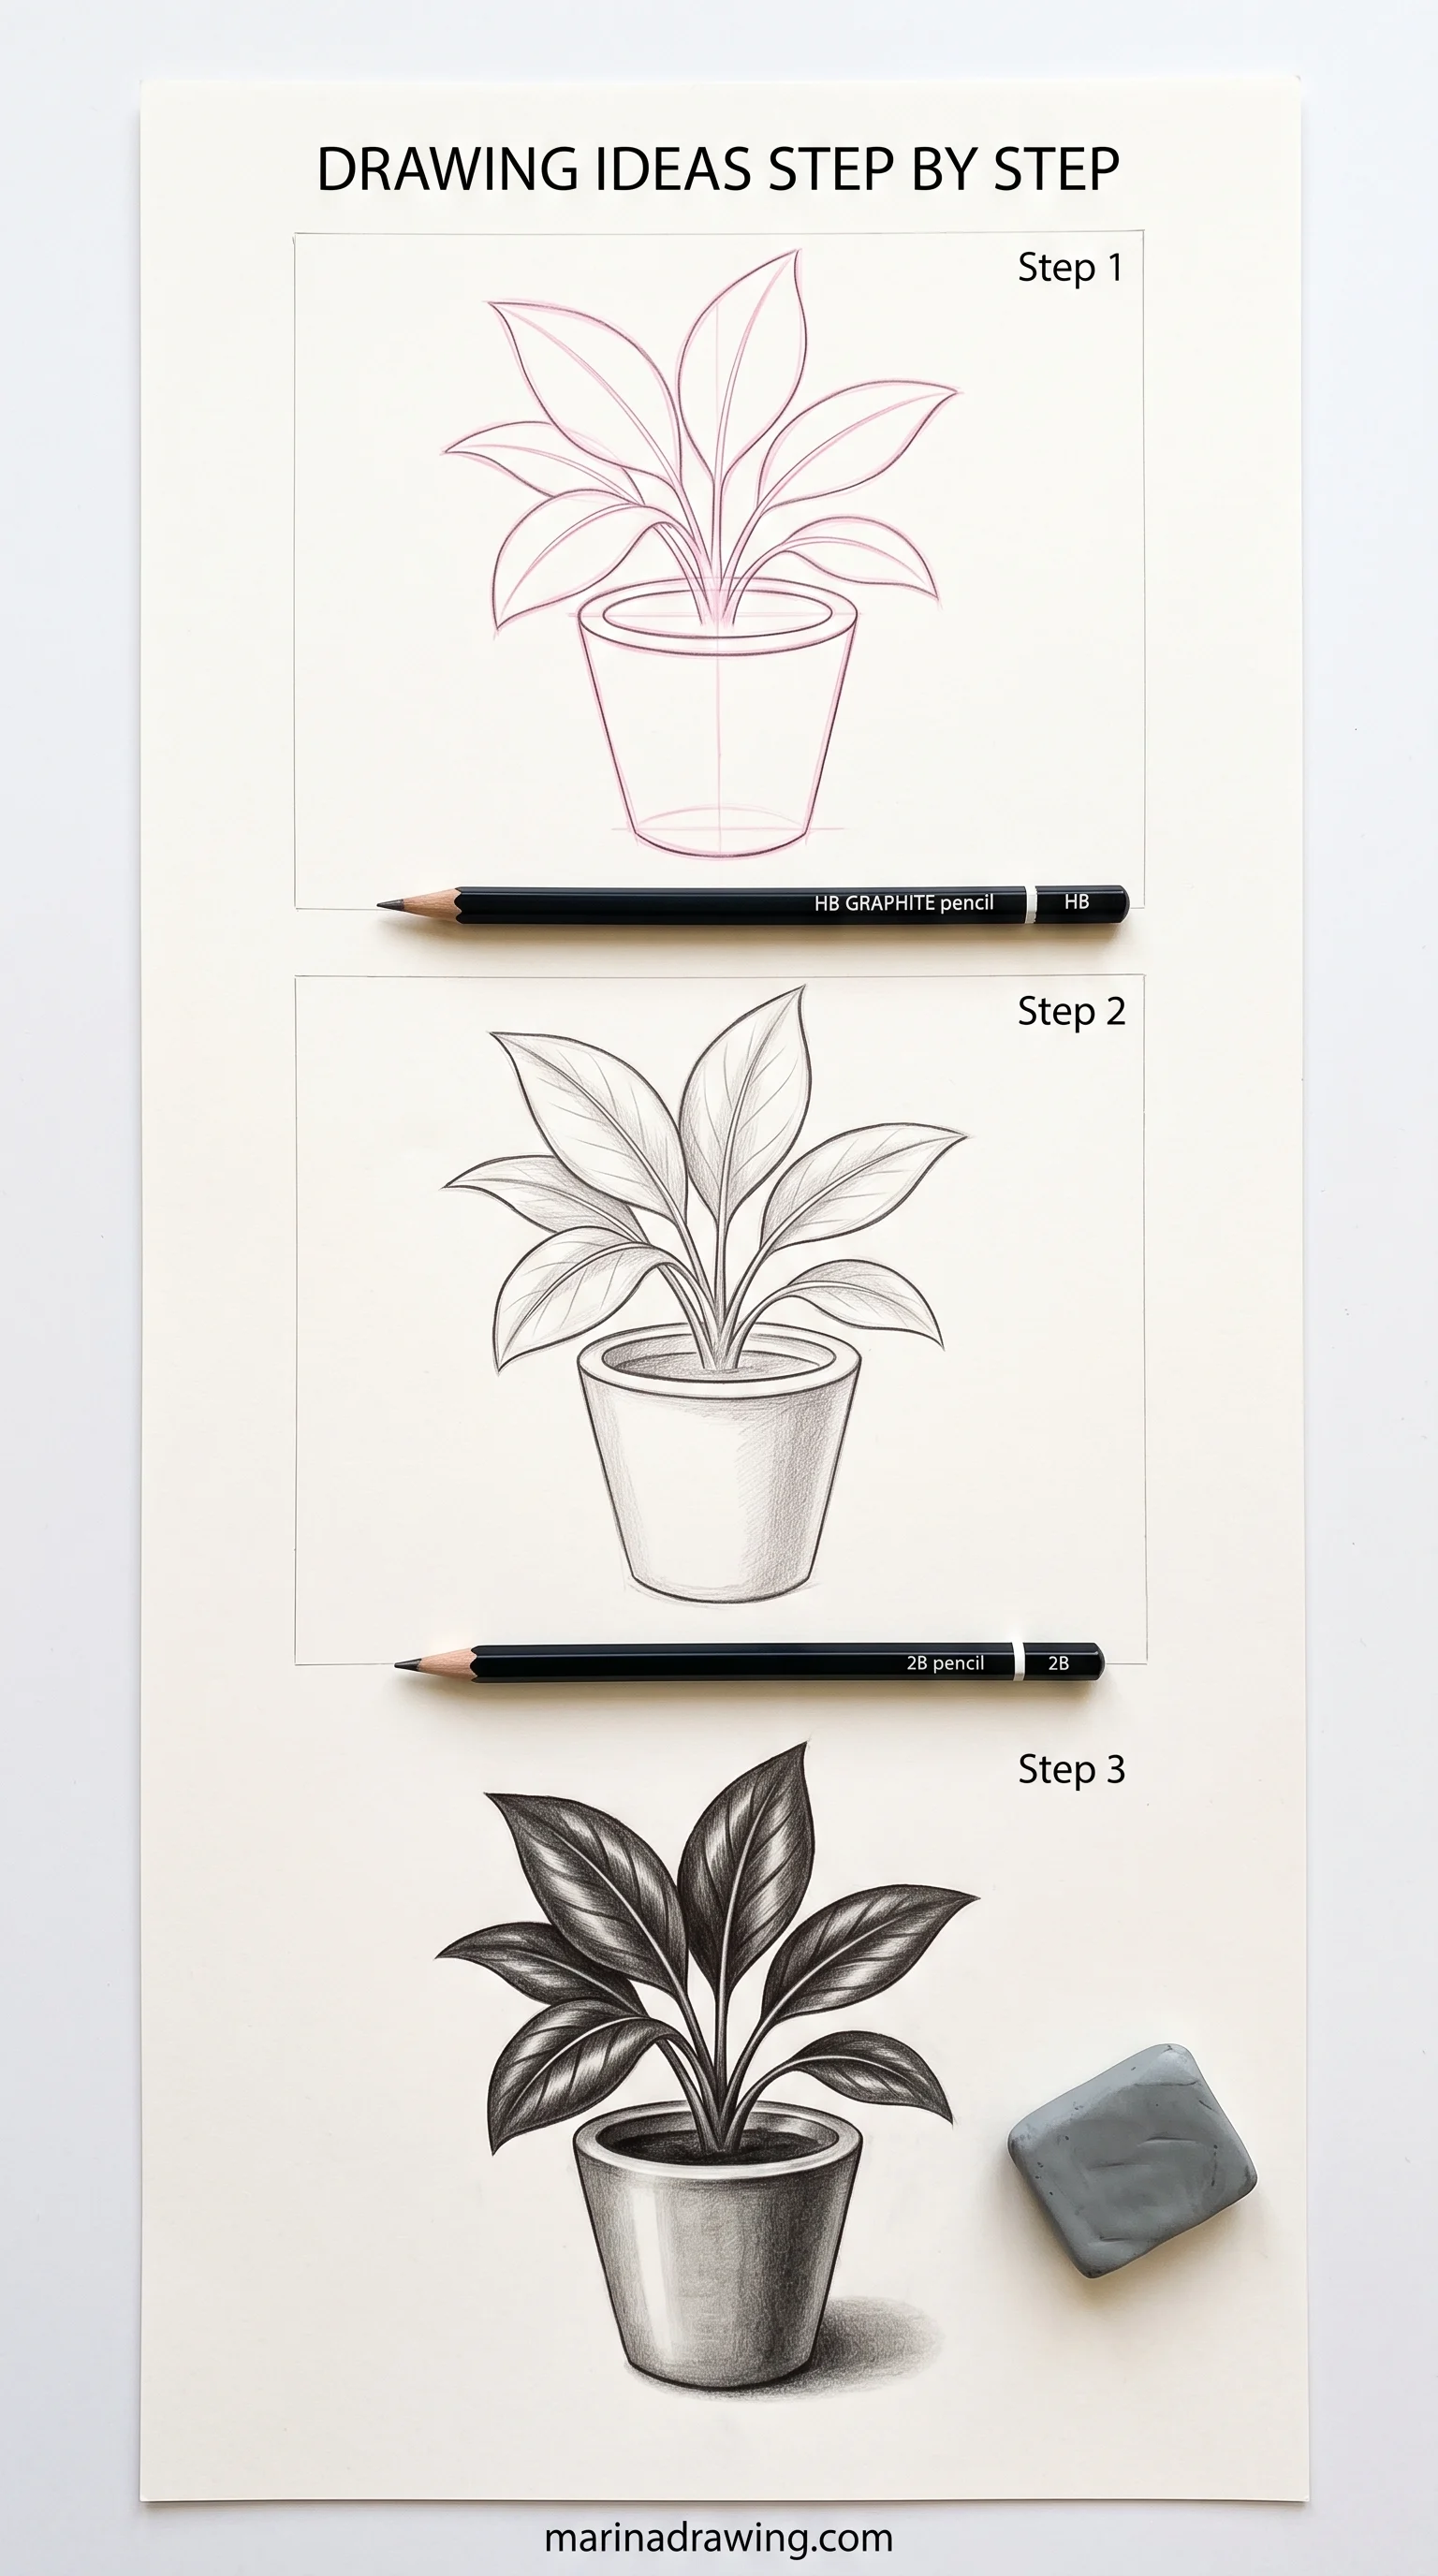
8. The Houseplant in a Pot
This rung is the pot from rung 4 plus leaves that overlap each other. First on the paper: the pot, then a light line for each leaf’s centre rib, fanning from one point in the soil.
The typical error is leaves drawn side by side, each one complete, like cut-outs laid on a table. Real leaves hide parts of each other, and your drawing needs the same overlap that shapes easy flower drawings.
Draw your front leaf whole and let it cut into the edge of the leaf behind.
Passed when you can point at any two leaves and say which one is in front.
 Pin it
Overlap is the rung where a faint block-in earns its keep; on paper that is the HB, on an iPad a sketch brush that stays light.
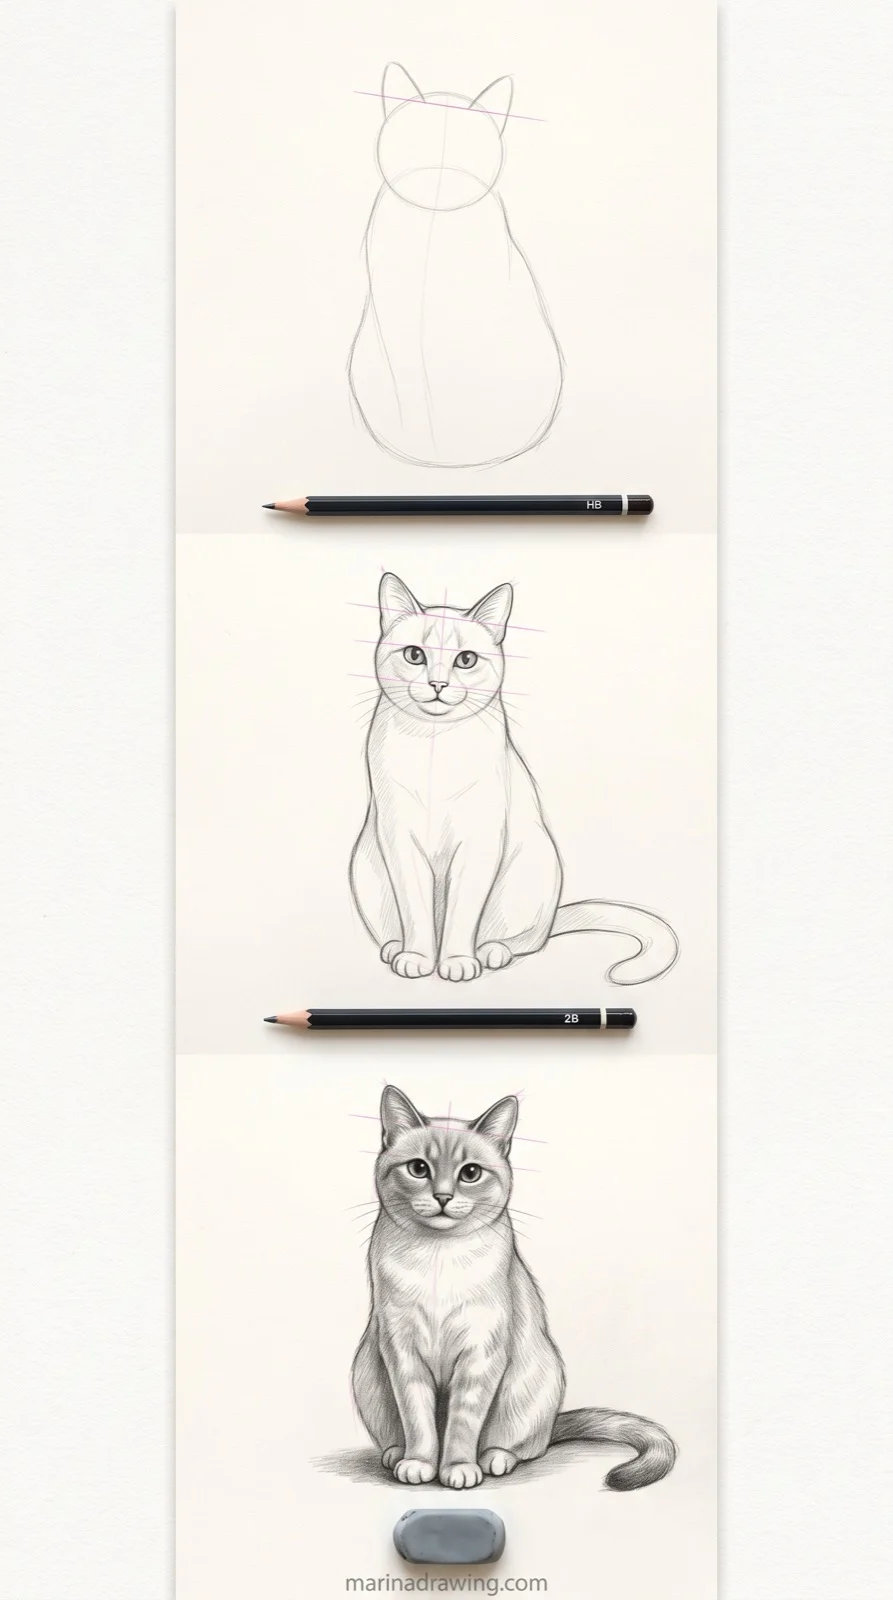
9. The Sitting Cat
A sitting cat is a pear for the body, a circle for the head and a tail curling round the front. First on the paper: the pear, then the head circle overlapping its top, then the tail as one curved line along the ground.
 Pin it
The typical error you’ll catch is ears of different sizes and a tail glued to the body. Draw a light line across the head through both ears, and keep the space between tail and front paws open.
That gap is a shape in its own right, and if it looks wrong to you, the cat looks wrong.
Passed when the gap between tail and body reads as real space with nothing drawn inside it.
 Pin it
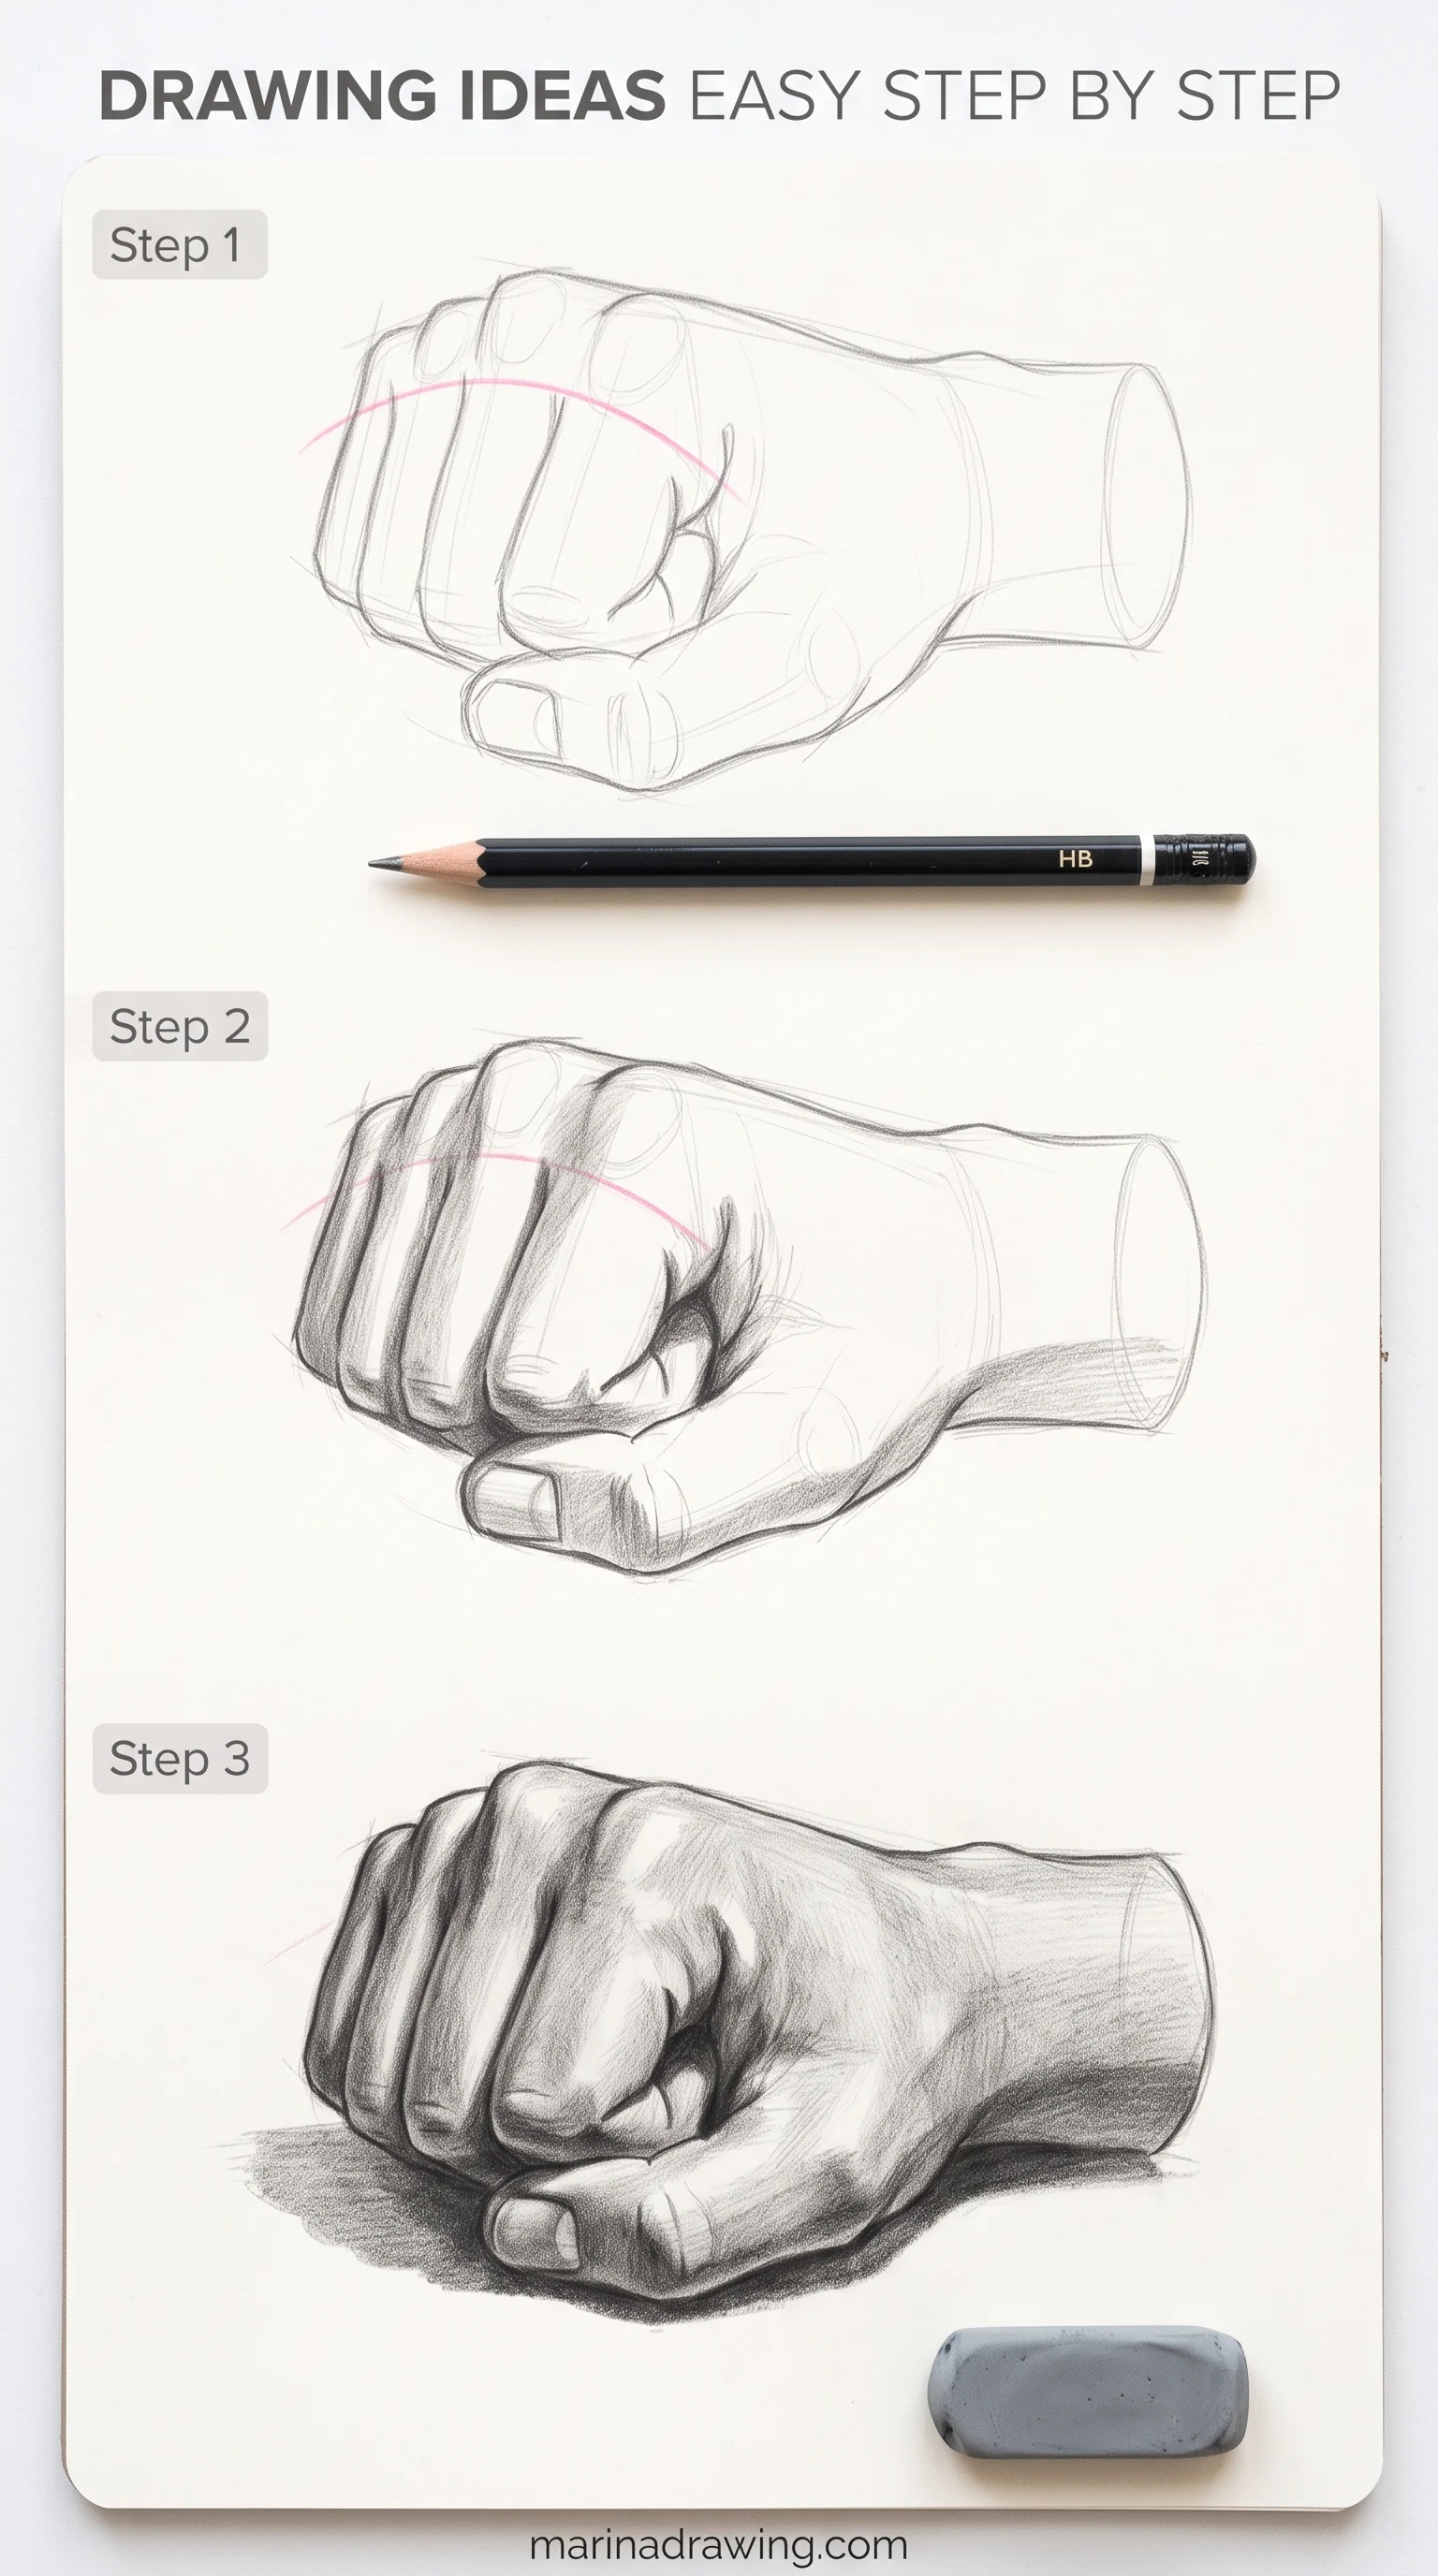
10. The Fist
A fist is the first rung that leads straight into drawing hands. It is four blocks pressed together, with the thumb wrapping in front. First on the paper: a box for the palm, then a curved line for the knuckles, then the finger blocks stepping down from it.
The typical error is knuckles you put in a straight row, like piano keys. The row curves, and the little finger sits lowest. The thumb is its own form and it overlaps the first finger, so it goes on after the fingers, not with them.
Passed when the knuckle curve holds without correction and the thumb clearly sits in front.
 Pin it
Drawing the ladder on an iPad
1. Illustration Brushes for Procreate
A pencil-style sketch brush keeps the block-in as faint as a real HB, so the forms stay easy to rebuild.
2. Procreate Grid and Texture Set
Grid overlays turn check three, size of parts against each other, into a measurement instead of a guess.
3. Procreate Line Brushes
A tapered line for the last step only, once the forms under it are right.
It Looks Off: Five Checks, in This Order
When a finished drawing looks off, the urge is to erase the part that bothers you most. Don’t. The part that bothers you is where the error shows, not where it started.
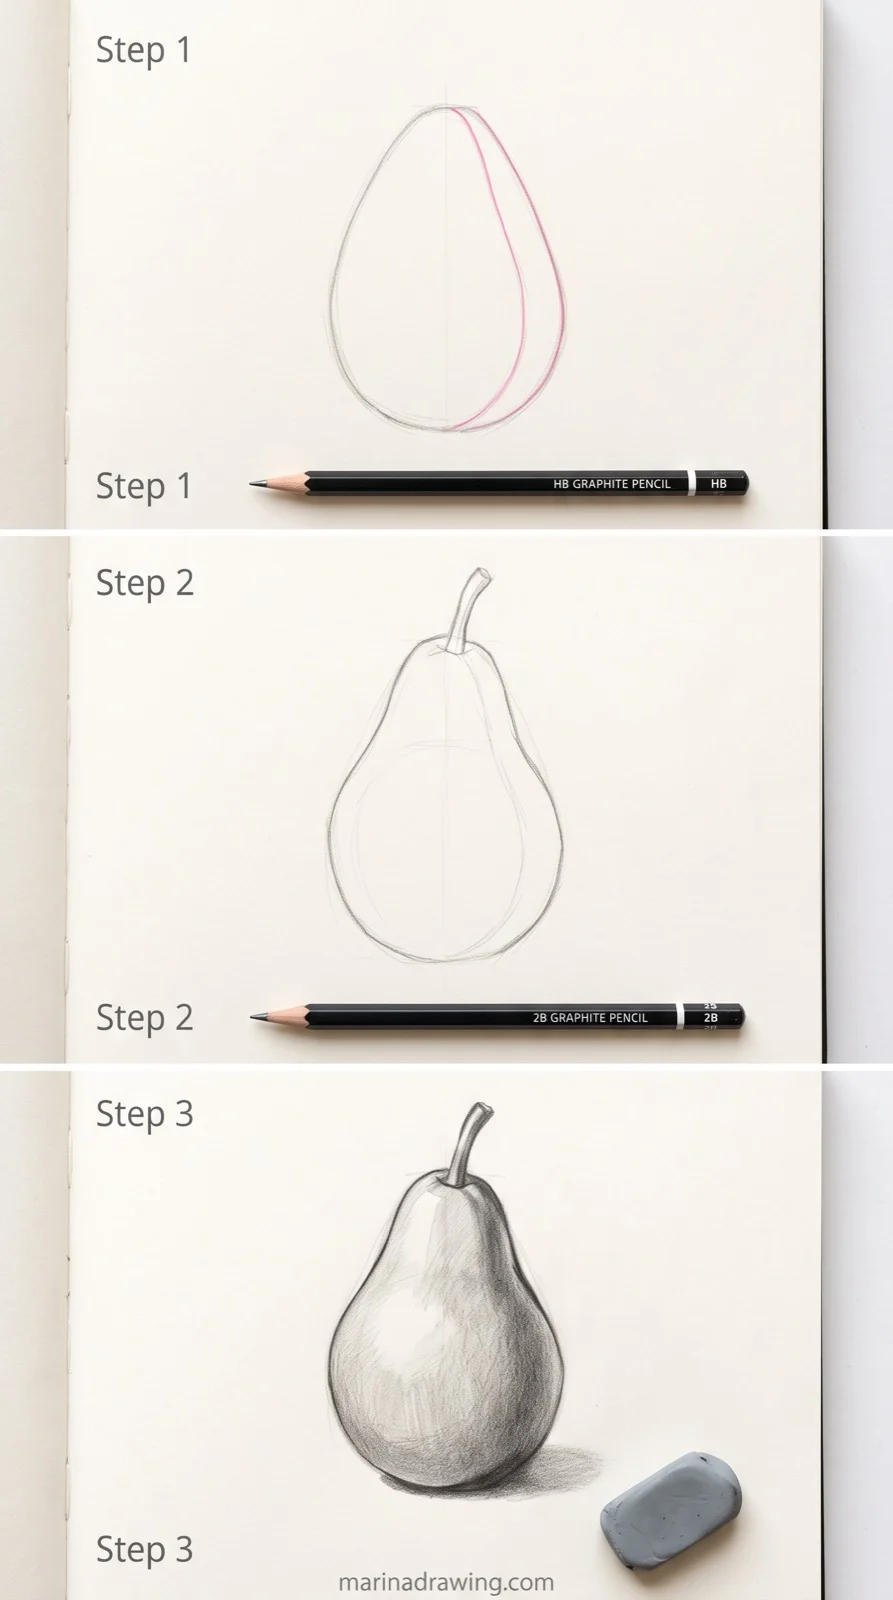
Run these five checks in order, and stop at the first one that finds something on your page.
 Pin it
Run them in this order, and stop at the first one that finds something.
1. Step back, or mirror the page. What you see: the drawing looks fine up close and wrong from across the room. What it means: your eye got used to the error while you drew.
What to redraw: nothing yet. Flip the page horizontally, on paper hold it up to a mirror, and the tilt shows up at once. Now you know where to look.
2. Ellipses and axes. What you see: the object leans or wobbles. What it means: two ellipses don’t share a centre line. What to redraw: put the centre line back in and fix the ellipse that’s off it.
On rungs 1 to 4 this check finds the error most of the time.
3. Size of parts against each other. What you see: the thing looks like a cartoon of itself. What it means: one part grew while you drew it.
What to redraw: hold the pencil at arm’s length, measure the head against the body or the pot against the plant, and resize the part that’s wrong, not the whole drawing.
4. Space between forms. What you see: the drawing looks crowded or flat. What it means: the gaps between forms are the wrong shape. What to redraw: look at the empty shape between tail and paw, or between two leaves, and redraw that shape. The forms around it fix themselves.
5. Where the outline is thicker than the form. What you see: a heavy, stiff line around everything. What it means: the outline went dark before the forms were right, and now it’s holding the error in place.
What to redraw: lighten the outline with a kneaded eraser, fix the form underneath, then put the outline back lightly and only darken it where the form turns away from the light.
The order matters for one reason: each check costs you less than the next. A mirror costs a second. Redrawing an outline costs you the evening. Start cheap.
Check three is the one I stopped guessing at: a grid and texture set turns measuring one part against another into something you can see.
Pencil, Paper, Eraser: The Whole Kit
42 hours of pencil drawing training, lifetime access
The video course I point plateaued students to — full lessons on portraits, hands, and realistic shading, not another short tutorial.
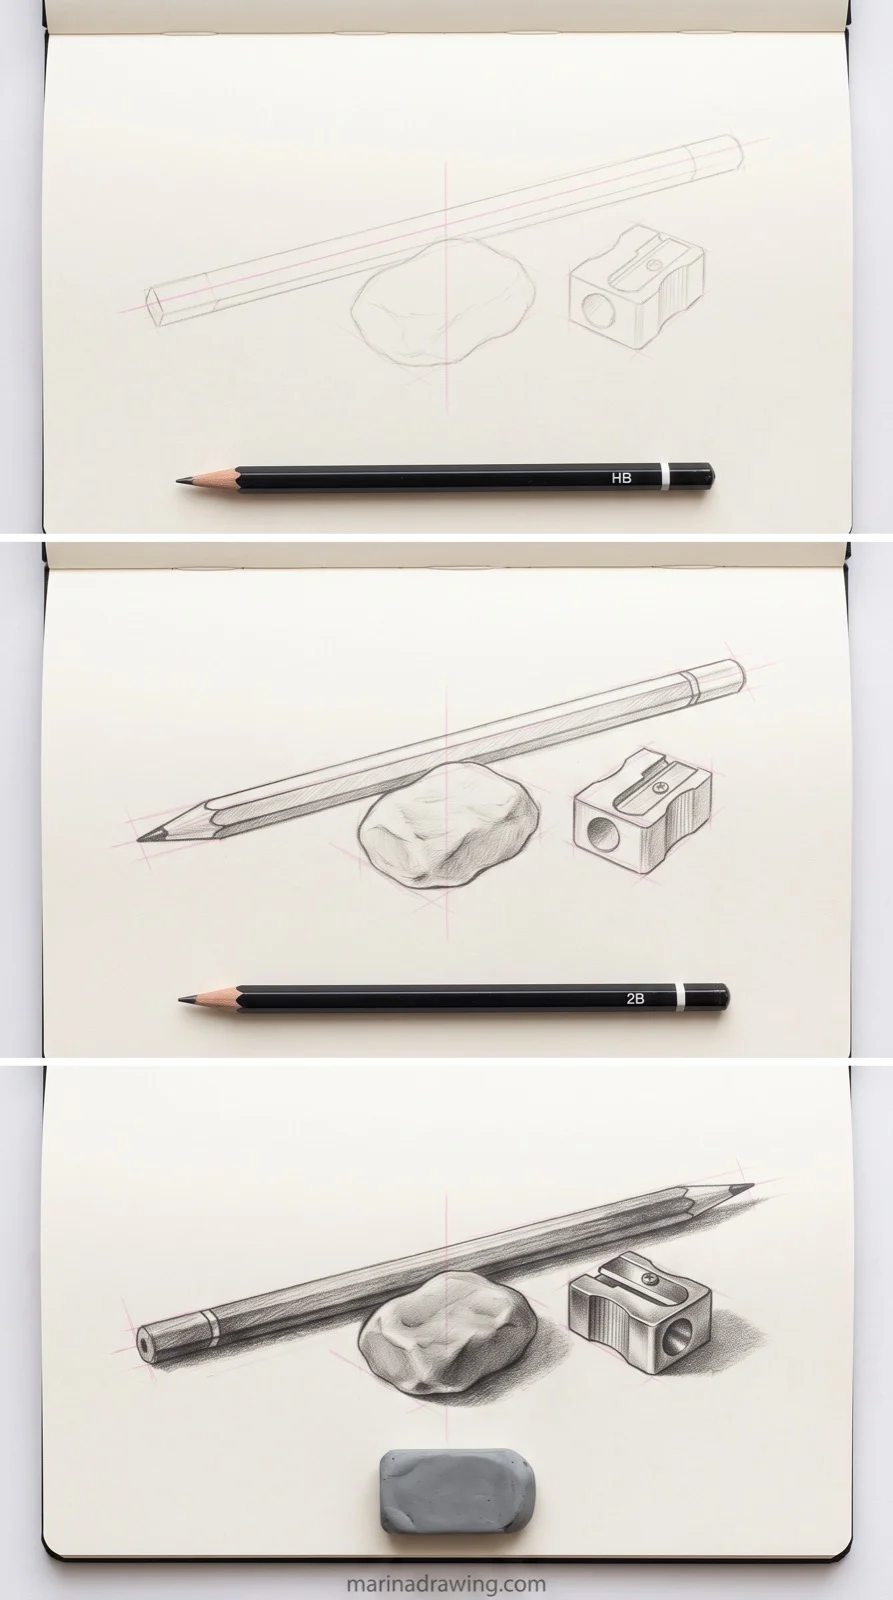
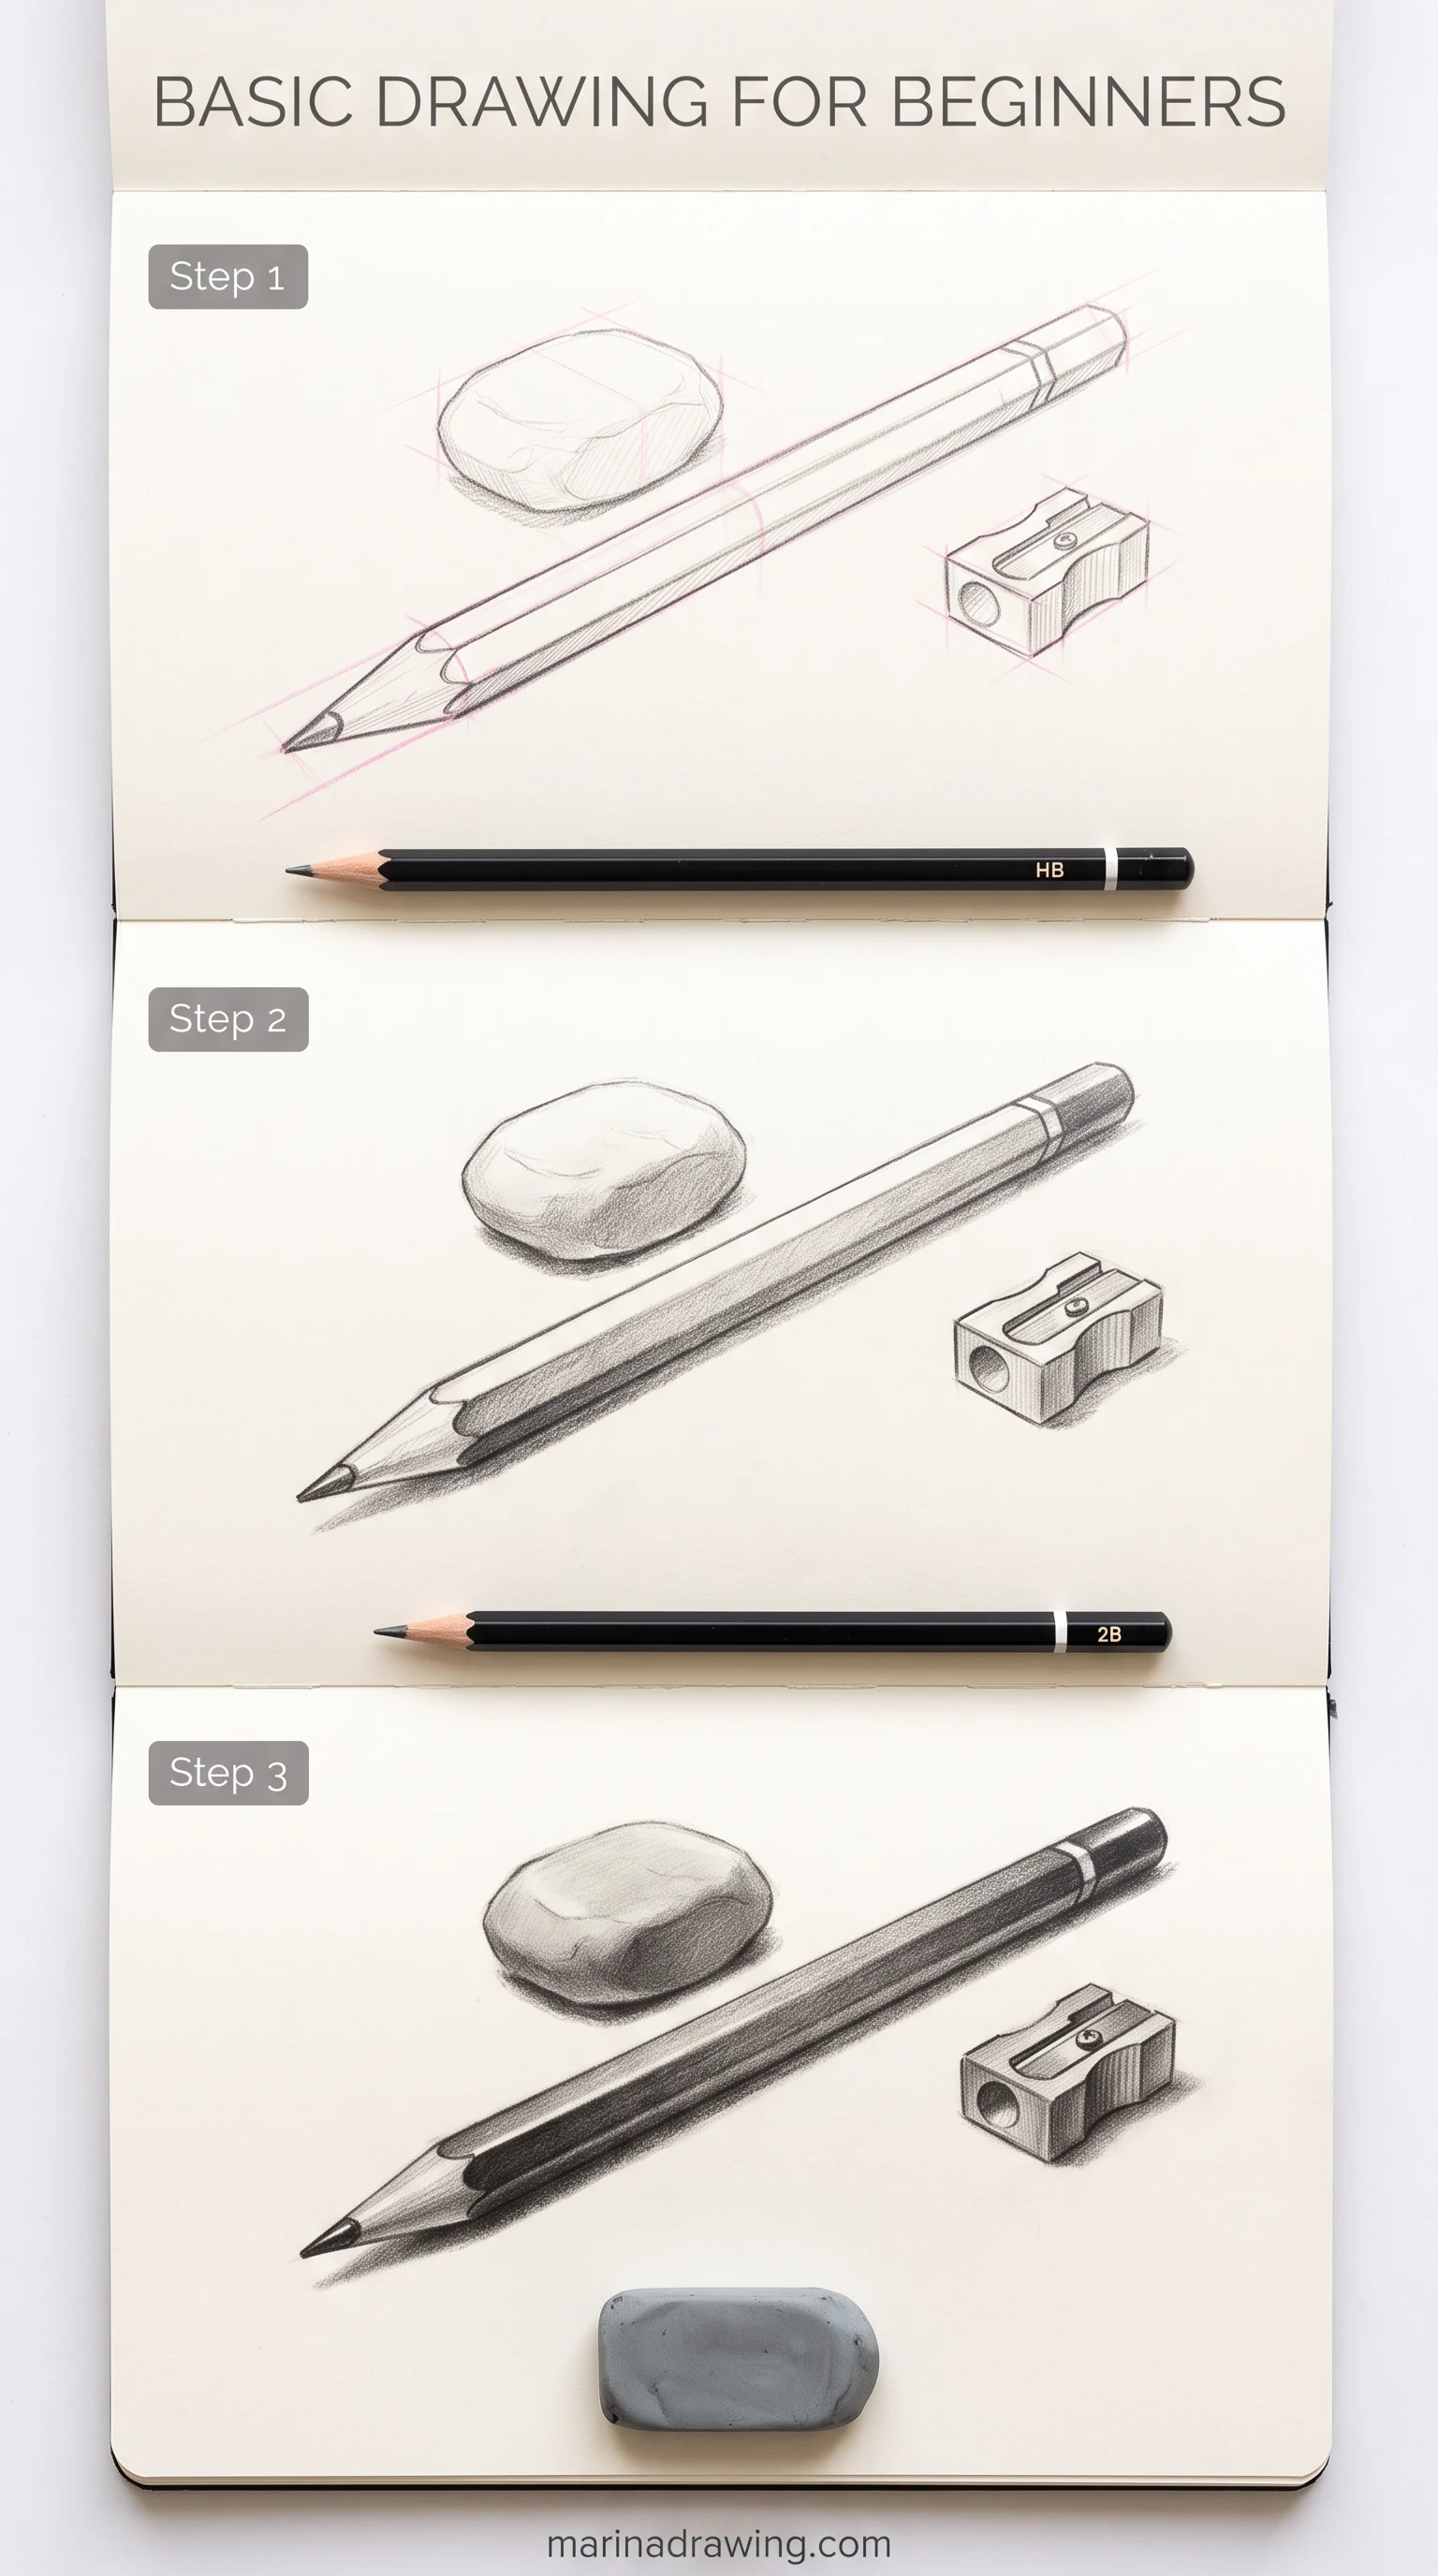
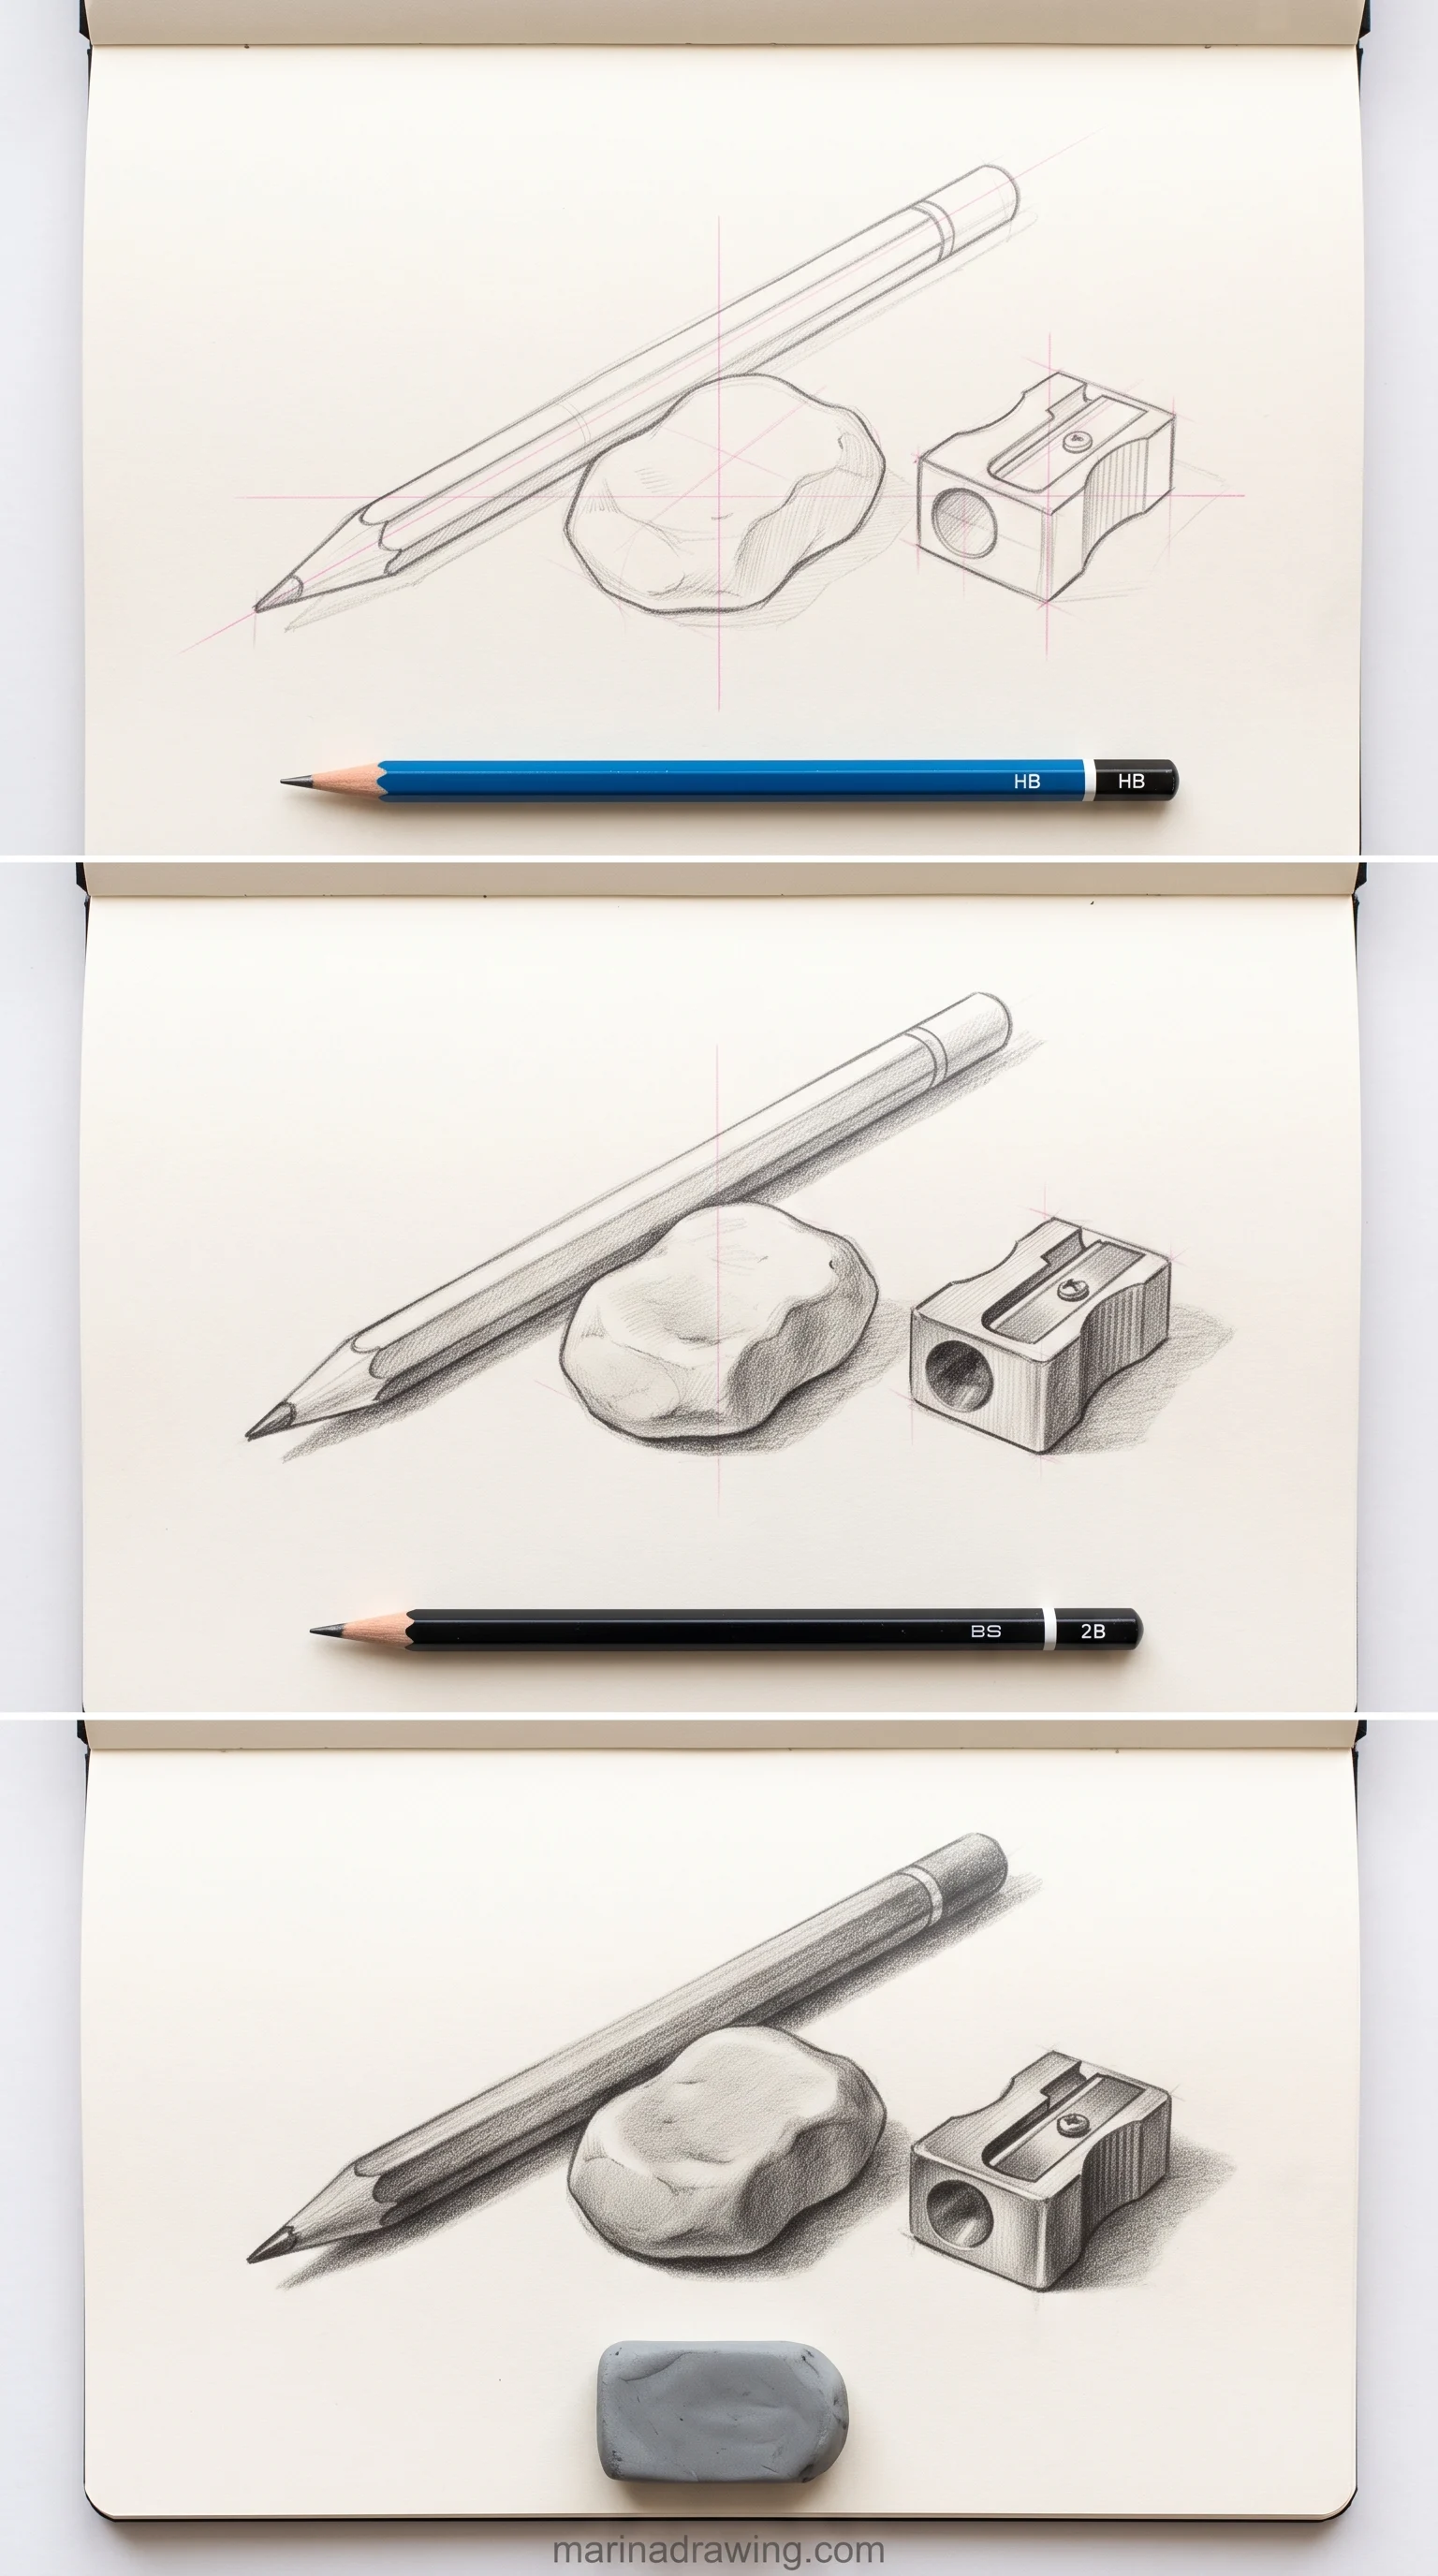
You need less than a supplies list suggests. One HB pencil for the construction lines, because it stays light and erases clean. One 2B for the final outline and any shading, because it goes darker without pressing hard.
A kneaded eraser, the soft grey kind you pull into a point, lifts graphite without scrubbing the paper.
 Pin it
That is the whole kit:
 Pin it
Three items, nothing else, before you start.
- one HB pencil for the construction lines
- one 2B for the outline and the tone
- a kneaded eraser to lift graphite back out
- plain paper around 100 gsm, a sheet per attempt
 Pin it
Lift, don’t scrub.
Paper around 100 gsm is enough for what you’re doing. That weight takes erasing without pilling and costs little enough that you’ll use a sheet per attempt, which is the point. Sketchbook paper sold for pencil is usually in the 80 to 100 gsm range.
Skip 2H to 6B sets for now: the ladder is about form, and a full range of pencils is a shading problem this article doesn’t ask you to solve yet.
Drawing on an iPad changes the tools but not the ladder. Layers do the work of the HB: build the forms on one layer at low opacity, draw the outline on a new layer above, then hide the construction.
Settle brushes before rung one, so the app doesn’t eat the first evenings: a pencil-style sketch brush keeps the block-in as faint as a real HB.
When a Rung Is Passed, and What Comes After Rung Ten
A rung is passed when you draw its subject three times in a row and none of the three needs a construction fix. Outline touch-ups don’t count against you.
Moving an ellipse, resizing the head or rebuilding the knuckle curve does. One clean drawing can be luck, and you know it. Three in a row means the order has moved into your hand.
Be honest with yourself about the reset. If rung seven passes but rung eight keeps failing on the pot, go back to rung four for one evening. The pot is a rung four problem, and drawing it alone for a sheet is faster than fighting it underneath the leaves.
A rung you keep failing is worth one evening of watching it drawn: that is what the lesson library is for.
What Comes After Rung Ten
This ladder isn’t for everyone. If what you want is cute doodles and kawaii faces for a journal, you don’t need construction at all: those styles are flat on purpose, and a doodle list like these quick sketches will serve you better.
The ladder is for the person whose drawings look off and who wants them to look solid.
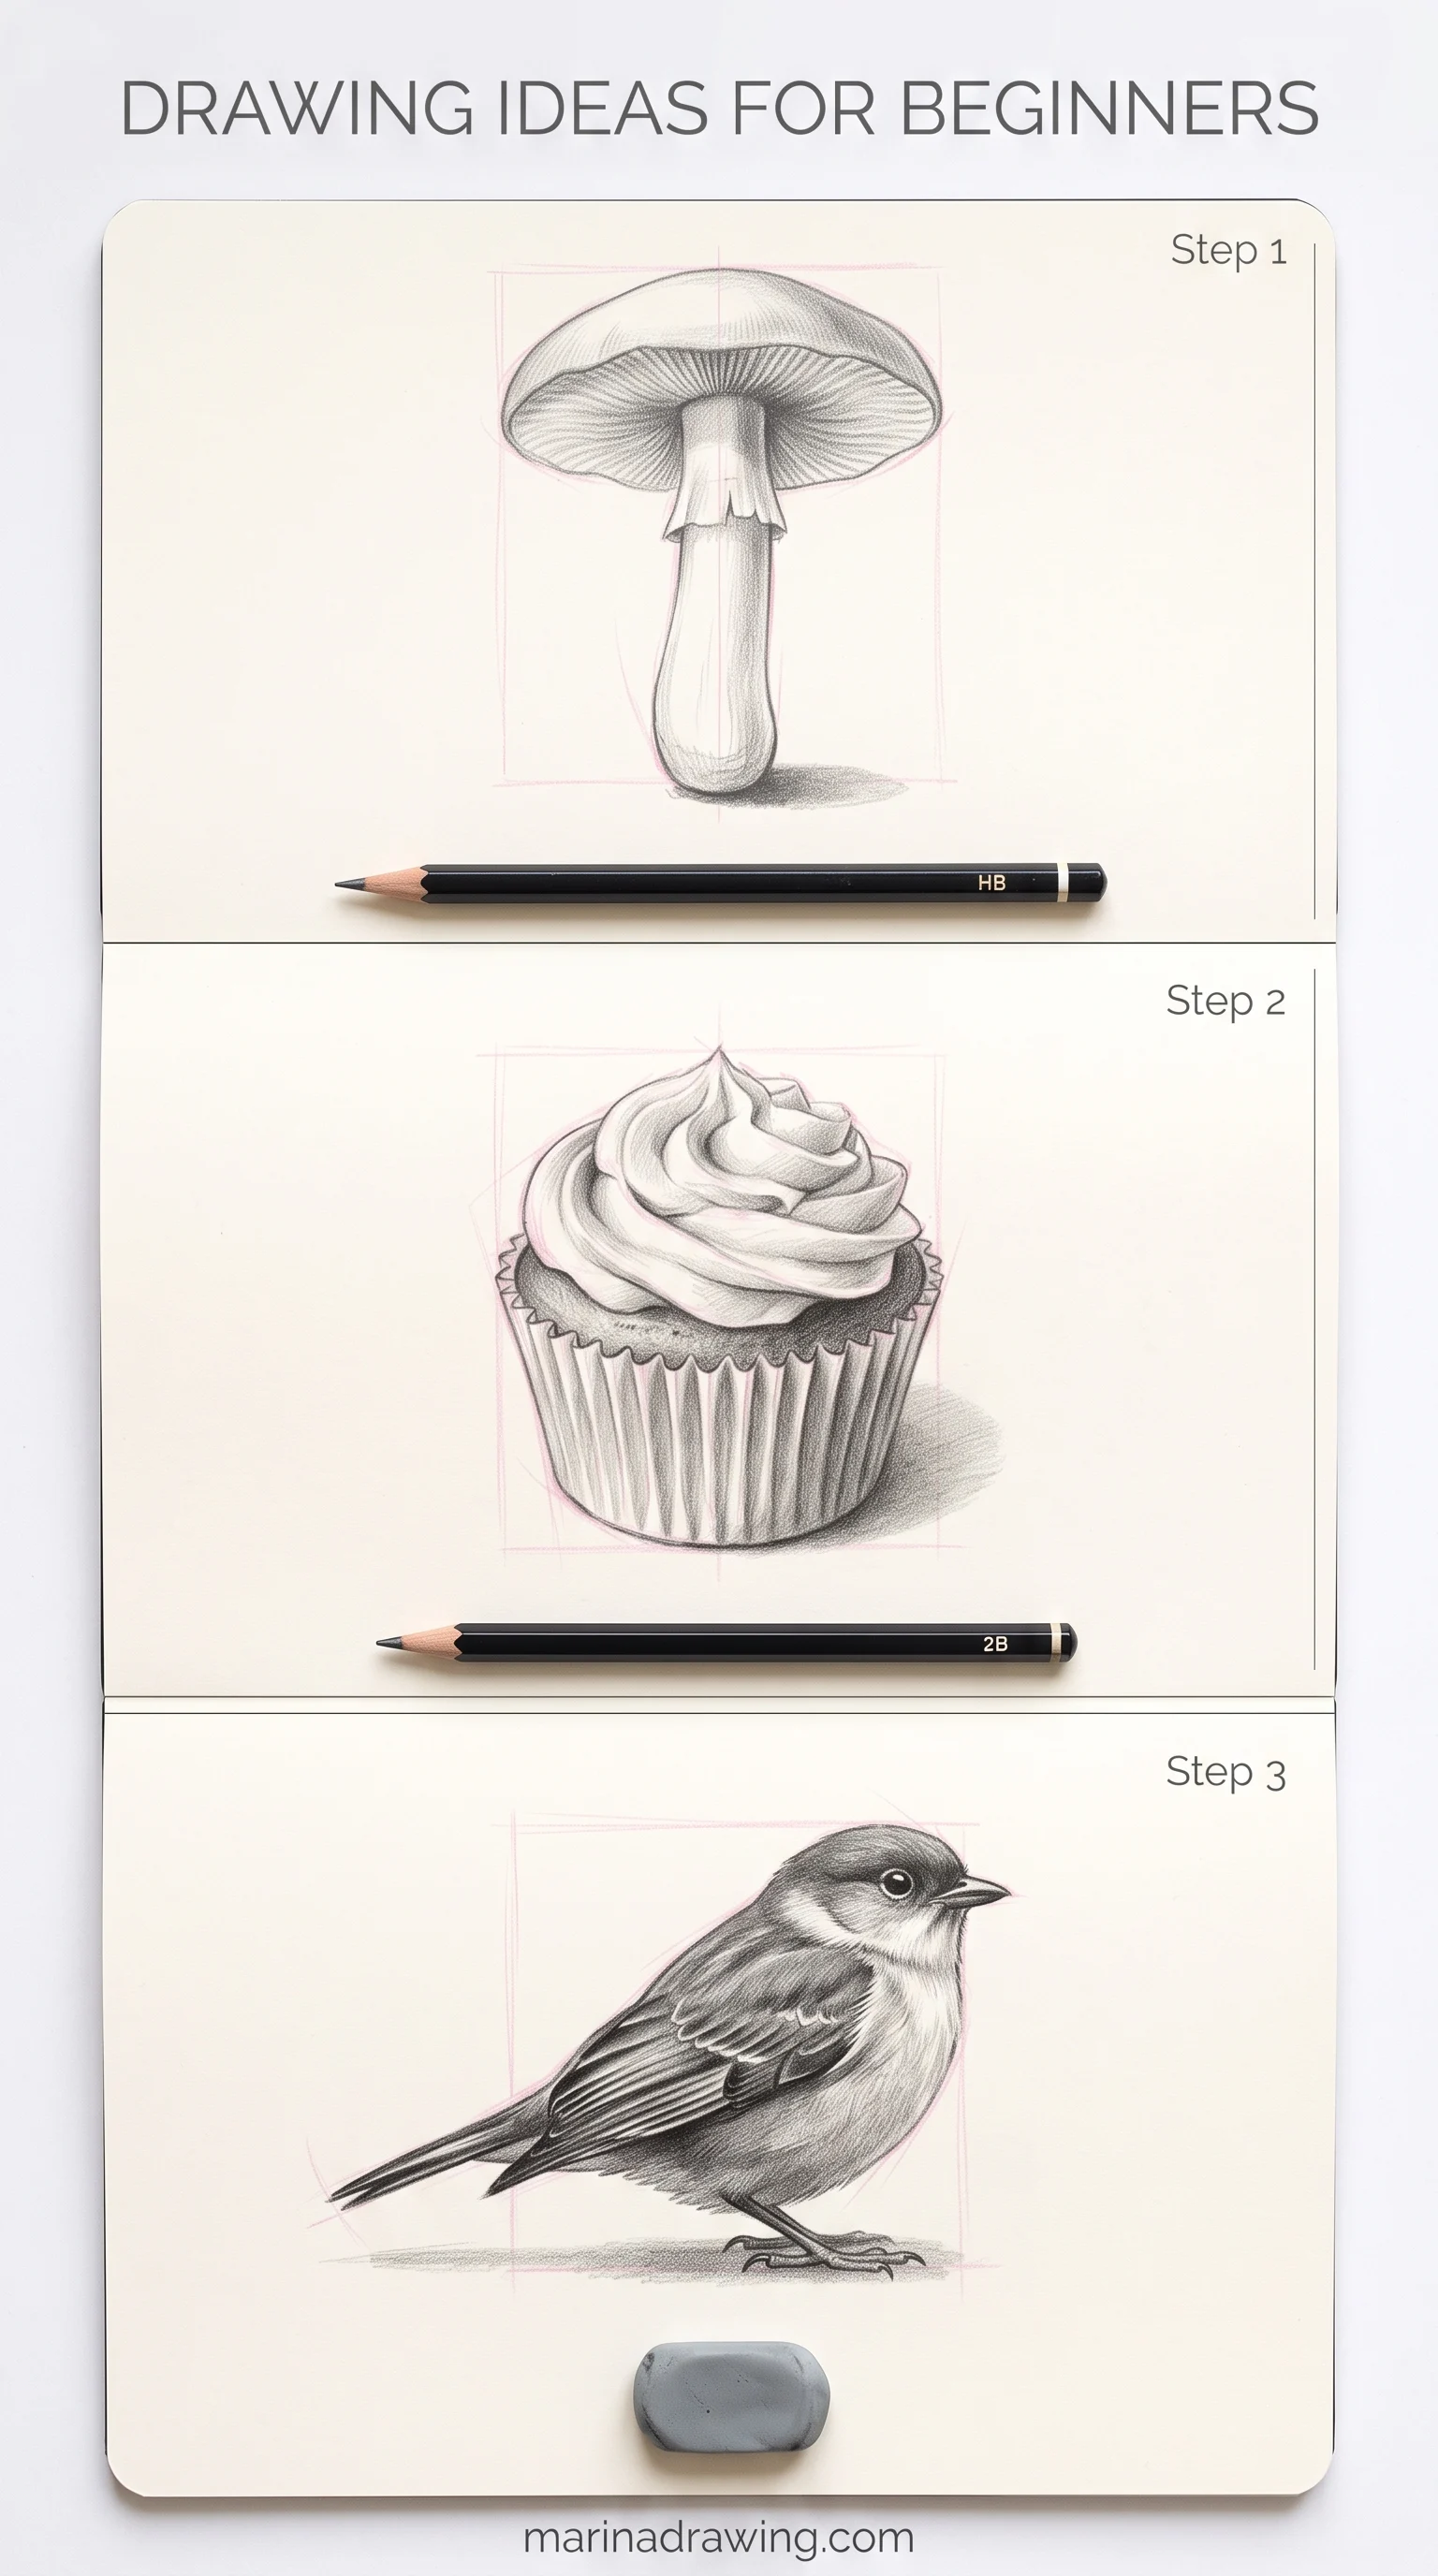
After rung ten, three things wait, and they’re a different kind of problem.
 Pin it
Rungs three, six and nine.
- Faces, the subject of portrait drawing: proportion across eyes, nose and mouth, parts with no hard edges.
- The full figure, covered in anatomy for self-taught artists: the same block-in as the fist, repeated across the body and balanced over the feet.
- Shading by form, the core of realistic shading: the full range of pencils you skipped in the kit, and one light source held in place.
None of these fits in a list of easy drawings for beginners step by step. Each one is its own ladder, built with the same rule: form first, outline last, and each one is taught in that order in the course.
 Pin it
Questions Beginners Ask
What should a beginner draw?
What should a beginner draw first is a question of order, not of subject. Start with a mug, then an apple, then a mushroom: one solid form each, and you keep them in that order.
Move to two forms that touch, then to overlap. A cat or a face on day one tests five problems at once, so you can’t tell which one failed.
What is the easiest thing to draw for beginners?
A mug. It’s one cylinder and two ellipses, and every mistake on it shows in two lines you can point at. That makes it the easiest thing to draw and the most useful one, which aren’t always the same.
 Pin it
How do beginners start drawing?
With a light centre line and the biggest form, before any outline. Build the solid shape with an HB pencil, check it, and only then draw the outline in 2B.
Keep every early drawing to one sheet so starting again costs nothing.
Do I need a course to learn this?
No. The ten rungs above are the whole method and they cost nothing. What a page can’t show is the block-in happening in real time, which is the one thing a video lesson does better than text.
What shape should I draw first?
Draw the largest form first, whatever the subject is: the body of the bird, the pot of the plant, the palm of the fist. Small parts go on after, because their size and place depend on your big form being right.
What if my circles are not perfect?
They don’t need to be. A construction circle is a guide you’ll erase. Draw it with several light passes from the shoulder, not one careful line from the wrist, and it evens out.
What matters is that your two ellipses share a centre line, not that either is perfect.
I can barely draw a straight line. Can I still learn?
Yes. Straight lines come from moving your whole arm, and that’s practice, not talent. The ladder barely uses straight lines anyway. Its first rungs are ellipses and curves, and a wobbly construction line is fine because it doesn’t survive into the finished drawing.
Where do I start drawing as a beginner?
Start at rung one, the mug, with an HB pencil and a sheet of plain paper. Where to start matters less than what you draw first on the page: the centre line and the biggest form, then the outline last.
What should I practice drawing as a beginner?
Practice the one subject you haven’t passed yet, three times per sitting. Practising a subject you’ve already passed feels good and teaches little. Practising two rungs ahead brings back the two-problems-at-once trap.
If you want a rung demonstrated before you attempt it, that is what a guided lesson is good for.
 Pin it
Repeat the rung you failed, not the list.
How should I start learning to draw?
Learning to draw starts with construction, not with copying finished pictures. Copying trains the outline, and the outline is exactly what makes your drawing look off. Build forms first, and use the five checks when something in your drawing breaks.
What are some easy things to draw for beginners?
Some easy things to draw for beginners are the ten on the ladder: mug, apple, mushroom, cactus in a pot, bird, cupcake, sneaker, houseplant, sitting cat and fist.
Other ideas work too, a jar, a pear, a shoe box, as long as you can name how many forms they hold.
What are the best easy sketches for beginners?
The best easy sketch for beginners is one you can check. A simple pencil sketch of a mug, drawn step by step from the centre line, tells you exactly what went wrong.
Easy sketching ideas that don’t show their errors, a cloud or a squiggle, feel easy and teach nothing about form.
Is it better to start with pencil or pen?
Pencil. Construction lines have to be light and erasable, and pen gives you neither. Pen is a good test later: draw a rung you’ve already passed in pen, and if it holds without correction, it’s passed.
Should I draw from references or from my imagination?
From real objects or photos, for the whole ladder. Imagination draws what you know about a mug, a symbol with a handle. A reference shows what a mug looks like from where you sit, with an ellipse you’d never invent.
How often should I practise to actually improve?
Often and short beats rare and long, whatever your week looks like. One rung per sitting, three attempts, and stop. Coming back the next day to the same rung does more than a long session where the last drawings get sloppy.
Why do my drawings look flat, and how do I add depth?
Flat drawings started from the outline. Your depth comes from forms that overlap and ellipses that wrap around, long before shading. Get rungs seven to ten right and your drawing reads as solid even in plain line.
Shading by form, once the line reads solid, is where the later lessons pick it up.
Are very easy drawings for beginners enough to get better?
Only if they’re in order and you check them. Thirty unrelated easy subjects give you thirty first attempts. Ten subjects that build on each other give you a reason each one looks off and a clear point where you move on.